|
180 TACK 180 STOVE
TEST SERIES BY NANCY GRIFFITH
LONG-TERM REPORT
February 15, 2013
CLICK HERE TO SKIP TO THE FIELD REPORT
CLICK HERE TO SKIP TO THE LONG-TERM REPORT
TESTER INFORMATION
|
NAME:
|
Nancy Griffith
|
|
EMAIL:
|
bkpkrgirlATyahooDOTcom
|
|
AGE:
|
46
|
|
LOCATION:
|
Northern California, USA
|
|
GENDER:
|
F
|
|
HEIGHT:
|
5' 6" (1.68 m)
|
|
WEIGHT:
|
130 lb (59.00 kg)
|
My outdoor experience began in high school with involvement in a local canoeing/camping group called Canoe Trails. The culmination was a 10-day canoe voyage through the Quebec wilds. I've been backpacking since my college days in Pennsylvania. I have completed all of the Appalachian Trail in Georgia, Tennessee and North Carolina. My typical trip now is in the Sierra Nevada in California and is from a few days to a week long. I carry a light to mid-weight load, use a tent, stove and trekking poles.
INITIAL REPORT
PRODUCT INFORMATION & SPECIFICATIONS
 Manufacturer: 180 Tack, LLC. Manufacturer: 180 Tack, LLC.
Year of Manufacture: 2012
Manufacturer's Website: http://www.180tack.com
MSRP: $46.95 US
Listed Weight: 10.4 oz (295 g)
Measured Weight: 10.3 oz (292 g)
Listed Size (Assembled): 7 in x 6 in x 3.25 in (18 cm x 15 cm x 8 cm)
Listed Size (Disassembled): 7 in x 3.25 in x 0.6 in (18 cm x 8 cm x 1.5 cm)
Sizes confirmed by measurement.
Optional Accessory Tested: 2-piece snow & ash pan; $17.95 US; 5.8 oz (164 g)
Made in USA
PRODUCT DESCRIPTION
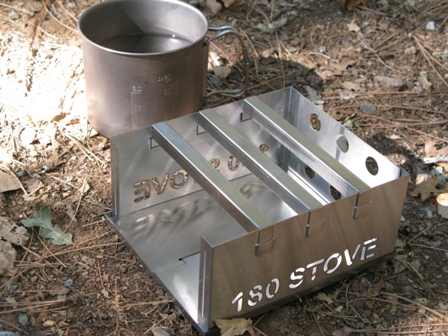
The 180 STOVE is a wood-burning stove made of 24 gauge 304 stainless steel components. The pieces assemble and disassemble without the need for any tools. There are no moving parts, hinges, screws, rivets or welds. The pieces fit together using a tab and slot interlocking method. The stove is three-sided to allow for wind resistance and the open side is used for feeding the fire. The back side has six holes to allow for air flow. The right and left hand sides have '180 STOVE' punched through the wall which allows for air flow. There are three cross-members which span the sides to provide structure and create the grates for the cooking surface.
The optional snow and ash pan is a two-piece interlocking barrier to place under the stove in deep snow conditions and to protect the ground. It is also made of 24 gauge 304 stainless steel. The pieces separate and can be stacked with the stove for storage.
INITIAL IMPRESSIONS & TRYING IT OUT
 My initial impression was that the stove is very sturdy and solid. The cook surface is huge and seems adequate for me to use with my heaviest kitchen pots and pans. I was able to easily assemble the stove without reading the instructions. I had some difficulty getting one side of one of the struts to slip into the stove side. I forced it and it seems easier to slip in now but is still tight. My initial impression was that the stove is very sturdy and solid. The cook surface is huge and seems adequate for me to use with my heaviest kitchen pots and pans. I was able to easily assemble the stove without reading the instructions. I had some difficulty getting one side of one of the struts to slip into the stove side. I forced it and it seems easier to slip in now but is still tight.
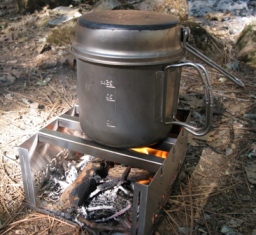
I tried the stove out in the yard to get an idea of just how quickly it could boil water. I gathered small twigs up to about finger-sized and some pine straw and built a small fire on top of the snow and ash pan. Once the fire got going I carefully slid the stove over the top of the fire. I set my titanium pot on the grates with 20 oz (0.6 L) of water, covered it with the lid and waited for it to boil. As the fire dwindled I added to it while carefully keeping my fingers away from the steel which was very hot. It took 5 minutes to see bubbles forming on the bottom and sides, 9 minutes to boil and 12 minutes to achieve a rolling boil.
I can see that with some practice that I can do better at this. Since one time I put fuel pieces on the fire which were too large and slowed it and one time I let it get too low. I also ended with a pretty large fire which then had to cool before I could pack everything up again.
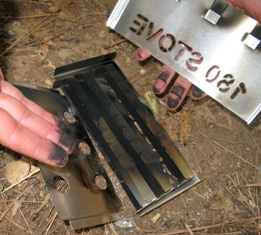 It took about 6 minutes to be cool enough to handle the stove at which time I disassembled it and stacked it as follows: side, grates, back, side. My fingers got quite covered with soot from the sides of the grate. The stove sides weren't as dirty. I then carefully dumped out the ash pan and waited 6 minutes for it to be cool enough to handle. I disassembled it and placed one half on either side of the stack I made with the stove. It took about 6 minutes to be cool enough to handle the stove at which time I disassembled it and stacked it as follows: side, grates, back, side. My fingers got quite covered with soot from the sides of the grate. The stove sides weren't as dirty. I then carefully dumped out the ash pan and waited 6 minutes for it to be cool enough to handle. I disassembled it and placed one half on either side of the stack I made with the stove.
Since this was just an experiment I used the warm water for washing my hands and for dousing the coals. Overall I was pretty impressed with how quickly the water warmed when I had a nice small fire going under the pot. I'm looking forward to getting to know this stove better.
READING THE INSTRUCTIONS & WARRANTY
An instruction sheet was included which explained how to assemble and disassemble the stove and how to pack it up. For cleaning it says to wipe it down to remove smoke residue and then to clean it with dish washing detergent or in the dishwasher. Heat discoloration is normal.
The sheet also explained how the build an appropriate fire using a variety of foraged fuels. There is a fire wisdom and fire safety section which can be summarized as 'Use your head and don't be an idiot.'
There is a two-year warranty which covers all components for material defects and workmanship.
INITIAL SUMMARY
The 180 Stove is a well-made simple design for a wood burning stove. It has a large cooking surface and stacks to a compact size for travel.
Initial Likes:
No fuel to carry
Disassembles to compact size
Made in USA
Initial Dislikes:
Had difficulty getting grate strut assembled
Pot and hands got dirty from soot
Stove pieces stay hot (especially ash pan)
FIELD REPORT
FIELD LOCATIONS AND CONDITIONS
 Over the Field Test period I used the stove for two overnight and two three-day backpacking trips for a total of six nights. Over the Field Test period I used the stove for two overnight and two three-day backpacking trips for a total of six nights.
Backpacking:
Sierra Nevada Foothills, California: overnight; 1,900 ft (579 m) elevation; 52 F (11 C) overnight low with clear conditions.
Two Peaks Trail, El Dorado National Forest, California: 2 nights; 6,560 and 8,220 ft (2,000 and 2,505 m) elevation; 28 and 40 F (-2 and 4 C) overnight lows with clear to cloudy and windy conditions.
Sierra Nevada Foothills, California: overnight; elevation 1,900 ft (579 m); 38 F (3 C) overnight low with partly cloudy conditions.
Point Reyes National Seashore, California: 2 nights; 21 mi (34 km); 0 to 1,407 ft (429 m) elevation; 40 to 55 F (4 to 13 C); sunny to partly cloudy conditions.
PERFORMANCE IN THE FIELD
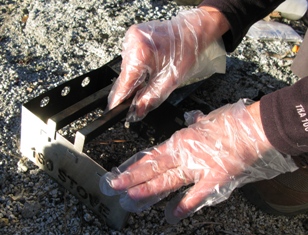 After my initial test in the backyard and discovery of how much soot got on my hands and pot, I began carrying disposable plastic gloves in my cook set. I used a grocery produce bag to store my cooking pot. This worked well to keep my hands relatively clean while handling a soot-covered stove and pot. My husband was the clean-up guy so after disassembling the stove, I transferred the gloves to him to use while scrubbing the pot. This also worked great since the disposable gloves held up during vigorous scrubbing. We both still needed to wash our hands but it did greatly reduce the degree of filth on our hands. As the weather turned colder however the soot problem was a bigger issue since I was much more reluctant to wash my hands in freezing cold water. I would much rather keep my hands from getting so dirty in the first place and certainly didn't want my warm gloves to get filthy. After my initial test in the backyard and discovery of how much soot got on my hands and pot, I began carrying disposable plastic gloves in my cook set. I used a grocery produce bag to store my cooking pot. This worked well to keep my hands relatively clean while handling a soot-covered stove and pot. My husband was the clean-up guy so after disassembling the stove, I transferred the gloves to him to use while scrubbing the pot. This also worked great since the disposable gloves held up during vigorous scrubbing. We both still needed to wash our hands but it did greatly reduce the degree of filth on our hands. As the weather turned colder however the soot problem was a bigger issue since I was much more reluctant to wash my hands in freezing cold water. I would much rather keep my hands from getting so dirty in the first place and certainly didn't want my warm gloves to get filthy.
The convenience of using available fuel was nice for keeping pack weight low. Fuel was easy to obtain although I haven't yet used it in soaking wet conditions where all fuel may be wet. Pine needles and small twigs were always readily available and it didn't take much fuel to get a pot of water boiling anyway. I would estimate that a quart bag of wood fuel was what I typically used. So in cases where I am hiking above tree-line I would easily be able to carry my own fuel for short distances.
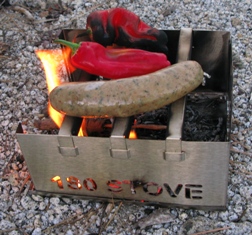 The area of the cooking surface is much larger than what I need for use with my backpacking pot. I typically try to keep the fire in one corner when just heating water. I did use the grates for grilling on the first night out on one trip. I cooked chicken sausage and peppers over the fire which made for a really nice meal. The area of the cooking surface is much larger than what I need for use with my backpacking pot. I typically try to keep the fire in one corner when just heating water. I did use the grates for grilling on the first night out on one trip. I cooked chicken sausage and peppers over the fire which made for a really nice meal.
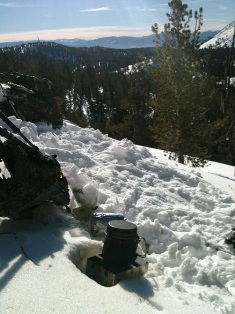
I used the ash pan to keep the granite from being scarred from the fire. Since the pan holds the hot coals it takes a while to cool down unless I carefully dump out hot coals on the ground. Ideally I just scraped off some rocks and dirt from the surface and built the fire directly on the ground. This way I could pull off the stove for cooling and then simply cover the ashes once they burned down and cooled.
The fire was easy to feed and to keep going but needed attention to get an efficient boil. If I got distracted by other kitchen chores then I would let the fire get too low. Adding pine needles to get the fire re-started made more soot so I tried to keep the heat high by constantly adding twigs.
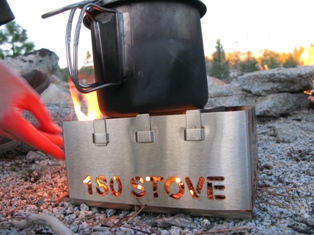
Wind was an issue on the last night and morning of the Two Peaks trip. An early season snow storm was moving in which kicked up the wind and temperatures fell below freezing overnight. The breezy conditions made it difficult to get any efficient amount of heat to concentrate beneath the pot. I used my windscreen but it wasn't effective enough to cover such a large stove. It took a long time and a lot of effort to get warm water in the morning which was a problem since we were so ready for a hot beverage. As we were getting our Styrofoam cups out, mine was easy to distinguish since it had black fingerprints all over it.
LONG-TERM REPORT
LONG-TERM TEST LOCATIONS AND CONDITIONS
 Over the Long-Term Test period I used the stove for two snowshoe day hikes and one three-day snowshoe backpacking trip. Over the Long-Term Test period I used the stove for two snowshoe day hikes and one three-day snowshoe backpacking trip.
Snowshoe Backpacking:
Loon Lake Trail, Sierra Nevada, California: 3 days; 16.7 mi (27 km); elevation 6,327 to 6,947 ft (1,928 to 2,117 m); 29 to 45 F (-2 to 7 C); cloudy with some strong breezes. Packed powder conditions.
Snowshoeing:
Mount Rose, Carson Range, Nevada: 8,900 to 9,300 ft (2,713 to 2,835 m) elevation; 29 to 33 F (-2 to 0 C); clear conditions with little breeze.
Pacific Crest Trail, Sierra Nevada, California: 4 mi (6.4 km); 7,382 to 7,800 ft (2,250 to 2,377 m) elevation; 18 to 23 F (-7 to -5 C); sunny and clear conditions in 4 ft (1.2 m) of powder.
PERFORMANCE IN THE FIELD
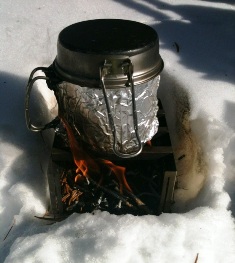 I found the stove to work well in calm conditions with little wind where dry fuel was plentiful. In windy conditions the flame kept being blown from beneath my pot significantly delaying boil time. With the stove being so large my windscreen wasn't able to block enough of the wind. Even in deep snow conditions dry fuel was always easy to find since I can find a dead standing tree and break off boughs or branches. On the Mount Rose hike I used tamarack which burned extremely well. The oils caught quickly and burned hot. I covered my pot with foil to keep the soot off and wore plastic gloves to keep my hands clean. They still got dirty and I used alcohol hand cleaner to wash them. This worked well when it was warmer so that the cleaner didn't cool my hands too much. I found the stove to work well in calm conditions with little wind where dry fuel was plentiful. In windy conditions the flame kept being blown from beneath my pot significantly delaying boil time. With the stove being so large my windscreen wasn't able to block enough of the wind. Even in deep snow conditions dry fuel was always easy to find since I can find a dead standing tree and break off boughs or branches. On the Mount Rose hike I used tamarack which burned extremely well. The oils caught quickly and burned hot. I covered my pot with foil to keep the soot off and wore plastic gloves to keep my hands clean. They still got dirty and I used alcohol hand cleaner to wash them. This worked well when it was warmer so that the cleaner didn't cool my hands too much.
I have gotten into the habit of carrying fire starter, plastic disposable gloves, foil for my pot, plastic produce bags to store the pot, a pot scrubber and extra hand cleaner. While none of these things are particularly heavy they do add to my gear list when I'm using a wood stove.
The cook area of this stove is particularly large and dwarfs my cook pot. I could easily fit two of them on this stove in opposite corners at the same time.
Overall I can see benefits of burning wood on long trips where carrying fuel literally outweighs the wood stove. This stove is especially useful in pleasant weather where dry fuel is readily available. Warm weather seems better too since my hands don't get so cold with the extra washing that is needed. However, the down sides are having to carry additional items, the inconvenience of soot and delay in boil times especially in stormy weather.
SUMMARY
The 180 Stove is a solidly-constructed simple design for a wood burning stove. It has a large cooking surface and stacks to a compact size for travel.
Likes:
No fuel to carry
Grate allows for grilling food
Disassembles to compact size
Made in USA
Dislikes:
Pot and hands get dirty from soot
Difficult to block wind
Too large for my backpacking pot
This concludes my Long-Term Test Report and this test series. Thanks to 180 Tack and BackpackGearTest.org for allowing me to participate in this test.
This report was created with the BackpackGearTest.org Report Writer Version 1.
Copyright 2013. All rights reserved.
Read more reviews of 180 Tack LLC gear
Read more gear reviews by Nancy Griffith
|