Test
series by David Wilkes
Brasslite Turbo 2D Backpacking Stove
| Name | David Wilke | | E-Mail | amatbrewer@yahoo.com | | Age | 49 | | Location | Yakima Washington USA | | Gender | M | | Height | 5'11" (1.80 m) | | Weight | 200 lb (90.7 kg) |
Tester BiographyI started
backpacking
in 1995 when I moved to Washington State. Since then, I have
backpacked in all seasons and conditions the Northwest has to
offer. I prefer trips on
rugged trails with plenty of elevation gain. While I continuously
strive to lighten my load, comfort and safety are most important to me.
I have finally managed to get my basic cold weather pack weight, not
including consumables, to under 30 lb (14 kg).
Initial Report Nov 25, 2014
Product Information| Manufacturer | Brasslite | | Year of Manufacture | 2014 | | Manufacturer’s Website | www.brasslite.com
| | MSRP | US$ 35.00 (stove only) | | Weight | Listed 2.6oz, 74gm Measured: 2.8 oz, 79 g |
Product Description:
The
Brasslite Turbo 2D (note the “D” indicates the stove uses a double wall
construction) is a brass alcohol fuel, ultra-light backpacking stove.
The 2D is similar to but larger than the 1D. The 2D is intended for
minimum pot diameter of 5 inches (12.7 cm) and the 1D is intended for
maximum pot diameter of 5 inches (12.7 cm). Both stoves are
constructed using brass with an attached stainless steel mesh pot stand.
NOTES:
The
manufacturer’s web site lists the stove as the “2D” while the invoice I
received used the older “II-D” nomenclature. I will be using the newer
2D label or throughout this report.
The image to the right is from the manufacturer’s web page showing the older version.
Some
background on my experience with alcohol stoves: I was lucky enough to
test the Brasslite Turbo 1D a few years ago. This stove was my
introduction to alcohol stoves. Since then I have used it off and on as
well as experimented with various designs of homemade alcohol stoves.
Most of these experiments were fun but rarely resulted in a product
superior to, or even on par with, commercial stoves I already own,
alcohol or otherwise. I have also experimented and researched various
fuel sources and some tricks. One constant I have encountered is that
while I love the weight savings of alcohol stoves, the conditions I
encounter during the winter months (just so happens when this test is
occurring) have proved to be a challenge for the alcohol stoves I have
used. The primary challenge is in getting the stove lit and insulating
it from the frozen ground/snow during use. I will go into that in more
detail if/when I encounter it during the testing.
The box I
received, in addition to the stove itself was one of the aluminum wind
screens and an 8oz (237 ml) “Alcohol Dispenser Bottle”. Both of
these are optional items that are offered on the Brasslite website.
NOTE: I already have my own alcohol fuel bottles (one identical to the
one I received) and wind screens (one also identical to what I
received) and will probably be using the ones I already have during
this test. I only mention that to explain why they will look rather
beat up and old in my pictures rather than new and shiny.
When I
received this stove I was very curious as to what changes have been
made since the version I tested. The most obvious change is the bottom
flange is flat as opposed to the fluted priming pan of the previous
version. I never did find that priming pan very useful as it did not
hold much alcohol so was not really effective at priming in cold
weather, and it was very difficult to fill without spilling fuel on the
ground (a potentially dangerous issue). The second and not so obvious
difference is that the parts of the original version were soldered
together while the new version uses “a combination of stamping, folding
and tack welding, similar to the manufacture of food cans”. Presumably
this makes the manufacture simpler and less costly. The stainless steel
pot support is still soldered to the body of the stove like the
previous version. Like the previous version the stove still has an
adjustable brass “simmer ring”, which is a thin brass sleeve that can
be rotated to open/cover the side air holes to adjust the stove's flame height.
 There
is also an option to have pot stand extensions added to the stove.
These were on the 1D I tested and while they did greatly improve the
stability of the stove, I found they made packing the stove more
difficult and ended up removing them. So I am glad they did not come
with this one. There
is also an option to have pot stand extensions added to the stove.
These were on the 1D I tested and while they did greatly improve the
stability of the stove, I found they made packing the stove more
difficult and ended up removing them. So I am glad they did not come
with this one.
The stove, like most alcohol stoves, is filled by
pouring fuel directly into the top opening. Experience has shown this
can be difficult to accomplish without spilling at least a little, and
this was true for my first test uses of this stove in my kitchen. Since
alcohol burns with mostly a clear flame, this can be dangerous. I have
found a few tricks for this that I will go into in the field report
if/when I find them relevant. Lighting the stove involves inserting a
flame (match, lighter, burning stick, etc) into the opening of the
stove. Like with all the alcohol stoves I have used, this often results in a
small burst of flame that on occasion has singed the hair off the back
of my hand.
Of note is there is no good way of recovering unused
fuel from these stoves (this is common for most alcohol stoves). It is
intended to be filled and then let burn until empty. This seems
wasteful but in practice I have found it to not really be a problem. It
should also be noted that this stove, like most alcohol stoves, is not
intended to be refilled while lit. In fact I would strongly caution
adding fuel until the stove has had gone out completely and had a
chance to cool. Since alcohol burns with an almost invisible flame I
find it very difficult to tell for sure if an alcohol stove is really
out. So I wait until I can handle the stove with my bare hands before
adding fuel.
Safety Notes: One trick I have learned is to add a
bit of salt to an alcohol stove when filling. This causes the flame to
be a bit yellow making it easier to see. In the field I have found this
to be only partially effective, so often do not do it. Another safety
tip is coloring the alcohol to reduce the chance of accidently
drinking. I have experimented with using various size containers for
holding the fuel so I can carry only what I expect to need. However
since the alcohol is clear (looks like water) and with one exception
(pure grain alcohol) poisonous, this could present a danger. So I put a
bit of food coloring in the fuel to make it a nasty green or yellow
color to deter accidental ingestion. I also try to clearly mark the
container. However the easiest method I have found is to use an alcohol
dispenser bottle (like the one I received for this test) as it looks
nothing like a drink container in addition to making it easy to measure
and dispense.
  On
the Brasslite website there is a good explanation as to why the stove
is made from brass, as well as some other information about alcohol
stoves and fuel. There is also a large volume of information (not to
mention lots of conflicting opinions) about alcohol stoves available on
the internet. On
the Brasslite website there is a good explanation as to why the stove
is made from brass, as well as some other information about alcohol
stoves and fuel. There is also a large volume of information (not to
mention lots of conflicting opinions) about alcohol stoves available on
the internet.
After inspecting the stove I gave it an initial
test using alcohol I have on hand (denatured alcohol from a hardware
store) and the three pots I use most often. The test was performed in
my kitchen solely to verify its function. I was able to fill and light
the stove as mentioned above with no problem. My 0.9 L Titanium pot,
with a somewhat disfigured bottom due to attempting to melt snow
without priming, rocked a bit but was reasonably stable. My 0.8 L
Jetboil pot fit nicely on the stove and seemed stable. My aluminum GSI
soloist cup fit well, but the flames from the stove went all the way up
the sides of the stove and so I had to remove the lid for fear of it
burning.
As with the 1D version the simmer ring of the 2D is a
thin brass sleeve that wraps around the body of the stove and can be
adjusted to open/close the air intake vents and thereby adjust the
flame height. As with the 1D, in my tests it was difficult to adjust
while the stove was in use. The ring is difficult to move without
having a firm grasp on the stove, and when in use both the stove and
the ring get too hot to touch with bare hands. I will go into more
detail about this as I see how it performs in the field testing.
Field ReportUse:
- Day hike Bear Canyon (eastern foothills of the Washington Cascades)
- 1 night Umtanum Canyon (Eastern foothills of the Cascades)
 Before
taking the stove out I did some repeated tests under controlled
conditions (my kitchen and backyard) to get used to it, compare it to
the original Turbo 1D that I have and to test various fuels and
lighting methods. In my Initial report I mentioned the unsuitability of
isopropyl alcohol for use as a stove fuel because of its low percentage
of alcohol. Since posting that I stumbled across a product listed as
having 91%. I purchased this for some testing. I was surprised to find,
even in ideal conditions (indoors) it was difficult to light and when
it did light burned cool and dirty. 1oz (30ml) of fuel was insufficient
to boil even 0.5l of water and in the processes left the bottom of my
pot covered in a thick layer of soot. Before
taking the stove out I did some repeated tests under controlled
conditions (my kitchen and backyard) to get used to it, compare it to
the original Turbo 1D that I have and to test various fuels and
lighting methods. In my Initial report I mentioned the unsuitability of
isopropyl alcohol for use as a stove fuel because of its low percentage
of alcohol. Since posting that I stumbled across a product listed as
having 91%. I purchased this for some testing. I was surprised to find,
even in ideal conditions (indoors) it was difficult to light and when
it did light burned cool and dirty. 1oz (30ml) of fuel was insufficient
to boil even 0.5l of water and in the processes left the bottom of my
pot covered in a thick layer of soot.
I performed a few indoor
tests of the Turbo 2D stove using the hardware store alcohol I
sometimes use as well as the yellow “Heet” auto fuel additive. My tests
showed very little difference when it came to lighting and boiling
water with these fuels, beyond my previous experience of the Heet
product being slightly easier to light and requiring slightly less fuel
to boil water. However the difference between these two was so slight
as to be irrelevant to how much fuel I would use for a given task, so
in practical terms they about equal.
I have found the larger
diameter of the stove (relative to the Turbo 1D) requires a bit more
care when I am filling the stove to avoid spilling the fuel. As a
result I have taken to tipping the stove at an angle as I start to pour
and this has been quite effective. I have tried filling the stove using
both the optional fuel bottle we received as well as smaller containers
I have ranging from 0.5 oz (15 ml) to 2 oz (60 ml) all with similar
results.
In my IR I mentioned that this version of the stove does
not have the priming ring that the original had and that the large flat
surface might serve that purpose. My experience so far is that the top
of the stove will not retain enough fuel for this purpose. However
since I don’t think the preheating ring in the original design was very
effective either, I don’t see this as a negative, just an observation.
As
mentioned in my IR (Initial Report) the simmer ring, while it does work
to control the flame and thus the heat of the stove, is difficult to
use. The ring can be difficult to move, and since the stove gets very
hot some sort of protection must be used. Making this more difficult is
that it would be very dangerous to knock over the stove while it is
lit, so care must be used when trying to adjust the simmer ring. I have
tried lighting the stove with the simmer ring closed and found even
indoors it makes the stove difficult to light so would not do this in
the field especially in cold conditions. As a result I have taken to
lighting the stove with the air vents open and then adjusting it as/if
needed after the stove is fully lit.
 My
first use of this stove in the field was during a day hike. I used the
stove to make miso soup in my 0.9 l titanium pot for lunch. The air
temperatures were hovering just above freezing and there was no wind in
the canyon I was hiking. I used 1oz (30 ml) of Heet fuel to heat 2c
(473 ml) of water for my soup and estimate that it required only about
half of the fuel to bring the water to a boil. The second outing was an
overnight trip where I again used my 0.9 l titanium pot to heat
tea during my lunch break, cook soup (grain with chicken bouillon) for
dinner, and cream of wheat (the quick 2.5min cooking version, not
instant) for breakfast. On this trip the temperatures were just below
freezing at night and just above during the day (very unusual for this
area and time of year). For the overnight trip I forgot to bring a wind
screen and at the last minute I decided to bring the 8oz (237 ml)
rather than the individual 1oz (30 ml) bottles I had planned. As a
result of not having the wind screen and there being a slight breeze
during this trip I ended up using twice the fuel I was expecting to.
Had I gone with my original plan of bringing only the fuel I expected
to use I would not have had enough. This also gives an idea of how much
even a slight breeze can have on an alcohol stove. Please note that it
is my experience that this is true for all of the alcohol stoves I have
used not just this one. My
first use of this stove in the field was during a day hike. I used the
stove to make miso soup in my 0.9 l titanium pot for lunch. The air
temperatures were hovering just above freezing and there was no wind in
the canyon I was hiking. I used 1oz (30 ml) of Heet fuel to heat 2c
(473 ml) of water for my soup and estimate that it required only about
half of the fuel to bring the water to a boil. The second outing was an
overnight trip where I again used my 0.9 l titanium pot to heat
tea during my lunch break, cook soup (grain with chicken bouillon) for
dinner, and cream of wheat (the quick 2.5min cooking version, not
instant) for breakfast. On this trip the temperatures were just below
freezing at night and just above during the day (very unusual for this
area and time of year). For the overnight trip I forgot to bring a wind
screen and at the last minute I decided to bring the 8oz (237 ml)
rather than the individual 1oz (30 ml) bottles I had planned. As a
result of not having the wind screen and there being a slight breeze
during this trip I ended up using twice the fuel I was expecting to.
Had I gone with my original plan of bringing only the fuel I expected
to use I would not have had enough. This also gives an idea of how much
even a slight breeze can have on an alcohol stove. Please note that it
is my experience that this is true for all of the alcohol stoves I have
used not just this one.
The Turbo 2D being larger than the Turbo
1D, and most other alcohol stoves I have used, creates a more stable
platform for my pots. However I discovered that the flat bottom of the
stove, vs. legs like some other kinds of stoves have, can make it
difficult to get the stove stable. If the surface the stove is on is
uneven it tends to rock, and this is exaggerated by the height of the
stove such that the water in the pot can slosh back and forth. To
combat this I have taken to getting the stove as level as I can and
then using whatever I have on hand (such as twigs) to shim under the
stove to prevent it from being able to rock and this has been quite
effective. Please note that most of my pressurized gas stoves that I
own have the same limitation, and since most are taller than the Turbo
2D it is even more important to ensure they are stable.
With
this stove, and has been my experience with all alcohol stoves I have
used, it is not really feasible to put the stove out once lit, and even
if I could it is very difficult to recover unused fuel from the stove
so it would be pointless to bother trying. Since it would be unsafe to
add fuel to the stove after it is lit because of the danger inherent
squirting a flammable liquid into a fire, it does require a bit of
planning when deciding how much fuel to use when filling the stove.
When I have not added enough, I had to wait to be absolutely sure the
stove was out before adding more fuel and relighting. It also seems
like the stove lights easier and performs better when starting with
more fuel so I have been trying to err on the side of starting off with
more fuel then I expect to need.
Overall I am quite
pleased with the stove. The new design looks to be at least as good as
the previous and I like the added stability and versatility of the
larger size (vs. my Turbo 1D).
Long Term ReportSince
the Field report I used the stove on two overnight trips. First was
another trip up Umtanum Canyon to look for petrified wood. The second
an overnight trip in shrub steps of Central Washington state.
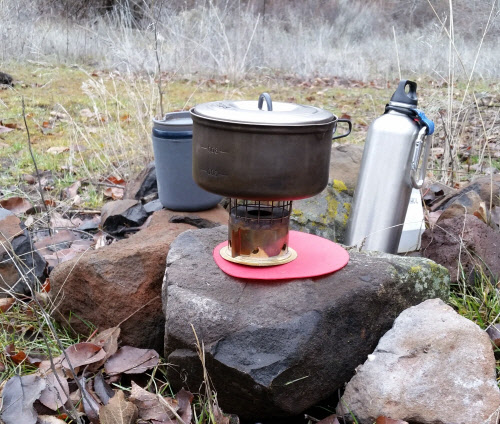
On
the Umtanum Canyon trip the temperatures were a little over freezing
during the day and dropped to a little below freezing at night. The
weather this spring was unusually warm and wet so the ground was wet
and the air damp. As such I again used the silicone pad to insulate the
stove from the ground. I also used my homemade aluminum wind screen. I
used the stove to cook broth with tortellini for dinner and cream of
wheat for breakfast. For both meals the stove and alcohol were cold (I
left my fuel bottle in my pack, outside my tent over night) so it took
a bit of effort to get the stove lit.
On the second trip I hiked
into the Ancient lakes area, but due to the unseasonably warm weather
it was rather crowded so I hiked down to the shore of the Columbia
River where I camped in a stand of trees near the beach. At dusk I used
the stove to heat water for tea then used it to make Ramen. In the
morning I decided to sleep in, so when I did finally get up I made more
tea and had a cold breakfast before heading back to the trail head.
During
this phase of the testing I had the opportunity to use this stove with
a new pot. This pot has wide bottom (7.5” / 19 cm), almost a frying
pan, and made of anodized aluminum. As I have experienced before the
wide bottom pot is more energy efficient than narrower ones and the
wide base of the Turbo 2D stove was reasonably stable.
During
this testing I have not made any effort to be gentle with this stove.
When not in use I have simply tossed it in with the rest of my cooking
gear. As expected the stove has proven to be strong and durable, and
while it has become discolored from use, this is only cosmetic only. I
fully expect to have this stove for years to come.
One of the
things I like about gear testing is it gets me to really think about my
gear choices. While I am fond of the light weight and simplicity of
alcohol stoves, they are also not as convenient as some other options I
have. As such, except for testing purposes, I tend to only use alcohol
stoves for warm weather trips where my priority is reducing my pack
weight. I anticipate this will be the case with this stove. However, as
mentioned previously I also have an earlier version of the Turbo 1D and
anticipate when I take an alcohol stove, I will probably opt for the
larger Turbo 2D in most cases, primarily for its greater stability.
| Likes | Dislikes | Lightweight
No critical moving parts
Stable
Durable | Simmer ring difficult to use |
This
concludes my report. I would like to thank the folks at Brasslite
and BackpackGearTest.org for the opportunity to test this product.
Read more reviews of Brasslite gear
Read more gear reviews by David Wilkes
|