|
|
|
|
|
PackaFeather XL Ultralight
Backpacking Stove |
Owner Review By Bob Dorenfeld
November 20, 2014
|
|
|
Tester
Bio |
|
Name: |
Bob Dorenfeld
|
I'm an active hiker, snowshoer,
skier, and backpacker. Home base is
the Southern Colorado Rockies, where I'll
hike from 7000 ft (2100 m) to alpine tundra,
with desert trips at lower altitudes.
Six to 12 miles (10 to 20 km) daily is my
norm, with elevation gains up to 4000 ft
(1200 m). Many of my backpack trips
are two or three nights, other trips are
longer, and I usually carry about 30 lb
(14 kg). My style is lightweight but
not obsessively so - extras like binoculars,
camera, and notebook make my trips more
enjoyable.
|
| Email: |
geartest(at)sageandspruce(dot)net
|
| Age: |
56
|
| Location: |
Salida, Colorado, USA
|
| Gender: |
M
|
| Height: |
5' 6" (1.68 m) |
| Weight: |
140 lb (64 kg) |
|
|
|
Product Overview
Manufacturer: PackaFeather
Website: www.packafeather.com
MSRP: US$32.97
Stated Weight:
1.4 oz (45 g)
Measured Weight:
1.4 oz (45 g)
Fuel type:
Alcohol
Fuel capacity:
2 fl oz (60 ml)
Materials: aluminum,
brass, and stainless steel; plastic travel
lid
Dimensions (in use):
Cylinder 2.5 in (6.4 cm) high x 3.625 in
(9.2 cm) diameter
Dimensions
(closed for travel): Cylinder
1.625 in (4.1 cm) high x 3.625 in (9.2 cm)
diameter
Optional Accessory:
Fuel Bottle Kit, US$3.79
|
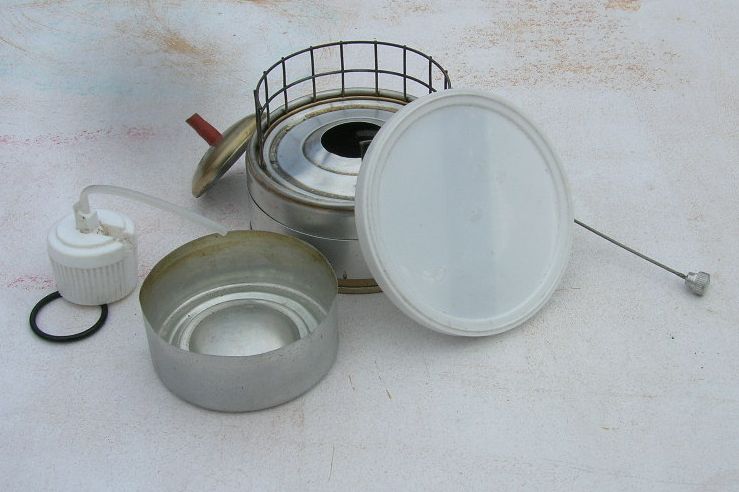
PackaFeather XL stove: 5 parts, plus the
optional Fuel Bottle Kit (at left)
|
|
The PackaFeather XL cook stove is a
simple and lightweight appliance that
uses alcohol fuel to heat water and
prepare hot food while on the trail.
Out of the box there are five
components, and one moving part.
When in use there are three stove
components: a fuel cup, the stove body
which covers and vents the fuel cup,
and the circular pot stand which sits on
top of the body. The moving part is
a stiff wire handle attached to a worm gear
mounted on the stove body's side, and when turned
it opens and closes the metal band covering
seven air holes in the body's side.
A fourth component, the snuffer cap, is
used to help extinguish the stove flame
when no longer needed. Finally, the
fifth component is a plastic cap used to
secure all of the stove parts when disassembled
and stacked together for storage and travel.
The XL stove will burn almost any type
of alcohol, although fuels will vary in
BTU output and performance.
PackaFeather recommends the XL for
smaller-diameter pots, less than 4 in
(10 cm) as measured across the bottom.
PackaFeather also offers a second stove
design and a number of optional stove components.
Reviewed here, in addition to the XL stove,
is the Fuel Bottle Kit.
|
|
Why an alcohol stove?
Sometime early last spring, while pouring over
trail guides and maps getting ready for the new
hiking season, I wondered if I still needed my
white-gas camping stove. It's all I've
ever used for backpacking, but lately my trail
cooking needs have become very simple: hot water
for tea or coffee, hot water for my home-made
dehydrated dinners, hot water for oatmeal in the
morning. Hmmm, is there a pattern here?
After looking at some half-dozen models on the
market, I settled on this PackaFeather XL.
Most alcohol stoves are lightweight, but the
PackaFeather impressed me with its clever design
and operating features. Although alcohol
fuel will burn in any kind of metal cup, I
wanted to have some control over the flame.
Plus, alcohol has several advantages over white
gas and compressed liquid fuels: it's safe
around nylon and other plastics, has very little
odor, and it's easy to find at a wide variety of
stores.
Field Performance
During the 2014 hiking season I used the XL
stove on 12 backpack trips for a total of about
30 days and some 50 uses (mornings and
evenings). The lowest altitude was at 5500
ft (1700 m), and highest was at 11,500 ft
(3500 m). Lowest temperature was 25 F(-4 C)
and highest was 85 F (29 C). Weather at my
campsites varied from still to moderately windy
(up to 15 mph (24 kph)), and from dry to humid
and rainy.
 I
found the PackaFeather XL very easy to operate
(much easier than a white gas appliance).
After unpacking the stove components, I could
set the fuel cup on a non-combustible level
surface (flat rock, bare dirt, thin piece of
metal). But I wanted to combine a
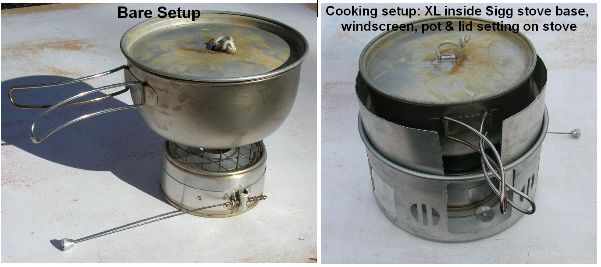
fireproof base with windscreen, and I found that
the XL fit perfectly inside an old Sigg
white-gas stove base (see photos below).
Windscreens are essential with alcohol stoves,
since the non-pressurized flame is very
sensitive to the slightest breeze. I cut a
piece of aluminum flashing to fit in the Sigg
base and to surround the stove. Since
the non-totally-enclosed fuel is also
susceptible to being spilled, it's a good idea
to protect the ground directly under and next to
the stove. The Sigg base does that while
also serving as a container for my entire stove
system, including the XL, pot, and lid.
Any flexible aluminum windscreen can also be
used to surround the stove in place of a
separate stove base. I
found the PackaFeather XL very easy to operate
(much easier than a white gas appliance).
After unpacking the stove components, I could
set the fuel cup on a non-combustible level
surface (flat rock, bare dirt, thin piece of
metal). But I wanted to combine a
fireproof base with windscreen, and I found that
the XL fit perfectly inside an old Sigg
white-gas stove base (see photos below).
Windscreens are essential with alcohol stoves,
since the non-pressurized flame is very
sensitive to the slightest breeze. I cut a
piece of aluminum flashing to fit in the Sigg
base and to surround the stove. Since
the non-totally-enclosed fuel is also
susceptible to being spilled, it's a good idea
to protect the ground directly under and next to
the stove. The Sigg base does that while
also serving as a container for my entire stove
system, including the XL, pot, and lid.
Any flexible aluminum windscreen can also be
used to surround the stove in place of a
separate stove base.
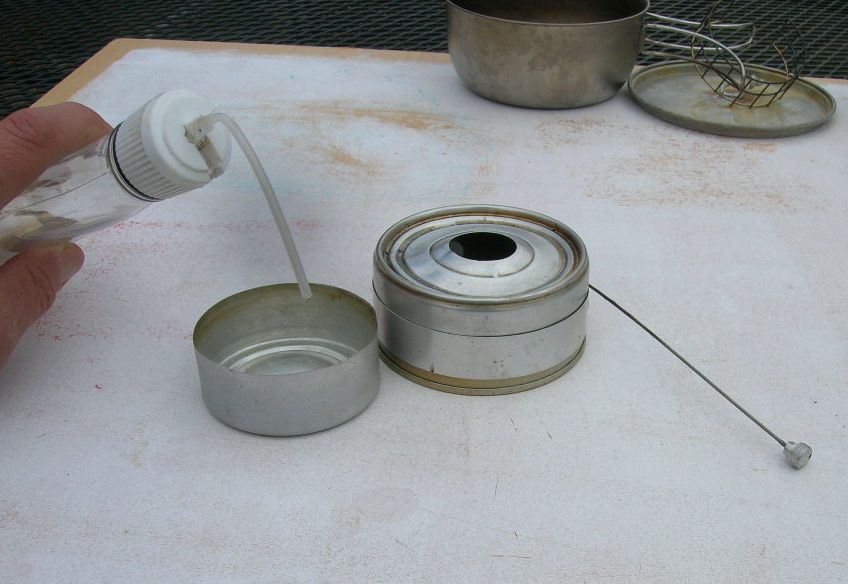
Next, I pour 1-2 oz (30-60 ml) of alcohol into
the fuel cup, then place the stove body over the
cup, with the fuel vent at the top. Then I
insert the wire-mesh pot stand using its three
offset pins that insert just one way into the
stove body, where friction holds it fairly
tight. One more task: I need to open the
side vents by turning the side-mounted control
rod about five times counter-clockwise to its
fully-open position.
 After
waiting 30-60 seconds to allow some alcohol
fumes to rise, I'll dip a twig into the fuel,
remove and light it, then light the alcohol.
I almost always get a satisfying low-volume
whhuuummmppphhh. But be careful:
unlike white gas or other petroleum fuels,
alcohol burns with a practically clear flame in
daylight (at night it appears more bluish).
I like to hold my palm down above the flame for
a second to see if it's burning. That's it
- no priming or pressure adjustments. Also
note that this stove is silent when burning,
nice when I'd rather listen to the wild sounds
around my campsite than the roar of a stove. After
waiting 30-60 seconds to allow some alcohol
fumes to rise, I'll dip a twig into the fuel,
remove and light it, then light the alcohol.
I almost always get a satisfying low-volume
whhuuummmppphhh. But be careful:
unlike white gas or other petroleum fuels,
alcohol burns with a practically clear flame in
daylight (at night it appears more bluish).
I like to hold my palm down above the flame for
a second to see if it's burning. That's it
- no priming or pressure adjustments. Also
note that this stove is silent when burning,
nice when I'd rather listen to the wild sounds
around my campsite than the roar of a stove.
With the air vents fully open, I found that
the stove generally takes about six minutes to
bring 1/2 L of water to a full boil. Times
are longer when the water is very cold, or when
a breeze is disturbing the flame. I use a
titanium pot that's slightly wider than it is
tall. It helps to keep the pot covered at
all times to conserve heat. Although it
takes a bit longer to heat water and cook than
it would with a pressurized stove, I don't mind
the extra few minutes - after all, in a
beautiful wilderness campsite, what's the hurry?
 To
reduce the heat output, I'll just turn the vent
control wire clockwise a couple of turns.
It'll take a minute or two for the flame to
settle down, and the difference is noticeable
if, for example, I'm cooking oatmeal and want to
reduce the risk of it burning on the pot bottom.
(See photos at right) The wire's knob is sized right for
my fingers (even with gloves), and it's never
hot to the touch. The worm gear works
well; PackaFeather recommends an occasional dab
of mineral lubricating oil (never cooking oil)
to keep it operating smoothly. I've done
that twice over the season, and it does help. To
reduce the heat output, I'll just turn the vent
control wire clockwise a couple of turns.
It'll take a minute or two for the flame to
settle down, and the difference is noticeable
if, for example, I'm cooking oatmeal and want to
reduce the risk of it burning on the pot bottom.
(See photos at right) The wire's knob is sized right for
my fingers (even with gloves), and it's never
hot to the touch. The worm gear works
well; PackaFeather recommends an occasional dab
of mineral lubricating oil (never cooking oil)
to keep it operating smoothly. I've done
that twice over the season, and it does help.
Shutting down the stove is also easy:
I remove the pot and completely close the air
vent, then place the snuffer cap over the heat
vent hole, holding the cap down lightly for
about 15 seconds to make sure flame pressure
doesn't push it aside (the rubber sleeve keeps
the cap from getting hot on my fingers).
Then I'll go about my business around the
campsite, and 5 to 10 minutes later the stove
will be cool enough to move or pack up.
How much fuel does the XL use? While I
haven't measured very precise amounts over all
conditions, the stove seems to consume about
0.3-0.5 fl oz (9-15 ml) for a full pot of
water+dehydrated meal, and less fuel than that
to heat enough water for one drink.
How
much fuel do I take for a 3-day backpack trip?
Usually I'll fill one 375 ml plastic liquor
bottle, and I almost always come home with one-third of it left over. I like to allow
extra for spillage and in case I make more hot
drinks than planned.
And what is the best
fuel? I've only used methanol (wood
alcohol), either from the hardware store or as
HEET (yellow bottle) from the auto parts store.
Other types that will work are ethanol,
denatured alcohol, and rubbing alcohol.
But methanol has the highest vapor pressure,
meaning that it reaches full flame power more
quickly that the other types. However, I'm
careful about keeping methanol off of my skin
and the ground, since it's very toxic as a
liquid and can
cause health issues if absorbed in large
quantities.
 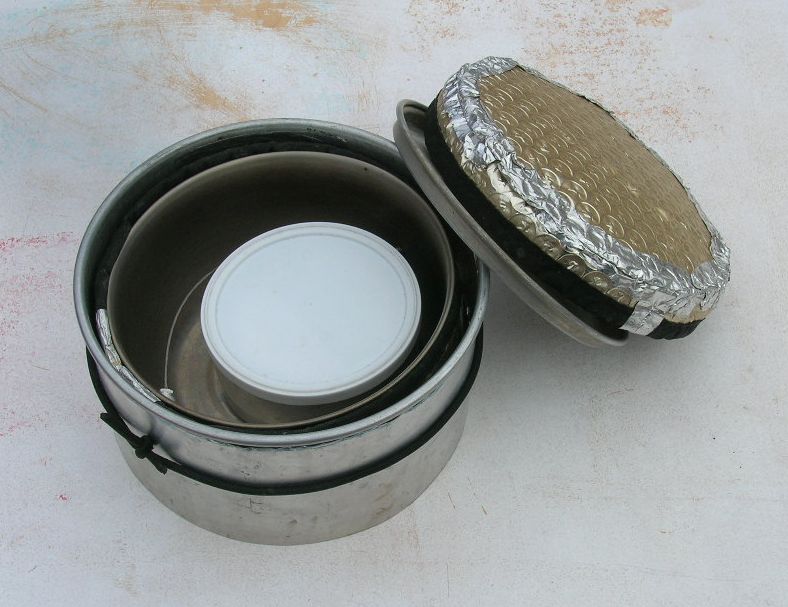
Packing up the XL stove is also an easy task
(photos, above). Remove the wire mesh pot
stand and wrap it around the fuel cup, flip the
stove body upside down and drop the snuffer cap
on the bottom of the stove body, drop the fuel
cup over the snuffer cap, then snap on the
plastic cap. Takes less time to do than to
describe how to do it! I glued a piece of
foam to the bottom of the plastic cap to keep
the parts inside from rattling. For my
complete stove kit, I drop the packed XL into my
cooking pot (the vent control rod easily wraps
around into the pot), the pot goes into its
cozy, and that package drops into the Sigg stove
screen with the pot lid. My entire
pot/stove package weighs 12 oz (340 g), and a
3-day fuel supply in its container weighs 9 oz
(255 g).
I've had only one mishap using
the XL stove, and it was my fault. I had
filled the fuel cup too high near the brim, then
knocked the stove which caused the alcohol to
spill and flare up. After quickly removing
the food pot, I just let the flame burn down in
the next couple of minutes. Except for
some blackening on parts of the stove, no harm
was done.
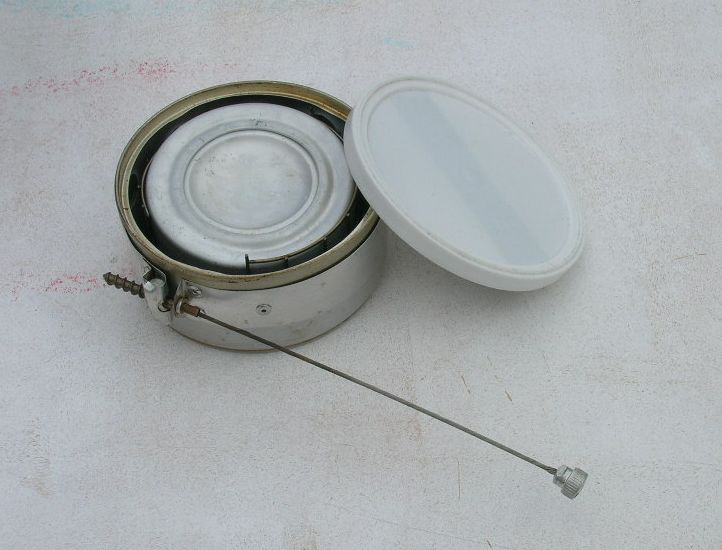
 For
dispensing fuel, I purchased the optional Fuel
Bottle Kit, which is a small-diameter stiff
plastic tube attached to a cap with an O-ring
(photo at right). This cap will replace
the original cap to almost any plastic drink or
liquor bottle. To use, just lift up the
tube to a horizontal position and squeeze the
bottle to squirt the alcohol into the fuel cup;
it's very easy to direct the flow so nothing is
wasted onto the ground. As a bonus, the
process is easily reversed to suck up extra fuel
from the fuel cup: I just squeeze some air out
of the bottle, put the tube into the fuel, and
release the bottle. Very convenient! For
dispensing fuel, I purchased the optional Fuel
Bottle Kit, which is a small-diameter stiff
plastic tube attached to a cap with an O-ring
(photo at right). This cap will replace
the original cap to almost any plastic drink or
liquor bottle. To use, just lift up the
tube to a horizontal position and squeeze the
bottle to squirt the alcohol into the fuel cup;
it's very easy to direct the flow so nothing is
wasted onto the ground. As a bonus, the
process is easily reversed to suck up extra fuel
from the fuel cup: I just squeeze some air out
of the bottle, put the tube into the fuel, and
release the bottle. Very convenient!
Performance of the XL stove was excellent
over the various conditions I used it in.
I have to be careful to site my kitchen out of
the wind, and choose or create a fairly level
spot, but otherwise it's not too picky about
location. One caveat concerning reusing
fuel (i.e. saving leftovers from the fuel cup):
I found that over time, the alcohol can absorb
water that condenses on the outside of my pot.
This usually happens when I heat very cold creek
water. That extra water in the fuel
(alcohol is water soluble) definitely reduces
the flame's heat, and during one morning at
below-freezing temperatures I never was able to
get my coffee hotter than lukewarm. I
might have to replace my current pot (very
rounded bottom) with one that has a square edge
to encourage the condensing water to roll off to
the ground instead of collecting through the
fuel vent and into the unburnt alcohol.
|
Concluding Thoughts
I am very satisfied with the PackaFeather XL
stove. It's nicely made and durable, even
considering the thin and somewhat fragile
materials it's made of. A stove like this
does warrant a bit of care, but it has rewarded
me with a reliable and very lightweight source
of heat for simple cooking and heating water.
I've put a couple of dings and crimps in it, but
I can bend them out easily. The
XL is easy to set up and to pack away for
transport and storage. I find it excellent
for 3-season backpacking use; for more demanding
tasks, like melting snow, I think that a white gas or other
type of pressurized stove would be a better
choice.
Pros
- very lightweight
- easy to set up
and pack down
- flame adjustment
design works well
- good performance
in variety of 3-season settings
- easy
to light and to shut down (no priming)
- silent operation
- extra fuel can be
saved for later
- good price (about
half of a typical pressurized stove)
Cons
- lower
heat output than petroleum-based pressurized
stoves
- very sensitive to wind, wind
screen is necessary
|
|
Reviewed
By
Bob Dorenfeld
Southern Colorado Mountains
|
|
|
|
|
|
|