MSR Hyperflow Filter
|

Tester
Information
|
|
| Name:
|
David
Wilkes |
|
E-Mail:
|
amatbrewer@yahoo.net
|
|
Age:
|
42 |
|
Location:
|
Yakima
Washington USA |
|
Gender:
|
M |
|
Height:
|
5'11"
(1.80 m) |
|
Weight:
|
197
lb (89.40 kg) |
|
Biography:
I started
backpacking
in 1995 when I moved to Washington State. Since then, I have
backpacked in all seasons and conditions. I have usually only managed
time for 1-3 trips a year averaging 2-5 days, and as many day hikes as
I can. I am currently getting into condition to summit some of the
higher peaks in Washington, Oregon, and California. I prefer trips on
rugged trails with plenty of elevation gain. While I continuously
strive to lighten my load, comfort and safety are most important to me.
My current pack is around 30 lbs (14 kg), not including consumables.
|
|
Product
Information
|
|
Manufacturer:
|
Mountain
Safety Research
|
|
Year
of Manufacture:
|
2009 |
|
Manufacturer’s
Website:
|
www.msrgear.com
|
|
MSRP:
|
US $99.95 |
| Listed
Weight: |
Kit 10.2 oz. / 289 g.
Pump + Pre-Filter 7.4 oz / 210 g |
| Measured
Weight: |
Kit 10.8 oz. / 306 g.
Pump + Pre-Filter 8.1 oz / 232 g |
| Dimensions
(listed): |
7
x 3.5 in. 17.8 x 8.3 cm |
| Cartridge Life: |
Up to 1,000 liters (depending on
conditions) Per the manufacturer
|
| Flow Rate: |
3.0 liters per min (depending on
filter condition, and water quality) Per the manufacturer
|
|
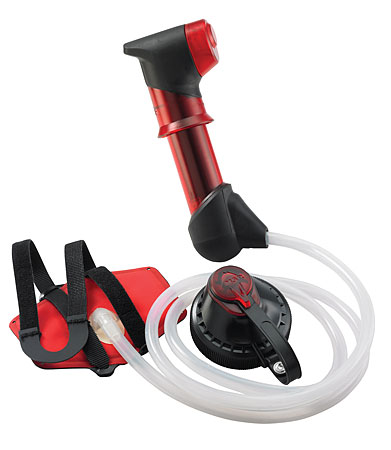 |
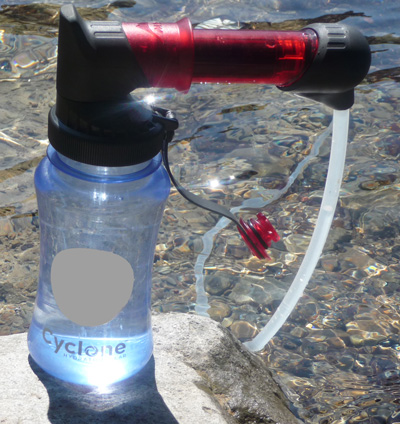
| Image
courtesy of Mountain Safety Research |
|
Product
Description:
The
MSR Hyperflow is the latest water filter in MSR’s “Fast &
Light”
series of products. It operates similar to a small bicycle tire pump
and utilizes what the MSR calls Hollow Fiber Technology (0.2 Micron
pore size). It includes a pre-filter, hose, and quick connect bottle
adapter. It is touted as having a high flow rate (1 L in 20 strokes),
and field maintainable without tools (including the ability to
backflush the filter
in the event of clogging) .
|
|
Initial
Report
|
My
measurement of the weight was just slightly above the manufacturer’s
specifications, however I weighed the pump after using it, and despite
trying to remove all the water from the pump, I suspect there is still
some residual water in the pump that could account for some of the
discrepancy in the weight.
The Hyperflow operates similar to a small
bicycle tire pump and utilizes what the MSR calls Hollow Fiber
Technology (0.2 Micron pore size). It includes a pre-filter, hose, and
quick connect bottle adapter. It is touted as having a high flow rate
(1 L in 20 strokes), and field maintainable (including the ability to
back flush the filter in the event of clogging) without tools.

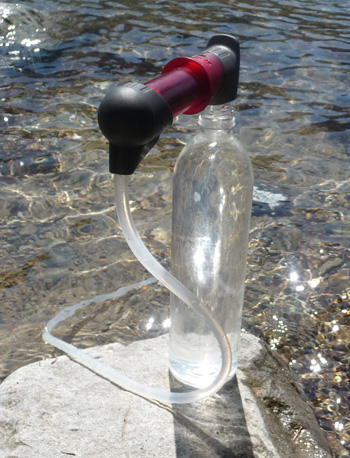
Close up of the filter cartridge ends |
I did some research on line in preparation for this test. I was
curious as to what makes this filter so different from others on the
market. I was unable to find much information regarding the “Hollow
Fiber” technology on the MSRGear.com website, so I did some research
on-line, and reached out to MSR to see if they had some additional
information they could send me. What I found was fascinating (to me
anyway). Apparently, the technology is derived from filters used in
dialysis to filter blood, wastewater treatment plants, and
laboratories. The filters are strands of hollow fibers made from a
porous material. The following is from a web link that MSR sent me in
response to my request for additional information on the filter:
“The
concept starts with a bundle of hollow fibers that are “glued” in
place. The water is filtered as it passes through the micro porous
walls of these small tubes and comes out down the center of each one.
The benefits to this media are that you can fit a substantial amount of
filtration surface area in a much smaller area, resulting in much
higher flow rates and a much lighter, more compact system.”
The pores in the fibers are small enough (0.2 Micron) to block
sediment,
bacteria and protozoa (but not viruses) that may be in the water.
The
filter itself is different from all other filters I have seen. As
stated above, it resembles a small bicycle tire pump, right down to the
quick connector extending out the side of the top end of the filter.
The filter takes in water through a hose connected between the bottom
of the filter the pre-filter. The pre-filter is also unlike any I have
seen. It is a flat rectangular pad like device that takes in water from
the bottom and attaches to the filter hose on the top. The idea is that
the filter floats on top of the water where the least amount of
sediment is likely to be. This design also makes it possible to draw
water from very shallow sources (the manufacturer mentions being able
to “suck water off of a rock”). The pre-filter is flexible and is
designed to be wrapped around the pump, after winding the inlet tubing
around the filter, and is held in place by wrapping the pre-filter
closure strap (hook and loop type strap attached to the pre-filter)
around the pump. When wrapped up for storage the pump assembly makes a
small neat package.
In addition to the above listed items, the
pump came with a handy little storage sack. The sack has one zippered
mesh pocket that fits the pump, pre-filter, hose, and quick connect cap
on one side. There is also a second zippered pouch on the other side
that I
expect to use to store the instructions and maybe other small items
like drink mix.
The pump comes with a ‘clean side cover’ that
covers the pump outlet adapter. This cap comes off completely when not
in use, so losing it is a possibility (especially for me since I have
been known to lose small items like this). The water exits the pump out
of a port on the side of the top of the pump. The output of the pump is
designed so it can be connected to the drink tube of many common
hydration systems or inserted into the opening of containers with
smaller openings like Platypus or common disposable plastic water
bottles. In addition, the pump is designed to be quickly connected to
the included bottle adapter. The bottle adapter is intended to replace
the fill cap of MSR and other hydration bladders, and provides a quick
connection to the pump. The quick connect bottle adapter fits my MSR
hydration bladder as well as, a generic hydration bladder I have, and
the large opening water bottles I have (I tried it on bottles from 3
different manufacturers and they all fit securely with no leaks). The
bottle adapter has a quick connect opening and cover. I tried attaching
the pump output to a standard disposable water bottle, it fit snugly
and securely.
Instructions:
The pump comes with an illustrated
instruction book (actually 10, in different languages), covering the
common usage of the filter, the various setups, along with maintenance
instructions, specifications and tips on using the filter with various
containers. This is the same instructions available for down load from
their web site. In addition to the instruction manual and “Filter Test
Guide”, stitched inside of the storage pouch is a water resistant sheet
showing the assembly of the pump for normal use on one side and the
configuration of the valves for back flushing on the other. This sheet
is perforated so it can be detached from the pouch if desired.
In
addition, a separate “Filter Test Guide” sheet explains the recommended
process to test the pump to verify the filter media’s integrity. If the
filter does not pass this test, the instructions state to replace the
cartridge.
The filter documentation mentions a warning I found
notable for a piece of backpacking gear. It states never to store the
filter cartridge in temperatures below freezing, as freezing will
permanently damage the filter fibers. My research into hollow fiber
filter media suggests that this is a common problem for this type of
filter. MSR recommends storing the filter where it is unlikely to
freeze if freezing temperatures are anticipated (e.g. in the hikers
tent or if necessary in the sleeping bag).
Impressions:
All
parts of the pump as well as the accessories seem to be of the highest
quality and I could find no indications of any defects or likely
failure points. Initial assembly and basic operation were easy to
figure out (prior to reading the instructions). I tested the pump by
pumping clean drinking water from a pot into a 1L (32 oz) water bottle.
The pump required a bit more effort to operate than I expected and
filled my bottle in about 20 strokes. The quick disconnect cap fit
securely on all the bottles I tried it on, and the pump attached to the
cap easily and securely. After reading the instructions, the back flush
procedure was quite easy to understand and perform. The procedure for
testing the pump for damage was a little less intuitive, but after
performing it once, I expect I should be able to perform it in the
field without the instructions if necessary.
Packed for storage and laying on top of the instructions
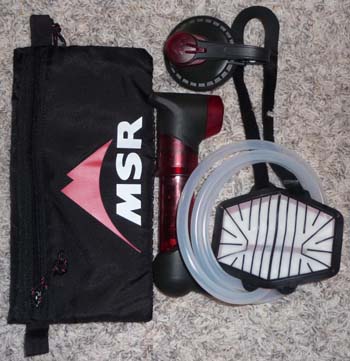
The Entire Kit |
|
Field
Report
|
Field Report Usage Summary:
* Day hike – Umptanum Creek Washington – Pumped 2.5 L (85 oz) w/flush
* Backpack (one night) Bear Canyon Washington – Pumped 4 L (135 oz) w/o flush
* Mountain Bike Ride (12mi / 19 km) – Cowiche Canyon – Pumped 2 L (64 oz) [cloudy tan water] w/o flush
* Backpack Bishop California (one overnight & one day hike) – Pumped 2L w/flush
* Backpack (3 nights) Alpine Lakes Wilderness Washington – Pumped 5.5 L (186 oz) w/o flush
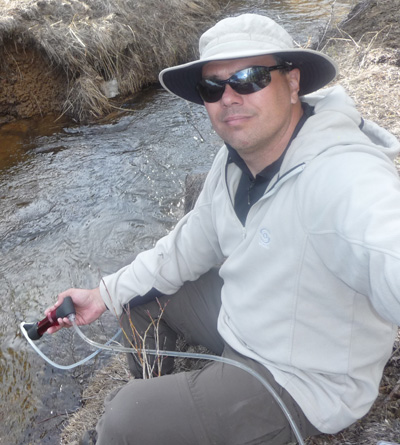 I
took the HyperFlow on a day hike up Umptanum creek. The creek was quite
brown from the spring runoff. I did a bit of exploring around some of
the side canyons and found a small stream that was running clear. It
was a bit shallow with a muddy bottom. With the pre-filter
configuration of my old pump (weighted foam) I would hesitate to pump
from this stream since the only way to get it fully submerged would be
to have it in contact with the bottom and hence sucking up the mud.
Recalling a comment from the manufacturer about the pump being able to
suck water off a rock I found a flat rock submerged just enough so that
when I placed the HyperFlow’s pre-filter it was mostly submerged. I
filled my 0.5 L (16 oz) water bottle by attaching the pump to the quick
connect lid. I also filled my 2 L (64 oz) hydration bladder by
attaching the pump directly to the drink tube. I
took the HyperFlow on a day hike up Umptanum creek. The creek was quite
brown from the spring runoff. I did a bit of exploring around some of
the side canyons and found a small stream that was running clear. It
was a bit shallow with a muddy bottom. With the pre-filter
configuration of my old pump (weighted foam) I would hesitate to pump
from this stream since the only way to get it fully submerged would be
to have it in contact with the bottom and hence sucking up the mud.
Recalling a comment from the manufacturer about the pump being able to
suck water off a rock I found a flat rock submerged just enough so that
when I placed the HyperFlow’s pre-filter it was mostly submerged. I
filled my 0.5 L (16 oz) water bottle by attaching the pump to the quick
connect lid. I also filled my 2 L (64 oz) hydration bladder by
attaching the pump directly to the drink tube.
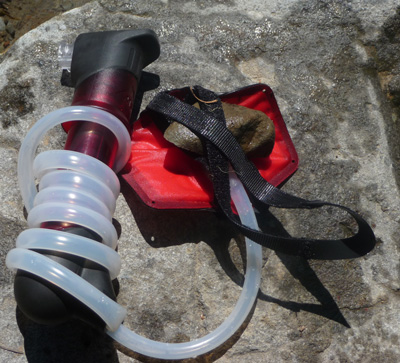
While backpacking in
Bear Canyon I filtered a total of 4 L (135 oz) from a clear running
stream without back flushing. I experienced some difficulty in keeping
the pre-filter facing downward in the moving water. I experimented with
wrapping the hook/loop straps across the back of the pre-filter, but I
don’t think that helped any.
I took my mountain bike up Cowichi
Canyon (an old rail line converted to a hiking trail) and intentionally
did not take any water. At the top of the canyon I filled up my 2 L (64
oz) hydration pouch. The water was light brown and cloudy. I did not
back flush.
 On
my trip to Bishop, California, I attempted to hike from Sabrina Lake to
Lake George but was stopped short by deep wet snow (I brought the wrong
boots for that). I camped at around 10000’ and filled my 2 L (64 oz)
hydration bladder from the very clear running stream. It seemed like it
might be harder to pump than it was before so I back flushed the pump
to see if that would make a difference. It did not. So I figured it was
going from 800’ (244 m) to over 10000' (3000 m) in 24hrs that made
things just seem harder. On
my trip to Bishop, California, I attempted to hike from Sabrina Lake to
Lake George but was stopped short by deep wet snow (I brought the wrong
boots for that). I camped at around 10000’ and filled my 2 L (64 oz)
hydration bladder from the very clear running stream. It seemed like it
might be harder to pump than it was before so I back flushed the pump
to see if that would make a difference. It did not. So I figured it was
going from 800’ (244 m) to over 10000' (3000 m) in 24hrs that made
things just seem harder.
I hiked into Cooper Lake in the Alpine
Lakes Wilderness intending to continue on to Pete lake but was stopped
due to deep wet snow that I was not prepared for. Instead I spent the
weekend camped at Cooper lake. While there I pumped a total of 5.5 L
(186 oz) of water from the very clear lake. I continued to have
difficulty in keeping the pre filter face down in the water. I finally
used the hook & loop straps to attach a rock to the back of the pre
filter in order to keep it under the water and thereby not suck a mix
of water and air. This worked quite well.
Observations:
The HyperFlow is a very
small light pump that filters quite a bit of water quickly. It requires
a bit of force to use, so I don’t think I would want to use it to
filter all the water for a large group. But for 1-3 people I think it
would work quite well.
I have used the filter to fill my hydration
bladder through the drinking tube, fill my Nalgene water bottle using
the quick connect bottle adapter and I have filled ordinary disposable
water bottles, with no difficulties. Connecting and disconnecting the
filter to these was quick, easy, and reliable.
The pre-filter is a
neat design but I have had difficulties in keeping it face down in both
moving and still water. Attaching a rock to the back was quite
effective and I intend to continue to do that unless there is a risk of
picking up too much mud and silt from the bottom of the water source.
While it works when the pre-filter is not fully submerged or sitting
flat on top of the water it sometimes picks up quite a bit of air along
with the water requiring more time and pumping to filter the same
amount of water. The manufacturers claim that it can suck water off a
rock is not the exaggeration I expected it would be, as evidenced by my
doing just that.
The thing that has surprised me the most is how
much I like the quick connect bottle adapter. I have found I like
having this lid on my Nalgene bottle, the quick connect opening is very
convenient to drink out of.
So far I am quite happy with the size,
weight, and performance of the HyperFlow. My only outstanding question
about the product is its longevity. I have used my old filter for many
years with no difficulties, but it is now packed away with the gear I
no longer use until such time at the HyperFlow fails (if ever).
|
Long
Term Report
|
July 28 2009
USAGE
* Day hike Mt Rainer National park (carried but did not use)
* Day hike Umptanum Falls (pumped 2L without back flush)
* Backpack trip to Umptanum Falls (pumped 4L without back flush)
* Canoe trip on Rimrock Lake (pumped 1L back flushed after returning home)
* Day hike Pleasant Valley, Washington Cascaides (pumped 1.5L without backflush)
I
took the pump on my daughter’s 6th grade field trip. I ended up not
using the pump on this trip due to not being able to find safe access
to the river near where we stopped for lunch.
I took a quick hike
to check out a possible camp for my 6 year old's first backpack trip. I
wanted to go quick and light, so I took minimal gear. I decided to take
an empty water bottle and the Hyperflow to save weight and get some
water when I stopped at the campsite I was checking out. This worked
very nicely. It was a pleasure to speed down the trail with virtually
no weight encumbering me. I stopped to check out where I planned on
camping and filed my water bottle from the stream. The water along the
way was running very slowly and in the places where it pooled looked
stagnant and rather unpleasant. Under different conditions I would
probably have avoided drinking from this even after filtering it, but
between the fact that I am testing a filter and had such a short quick
trip back to my vehicle I decided to risk it. The water was warm and
tasted a bit like dirt, but not unpleasant. I filtered and drank half a
liter, with no problem. The pump's lightweight and quick/easy setup,
combined with its high rate of flow makes this an attractive option for
when I want to cut down on the weight I carry and know there is a
reliable water source available.
 On
my backpacking trip to Umptanum falls with my daughter I had some
concerns about the quality of the water available. While there were
fish living in the biggest pond, the water in many spots was a nasty
looking dark gray (maybe a bit worse than on my previous trip) and I
even noticed the jawbone of an animal in the water just upstream from
where we camped. I made it a point to bring enough water with me for my
daughter to drink and only used the filtered water from the stream for
cooking and for drinking myself. I also made it a point to only collect
water from above the spot with the animal remains (the ones I could see
anyway). As in my previous trip the water was not the best tasting, but
I experienced no health problems. On
my backpacking trip to Umptanum falls with my daughter I had some
concerns about the quality of the water available. While there were
fish living in the biggest pond, the water in many spots was a nasty
looking dark gray (maybe a bit worse than on my previous trip) and I
even noticed the jawbone of an animal in the water just upstream from
where we camped. I made it a point to bring enough water with me for my
daughter to drink and only used the filtered water from the stream for
cooking and for drinking myself. I also made it a point to only collect
water from above the spot with the animal remains (the ones I could see
anyway). As in my previous trip the water was not the best tasting, but
I experienced no health problems. 
During
this trip I noticed that the pump seems to leak just slightly. While
pumping I noticed a few drips of water was coming from in-between the
two sections of the pump. While this is not a problem in and of itself
it makes me wonder about the long term durability of the product. Also
during this trip, I realized the one non-intuitive step in using the
product (at least for me) is the test to see if the filter media has
been damaged. I realized this is not part of the instructions that are
attached in the inside of the pump carrying pouch, and I forgot that I
had the full instructions with me.
I used the pump during a day trip
where my daughters and I spent the day paddling our canoe around
Rimrock Lake. The lake water was only slightly cloudy and warm enough
to swim in. Operating the pump from the canoe was very easy. I simply
dropped the pre-filter into the water next to me, attached the pump to
my water bottle and pumped. Again the pre-filter floated on the top of
the water only partially submerged. After returning from this trip I
thought again about how the pump leaked slightly during the previous
trip so I looked up and performed the Integrity Check process. The
filter did not pass. While holding the pump for the recommended 4
seconds I could hear air leaking into the pump chamber and when I
released it, it only moved back slightly, not the ‘snap back’ that the
instructions describe (I tried this out while going over the product in
preparation for the Initial Report and it worked then). Since I know I
have not dropped the pump and have not let it freeze, I am surprised at
this failure. I have tried holding the pump to my ear and the leak
sounds like it is coming from the output end of the pump. I don’t know
how to figure out if the problem is with the filter media or the seal.
Before contacting the manufacturer I decided to go over the process
again to be sure I had not missed anything and maybe better identify
the problem. I started by going to the MSR Water Treatment FAQ
(Frequently Asked Questions) and found the following:
“In
preparation you need to make sure that your filter is fully wetted out.
This means that you should have pumped several liters of water before
performing this test. Generally your Filter Cartridge will not dry much
during storage, so as long as you have used the pumps a few times, you
should be in good shape.”
After reading this I tried pumping some
water through the filter and back flushing it before doing the
integrity test again. This time it passed! Since I had just used the
pump the day before, I think the “will not dry much during storage, so
as long as you have used the pumps a few times, you should be in good
shape.” may be a bit misleading. My recommendation would be to be sure
you only perform this test immediately after pumping water through the
filter.
I used the pump on one final trip, a family day hike with
the Cascadians in Pleasant Valley. It was a short hike where I pumped
about 1.5l out of a small stream to refill our water.
I continue
to struggle with getting the pre-filter to remain in the water, and
have given up trying to get it to sit on top of the water facing down
as it is intended. Every time I use it, it ends up only partially
submerged and at an angle. Attaching a rock to the pre-filter has been
effective, but I don’t like to do that if this will cause the
pre-filter to come in contact with the muddy bottom of the water
source. The pre-filter seems like a good idea, but just does not seem
to work as intended. At the conclusion of this test series, I am
considering trying the pre-filter/float from my old pump with the
Hyperflow to see how well they function together.
Summary
The
Hyperflow’s small size, light weight, and speed along with the ability
to back flush in the field are real advantages. Sometimes with my old
pump I would have an internal debate as to if I was really thirsty
enough to pull the pump out and filter water. With the MSR I have been
filling my water containers more often and as a result despite often
carrying less water than I normally would I have remained better
hydrated. The pump's only disadvantages are the force needed to operate
it and the poor performance of the pre-filter. Aside from the
pre-filter, the pump works as advertised and has performed admirably.
Losing one of the small parts (outlet cover or valves) could be a
problem if I am not careful, and so carrying spare valves might be a
good idea. Overall I am very happy and impressed with the Hyperflow,
and would recommend it to friends and family.
|
|
|