

|
|
 |
Guest - Not logged in | ||||||||||||||||||||||||||||||||||||||||||||||
Reviews > Stuff Sacks > Dry Bags > Sea to Summit Ultra-Sil Dry Sack > Test Report by Derek Hansen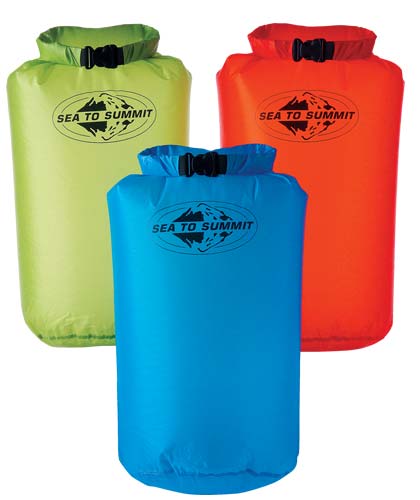
Photo courtesy seatosummit.com Sea to Summit — Ultra-Sil™ Dry SacksTest Series by Derek HansenTESTER INFORMATION
BACKPACKING BACKGROUNDI am a lightweight backpacker with a typical weekend pack weight of 15 lb (7 kg) and a multi-day weight of 20 lb (9 kg), which includes food and water. Because I pack less than 20 lb (9 kg), I prefer lightweight trail-running shoes. I prefer backpacking with a hammock as part of my sleep system. PRODUCT INFORMATION
INITIAL REPORT23 Jun 2011 PRODUCT DESCRIPTIONThe Sea to Summit Ultra-Sil Dry Sack (hereafter just stuff sack or sack) is a straight-forward stuff sack with water resistant features. When used correctly, the stuff sack will remain water tight, thanks to the siliconized rip-stop nylon fabric, taped seams, and roll-top enclosure. 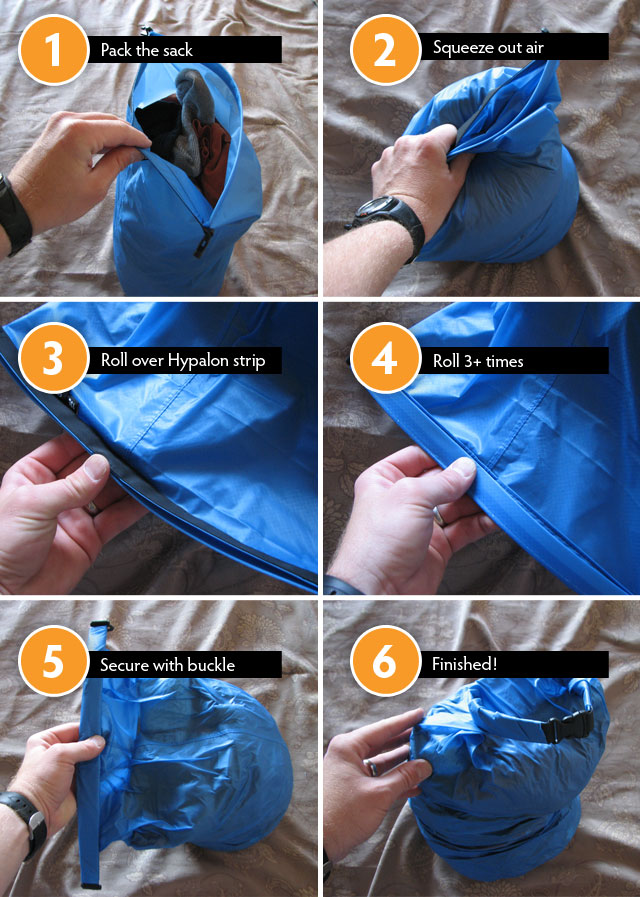
The lightweight fabric is not meant for the rigors outside a pack, and the manufacturer recommends using the sack inside another pack, to resist abrasion. To properly secure the enclosure, first press out any air before closing the opening, then begin rolling the seal with the black Hypalon strip facing into the fold. Complete three folds and secure with the buckle. The manufacturer indicates that with the proper seal, the sack is “sufficiently watertight to prevent water entry only in the case of shallow submersion for a short duration.” INITIAL IMPRESSIONS
I am testing the 13L, “sky blue” colored stuff sack. The stitching and construction are well-done and the product looks and feels great. For this size, I could easily fit my summer down quilt, but I think I’ll use it more often for storing extra clothing that I want to keep dry during my backpacking trips. I was easily able to stuff the gear I needed into the sack. The silicone fabric makes stuffing and fitting the sack into my backpack a breeze. The slippery fabric slides effortlessly into position. I can tell the fabric is fairly air tight because when I stuffed my gear inside, let out the air, and affixed the roll-top enclosure, the sack maintained its “dried raisin” look for more than 24-hours when I went to check on it again. No air had leaked in through the night. INITIAL SUMMARYPRO—Nice, slick feel; easy to pack; easy top roll feature with snap. CON—None so far. FIELD REPORT26 Sep 2011 FIELD LOCATIONS AND CONDITIONSI have used the Sea to Summit Dry Sack almost daily since receiving it back in June, primarily using it to store clothing during my bicycle commutes to work, but also during the following outdoor trips.Jul 25-29: Arizona Trail, south of Flagstaff, Arizona. I took a troop of Boy Scouts on a 50-miler trek over four days where we backpacked, canoed, and mountain biked the Arizona Trail. We hiked through a few thunder storms and braved an electrical storm. The mean elevation was around 7,000 ft (2,134 m). Jul 30: Arizona Trail, south of Flagstaff, Arizona. Having "left" some gear somewhere along the trail, I was determined to recover it. I went on a day hike with my sons and was caught in a heavy downpour and thunderstorm. The dry sack kept my extra clothes dry. Aug 13-16: Wasatch Mountains near Heber, Utah. I participated with my family in a multi-day family reunion in the mountains. We base camped and I went on hikes or spent time in my hammock. I used the dry sack to keep my clothes dry and well organized. PERFORMANCE IN THE FIELD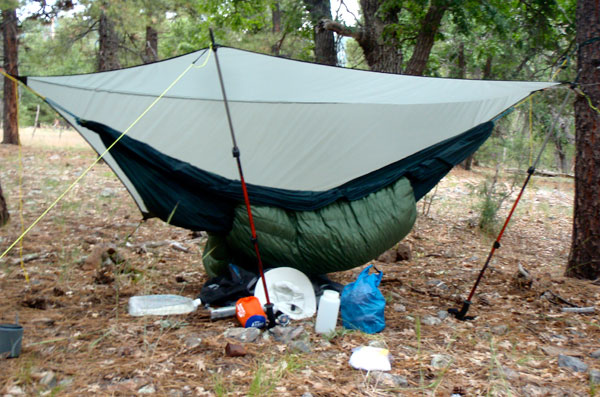
In all my uses over the testing period, I kept the dry sack inside another pack for protection. I don't think I handled it any differently than other stuff sacks in that regard, but I was conscious of being careful with it. I think the best testimonial I can give was from my week with the Boy Scouts. I kept all my sleeping clothes in the dry bag for most of the trip, but when we got to the lake for a day of canoeing, I'm grateful I took the dry sack to place my electronics, first aid kit, and a few other odds-and-ends. Mid-way along the lake I thought it would be fun to swamp one of the scouts' canoes. My plan backfired as I was sent over the side with my son. 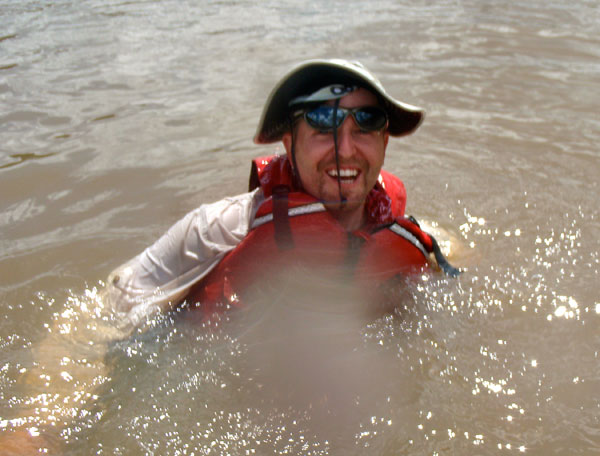
We performed a canoe rescue with the scouts who tipped me over. The process took much longer than when we practiced in the swimming pool. In other words, my gear was submerged for a long time. I learned a few things from this experience. First, the dry sack acted as a second buoyancy device as it had a little air in it, keeping my day pack afloat on my back. Second, all my gear in the sack was completely dry! Finally, I learned not to tip over Boy Scouts in a canoe. I was so pleased to find my gear dry, where everything else in the pack was soaked. Later on that trip we hiked through some heavy thunderstorms with drenching rain. Again, I was comforted to know that my gear was dry. After the 50 miles was complete, I went back down the trail to recover some lost gear. Rain clouds were threatening, but I didn't think I'd get caught in a downpour, so like a greenhorn, I wore cotton shorts and a t-shirt. My day pack contained a 2L hydration water bottle and I carried a Polynesian lava-lava and some other gear in the dry sack. I was unlucky, I guess, because a few miles into my recovery hike I was caught in a heavy downpour. I had brought my GoLite Poncho, which kept me pretty dry, but as I continued on my hike I was surprised to find that I was soaked--shirt, shorts and all. I couldn't figure it out -- my poncho didn't have any holes or leaks, so what happened? I also found that I was running low on water. Curious. During the hike my water bottle failed, spilling 2L of water into my day pack and on to me. I was soaked. The good news was that all my gear in the stuff sack was dry. I wrung out my clothes as best I could and wrapped the lava-lava to stay warm for the rest of the hike. Thankfully I was able to recover the lost gear and make it back home safely. FIELD SUMMARYThis is a great dry bag. The bag performed great to keep my gear dry and organized. I also really like that it is semi-translucent. There were times when I was looking for gear and because I could see it, I didn't have to rummage around to find it. For the most part, I kept the sack about half-way filled and squeezed the air out of it so I could pack it more easily. Please check back in approximately two months when I will add the long term section to this report. LONG TERM REPORT21 Nov 2011 FIELD LOCATIONS AND CONDITIONSI have taken the dry sack on three more backpacking trips. In addition, I have taken the dry bag on a couple more day hikes where I stored extra clothing. On a few occasions, when I pedaled my bicycle to work, I used the sack to store a change of clothes. Oct 7-8: Foothills near Mount Elden, Flagstaff, Arizona. I took my daughter on a short backpacking trip in the national forest in Flagstaff. We found an ideal spot on the north slope of a small cinder mountain, just below 7,000 ft (2,134 m). The weather was cool, around 35°F (2°C) and dry. Nov 4: Old Caves Crater, Flagstaff, Arizona. A backpacking trip cut short due to an unexpected rain storm with intense lightning and wind. The temperature was just above freezing and I had to abandon my overnight plans. Thankfully I was only a few miles from the trailhead. Nov 10-12: Upper Pumphouse Wash, near Sedona, Arizona. I took a three-day trip into the Upper Pumphouse Wash in Northern Arizona where temperatures got down to 15°F (-10°C) with scattered snow conditions. PERFORMANCE IN THE FIELDThe Sea to Summit Ultra-Sil Dry Sack has performed wonderfully for me and I've been very grateful to have it as part of my kit the past few months. I primarily stored extra clothing in the sack, not wanting to mix or associate my clothing with food smells (I stored food in a separate container). 
Storing clothing in the dry sack, under my hammock. On several occasions I went hunting for a clothing item and found it first by scanning the semi-translucent bag before digging in. This was a real time-saver. During my failed overnighter around Old Caves Crater, the sack proved itself again as a reliable dry bag. I began backpacking at night and only got about two miles in when an unexpected storm moved in. I quickly set up camp over a small collection of boulders, thinking I would be shielded from the storm. The forecast didn't mention any rain or violent storm so I only brought a small coverage tarp. A dramatic lightning storm lit the hills around me and the heavy rain and strong winds funneled through the rocks and into my hammock like a wind tunnel. The temperature was just above freezing, making conditions worse. I was forced to abandon my plans because my gear was getting wet, except for my clothes stored in the dry sack. I changed into dry clothes and my rain gear and hastily packed up my gear in the rain. Thankfully I was close enough to the trail head to bail out. 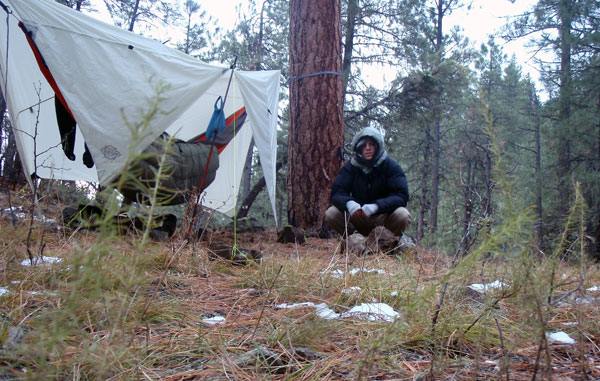
Day two at Pumphouse Wash. Notice the dry sack hanging from the hammock ridgeline. The next weekend I went out again, but this time into a canyon. Snow from the previous weekend was still clinging to spots on the ground. I again used the dry sack to store my warm sleeping clothes. In the cold, I found the plastic buckle a little stiff and more difficult to unlatch. FINAL SUMMARYPRO—Keeps my gear dry. Easier to spot gear through the material. CON—The plastic buckle was hard to unlatch in the cold. I would like to thank Sea to Summit and BackpackGearTest.org for providing me with the opportunity to test this product. Read more reviews of Sea to Summit gear Read more gear reviews by Derek Hansen Reviews > Stuff Sacks > Dry Bags > Sea to Summit Ultra-Sil Dry Sack > Test Report by Derek Hansen | |||||||||||||||||||||||||||||||||||||||||||||||