|
TSL VANOISE TREKKING POLES
TEST SERIES BY JOHN R. WATERS
LONG-TERM REPORT
April 21, 2009
CLICK HERE TO SKIP TO THE FIELD REPORT
CLICK HERE TO SKIP TO THE LONG-TERM REPORT
TESTER INFORMATION
|
NAME:
|
John R. Waters
|
|
EMAIL:
|
exec@bysky.com
|
|
AGE:
|
59
|
|
LOCATION:
|
White Lake, Michigan USA
|
|
GENDER:
|
M
|
|
HEIGHT:
|
5' 9" (1.75 m)
|
|
WEIGHT:
|
178 lb (80.70 kg)
|
|
CHEST:
|
43 in (109 cm)
|
|
WAIST:
|
38 in (97 cm)
|
My backpacking began in 1999. I have hiked rainforests in Hawaii, Costa Rica, and Puerto Rico, on glaciers in New Zealand and Iceland, 14ers in Colorado and Death Valley's deserts. I hike or snowshoe 6-8 miles (10 km-13 km) 2-3 times weekly in Pontiac Lake Recreation Area, with other day-long hikes on various SE Michigan trails. I also hike in Colorado and am relocating there, which will increase my hiking time and trail variety tremendously.
My daypack is 18 lb (8 kg); overnights' weigh over 25 lb (11 kg). I'm aiming to reduce my weight load by 40% or more.
INITIAL REPORT
PRODUCT INFORMATION & SPECIFICATIONS
Manufacturer: TSL Outdoor
Year of Manufacture: 2008
Manufacturer's Website: http://www.tsloutdoor.com
MSRP: N/A
Listed Weight: 9.91 oz (281 g) each
Measured Weight: 9.75 oz (276 g)
Listed Total Weight: N/A>
Measured Total Weight: 36 oz (950 g), both poles, three sets of baskets in carrying case
Listed Length: 25 - 57 in (64 - 145 cm)
Measured Length: 26.5 in - 57 in (67.5 - 145 cm)
Warranty: TSL Products carry a two year warranty after date of purchase against manufacturing defects and as long as they are used in a proper manner.
Other Details:
* Ergonomic Strap
* Aluminum 7075
* Tungsten Tip
* Tip Protector
* Three Baskets
* Comes in a Bag
* Made in Italy | 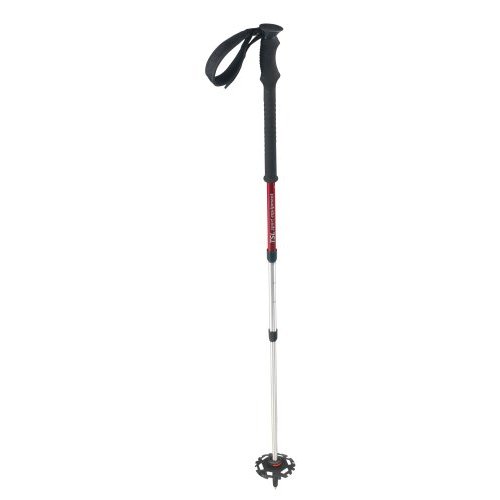 | | Picture Courtesy of TSL Outdoor |
|
INITIAL IMPRESSIONS
For the most part, and confirmed by the TSL Outdoor website, trekking poles are pretty predictable in appearance - padded to varying degrees hand grips, wrist straps, adjustable telescoping sections, changeable baskets and various kinds of tips. In my experience, it is the variations which make some trekking poles stand out from the rest.
When the Vanoise poles arrived, I was first pleasantly surprised by the very nice, durable storage bag. While the website posts a graphic of the poles and mentions the poles "come in a bag", the bag was not pictured. The bag is constructed from a heavy duty vinyl-like material, mostly dark gray with red accent. The TSL logo and the words "TSL Sport Equipment" are stenciled in white on the red accent down the front right side of the bag. A good portion of the front of the bag is a mesh fabric.
There is an open top pocket (approximately 8 x 7 in/20 x 18 cm) on the back of the bag and a nice size (approximately 8 x 7 in/20 x 18 cm) zippered pocket on the front of the bag. The front pocket has a clear vinyl "window" which contains a retail placard. The placard can be accessed from inside the pocket and something else (ID, map?) could be displayed in its place. Unfortunately, when I removed the placard it was stuck to the clear vinyl. Some of the ink transferred and smeared on the inside of the clear vinyl. I will have to see if I can remove it.
The top of the bag is closed via a fold over flap which is secured with a hook and loop strip. At the top of this closure is a large webbed loop for hanging while in storage.
Tucked inside the front pocket were three sets of black changeable baskets. This was another surprise; three baskets instead of the two indicated on the TSL Outdoor website. The flexible plastic-like baskets are to be used for different seasonal conditions. There is a summer, winter and snow basket, which measure 2 in (5.5 cm), 4 in (10 cm) and 5 in (13 cm) respectively.
Now, on to the Vanoise poles themselves. The first thing I noticed about the poles was the extensive amount of black cushioning material on the poles. I'm used to seeing this sort of material on the hand grips, but not so far down the poles themselves. The cushioning measures a full 12.5 in (32 cm). I'm thinking the extra cushioning is to absorb vibrations from the tips striking the ground. I'll see if I notice a difference while testing. The main body of the poles is a deep metallic red color with a white "TSL sport equipment" stencil.
The wrist straps are slightly padded and lined (inside and out) with a soft material. The adjustment to the strap length is made by simply pulling on the loose ends of the strap which releases a "plug". The plug operates like a buckle and I can loosen/tighten the wrist straps through it.
TSL uses a Push Pull Pad System for their baskets. It looks to be quite interesting.
The standard rubber tip covers protect the tungsten tips of the poles from hard surface hikes (like paved roads) and also serve to protect the storage bag or other equipment from damage when the poles are stored.
I thoroughly examined the Vanoise poles and found them to be free of any noticeable defects.
READING THE INSTRUCTIONS
According to the provided TSL instruction pamphlet, the poles are designed for "Cross-country skiing, hiking and snowshoe walks." There are directions for the various adjustments in 6 languages. The pamphlet also covers the complete line of TSL poles, so I had to sort through to find only that which applied to the Vanoise.
Accompanied by a step-by-step graphic, TSL gives three steps to adjusting the poles to the desired length:
"1. Unblock the two sections by turning them clockwise.
2. Close the lower section on the STOP mark by turning anticlockwise and pushing lightly upwards.
3. Close the middle section acting in the same way and block it at the desired height."
I'm assuming that "unblock " and "block" is the same as "unlock" and "lock".
Actually, using the poles, including the adjustment of the wrist straps is a fairly intuitive process; I got it, even without reading the simple instructions.
TSL also includes a few lines with pointers on how to adjust the pole lengths for different terrains.
TRYING IT OUT
I haven't had much of a chance yet to try out the Vanoise poles on a major hike or snow shoe excursion, but I did check them out on a short hike down our bumpy dirt road. The twist lock section adjustments turn smoothly and pulling out the sections of the poles took minimal tugging. Like other poles I've used, once you release the twist locks, each section needs to be rotated counterclockwise to loosen the telescoping mechanism so the sections can be extended. There are 5 cm increments marked in black on the upper telescoping section and one STOP mark at the top of the lower telescoping section. To adjust the poles for my use , I extended the lower section to the stop point, then extended the upper section to the 120 cm mark and tightened both twist locks to what I felt was a reasonable tightness.
I did not have to adjust the wrist straps; they were good-to-go right out of the bag. I'm impressed with the strap construction. I'll report on how they maintain flexibility in frigid temperatures.
I removed the tip protectors to take a look at what was underneath (the Tungsten tips) and they pulled off with minimal force. I did not yet try to switch baskets.
SUMMARY
This concludes my Initial Report of the TSL Vanoise Trekking Poles. Please see below for the results of my first two months' testing of this product.
FIELD REPORT
FIELD LOCATIONS/CONDITIONS - Feb 09
This was a good season for snowshoeing. We didn't get much snow in Canon City, Colorado where I live. SO, even though I live on 37 acres (15 hectares) and can walk right off my property into over 200,000 acres (81,000 hectares) of state and federal land, I had to drive off into the mountains west and north of here to get deep enough snow to snowshoe in. And deep it was. The areas I snowshoed in had snow depths of over 3 ft (91 m) to 4 ft (1.2 m) or more. I used the TSL Vanoise Poles snowshoeing with the medium sized snowflakes (baskets) attached.
I also used the TSL poles on regular hikes where there was no snow. The terrain varied from bedrock, to dry soil, to mud and scree.
Here is where I snowshoed:
Mount Evans - a mountain in the Front Range region of the Rocky Mountains, in Clear Creek County, Colorado. It is one of 54 fourteeners (mountains with peaks over 14,000 feet/4200 m) in Colorado, and the closest fourteener to Denver. This was a 3 mi (5 km) snowshoe trek cut short because we didn't expect the wind chill to be so bad. At 11.200 ft (3414 m) above sea level, the ambient temp was -1 F (-18.3 C) and the wind was blowing over 40 mph (65 kph), creating a wind chill below -25 F (-32 C).
Sangre de Cristo mountain range - west of Westcliffe, Colorado about 9,000 ft (2743 m) above sea level. Using different trails on 3 different snowshoe treks about 2 or 3 mi (3 - 5 km) each. Temperatures ranged from 5 F (-15 C) to 22 F (-6 C).
Ski Cooper at the Tennessee Pass in Leadville, CO - over 10,000 ft (3048 m) above sea level. Snowshoed for 2 days and over 9 mi (14 km) in temps from 12 F (-11 C) to 28 F (-2.2 C) in moonlight and sunshine.
Other locations used for regular hiking ranged from 5600 ft (1707 m) above sea level to over 7,000 ft (2134 m) with temps ranging from 14 F (-10 C) to over 60 F (16 C)
(Anyone from Florida getting the chills reading this?)
 | | Mt. Evans at Christmas 2008 |
| 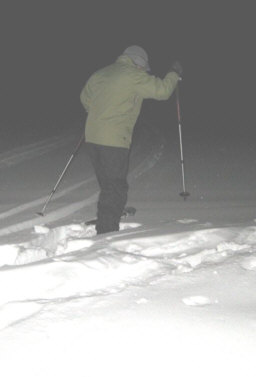 | | Tennessee Pass at Night |
|
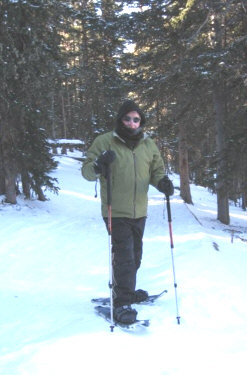
PERFORMANCE IN THE FIELD
Of course, when trekking and snowshoeing at these altitudes and temperatures, I have to make sure that I'm dressed properly. Exposed skin can get frostbite quickly and it becomes more difficult to work with gear. Making adjustments with gloves on can be clumsy. Removing gloves because gear can't be manipulated with gloves on can be downright dangerous.
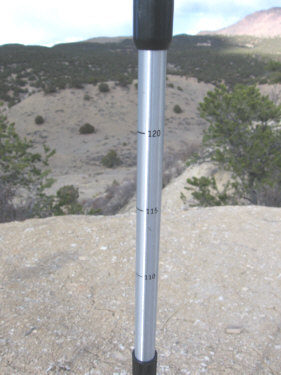 | I had no issues when working with the TSL poles under any conditions so far except when changing baskets (see below). It was very easy to take the poles from fully collapsed position (these are 3 section poles) to the length I needed. I would like to have seen length marking tic marks on the lower section though. With other poles I can remember what the tic marks are and quickly telescope each section out to my preferred setting. The TSL poles have tic marks on the middle section, but not on the bottom section. So I was able to extend the middle section out to my preferred setting, but had to play with the bottom section to get it adjusted for me. Once I did the first pole, it was easy to adjust the second one by just holding the first one up as a guide.
The TSL poles telescope and collapse by turning the sections clockwise or counterclockwise to loosen or tighten the sections in place. |
I loosen them enough to slide the lower section in and out, then turn the section to tighten it in place. The sections are lightweight aluminum alloy and the tic marks on the middle section are labeled in centimeters which indicate the length of the pole from handle top to the bottom tip when the lower section is set at its STOP mark. I checked the measurement and it is correct. The top surface of the handle slopes down slightly and the measurement is to the lower end of the top slope.
I never had an issue with the poles collapsing on the trail while in use if I securely turned them to lock them in place.
When snowshoeing, I used the medium sized 4 in (10.2 cm) diameter snowflake basket. Snowflakes provide quite an advantage when using poles in snow. A regular pole with no snowflake will go down usually over 2/3 of its length in deep snow when it icy and down past my wrist when in powder. Snowflakes compress the snow under the flake and create more resistance, much like a snowshoe. I took a couple pictures of the difference. The green pole is a plain tipped, no snowflake pole of a different brand and the red pole is the TSL with the medium sized snowflake. They are pushed down into 4 ft (1.2 m) of crusty icy snow as far as I could push them using one arm. Both poles were adjusted to the same length. Note how far into the snow the green pole goes compared to the TSL.
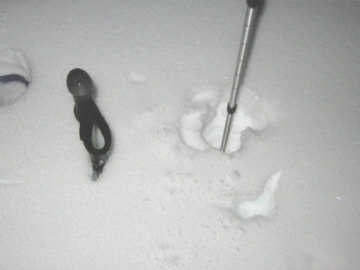 | | Pole on left w/o Snowflake, Pole on right w/Snowflake |
| 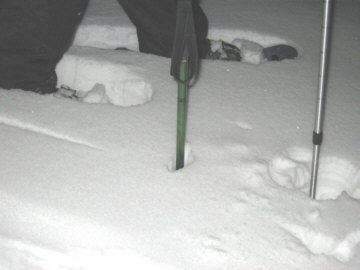 | | Pole on right w/o Snowflake, Pole on right w/Snowflake |
|
I had no issues with durability. When snowshoeing off trail in deep snow, tripping and falling does not hurt because falling into 4 ft (1.2 m) of snow is like landing on cotton. However, getting up is another story. My arms are not 4 ft (1.2 m) long, so if I need to get up, I can't put my arm out and push myself back up into a sitting or standing position because I can't reach the ground (any snow boarder or skier will know what I mean). I need to use my poles to get upright again. I don't normally fall, but when going downhill over a steep ledge I can loose my footing. I did that in the Sangres. Looking up at my wife, who is laughing as I roll around trying to get up and while I was eating some snow, I lifted all 190 lbs (87 kg) of me and my gear up and into a standing position (that includes a day pack and snowshoes that have a tendency to twist me around more, making it even more difficult to get upright in deep snow).The poles worked fine.
There is an anti-vibration damping system in these poles. When they hit the ground, the poles vibrate slightly. On hard ground and heavy packed snow they "sing" and make a sound at times I can only say equates to twanging a base string fiddle. I don't know how else to describe it. In packed snow at night it sounds like a bird chirping. It's not really loud, but it's noticeable.
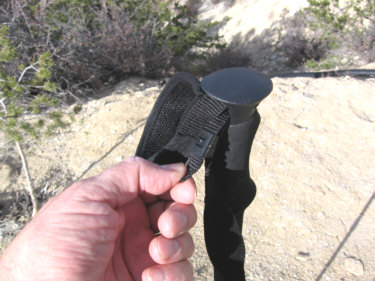 | | Adjusting Wrist Strap on Vanoise Poles |
| The wrist straps worked fine. Even with heavy winter ski gloves on, they went over my hands fine and were comfortable. With no gloves on, the straps were comfortable and were not rough or abrasive. In the next few months I'll see how they do in warmer weather when my hands are going to sweat more. The straps are easily adjusted by pulling on the end tab (see image) to release a plastic stop. I can then adjust the strap and pull tight to position the stop back in place, making it easy to adjust the strap size even with heavy gloves on. |
The grip material was comfortable and showed no signs of wear or signs of coming apart. I have had poles where the handle material delaminated and I had to wrap them in tape. I see no sign of having to do that so far.
I see no scratching or etchings from opening and closing the extensions many times. The finish still looks like new.
| The snowflakes and bottom fittings are rather difficult to work with. They don't just push on and lock into place. Looking at the image at right, there are orange tabs at the bottom just above the bottom tip that are on opposite sides of the pole. These tabs must be pulled out to add the option, such as a snowflake. This is not easy. When we were on Mt. Evans with those crazy wind chills, I could not get the tabs to come out to allow me to put the snowflakes on. I tried using the bottom tip of the 2nd pole and could almost get them to open up, but was afraid that I was going to slip and hurt myself. I ended up using a screwdriver we had in the car. I also ended up sitting in the car with the heat on because the tip of my index finger was getting seriously numb because I had to take my gloves off. | 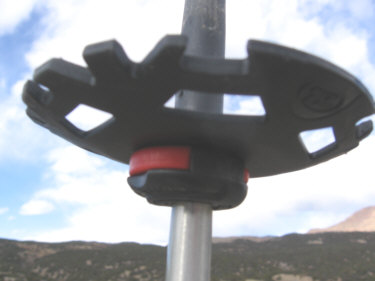 | | Lock Tab on Snowflake |
|
One snowflake would not stay on and kept falling off. It blew across the trail head and was fortunately stopped by a tree so I could get it or else it was on its way to Kansas. It may have been the cold. It may have been that those orange tabs need to be worked back and forth for a while before they loosen up. I did manage to get the snowflakes on while at home inside and then they locked in fine and have been no trouble after that. I will have to make sure that any changes to the bottom options get done at home where I have time and warmer temps.
SUMMARY
These poles are attractive. I like the bright aluminum sections. The poles are marked as being "aeronautical aluminum", which is the same lightweight material that has been engineered for airplane airframes. I tried Google for "aeronautic aluminum composition" and didn't get much specific detail on what the alloy really is made of. I guess it's just good to know it's lighter and stronger than regular aluminum.
The poles are comfortable and perform well except for changing the lower basket options.
Now that we are moving into warmer weather here in Colorado, they will get a workout at temps more into the 80 F (27 C) range over the next few months and I'll be using them in much rougher terrain, with boulders, stream crossings, lots of scree and pebbles and hard dry dirt where tips tend to wear out quickly. I'll report the results in the final report
This concludes my Field Report. Please see below for my Long Term Report.
LONG-TERM REPORT
FIELD PERFORMANCE-Locations/Conditions
Well, winter is winding down. It's April 21 and it is going to be 87 F (31 C) today in the Arkansas Valley area of southern Colorado. It's like summer here in Canon City, but looking around, the higher mountains are still all white.
Where the poles went the past few weeks:
Location 1 - Sangre De Cristo mountain range - west of Westcliffe, Colorado and about 9000 ft (2700 m) above sea level. Using different trails on 2 different snowshoe treks of 2 or 3 mi (3 or 5 km) each. Temperature ranged from 5 F (-15 C) to 22 F (-6 C)
Location 2 - Ridgway, Colorado up to 7000 ft (2100 m) above sea level on a 7 mi (11 km) trek on rock, sand, mud and snow. Temperature ranged from 40 F (4 C) to 50 F (10 C)
Location 3 - Canon City, Colorado at 5635 ft (1718 m) with temperatures at 76 F (24 C)
At location #1, I was still using the snowflakes on the poles. As in my previous snowshoe treks, these poles performed very well. I've gotten use to setting the bottom section to a little shorter than where the limit mark is and then tuning the upper section right onto my favorite length marking. The poles never fought with me when it came time to tighten them up. I have had poles that I could turn and turn and turn what seemed like for minutes until they finally gripped and locked in. Not these guys so far. A few twists and they are locked into position.
At location #2, off came the baskets. They very much get in the way when scrambling over rocky terrain. I removed them while walking from the car to the trailhead because I forgot to do it before we left the vehicle. It was pretty simple. I used the tip of one pole to push the basket-locking tab of the other pole to unlock its basket. Once unlocked, the basket pops right off. Then I switched and did the other pole. I did have to be careful not to let the tip slip off the basket-locking tab, because if I did, the tip of the pole could do me some damage. I put the baskets in my pocket and I was ready for rough terrain.
Below are some pictures of the rock field we hiked over for about 0.5 mi (0.8 km). This, I've found, is the kind of terrain that can cause a pole to break if it slips off a rock and gets into a crevasse. I had no trouble at all with these poles. The tips securely held on the rocks and when it was my fault and I placed the tip into a crevasse, I was able to wiggle it out without any trouble. I was also quite comfortable using the pole to jump between rocks. They did not bend or flex under my 180 lb (82 kg) weight/load.
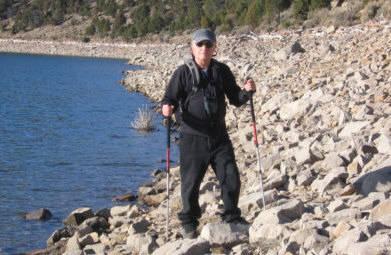 | | Hiking at Ridgway Reservoir |
| 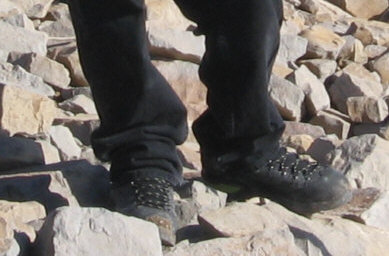 | | Rocks at Ridgway State Park |
|
Location #3 involved treks on and around our ranch. We bushwhack around here where the ground is desert sand, rock, shale, fine pebbles and plenty of solid bedrock. We don't have topsoil here. We take frequent multi-mile/kilometer hikes around our 37 acre ranch (149,733 m2) and into the 200,000 acres (809 million-m2) of public land behind us (GPS SUGGESTED). These treks require hiking poles because we're climbing over ledges, going down steep rocky inclines of solid layered bedrock or down loose shale that breaks up underfoot. I rely a lot on my poles.
Plus, they are potentially a really good defensive item when traveling in territory with residents like bears, mountain lions, badgers, coyote, and rattle snakes. Even though, I carry a big can of grizzly bear spray that'll go 30 ft (9 m), a good solid trekking pole with a nice sharp tip is also nice to have along. There are no grizzly bears here, but the extra protection is nice to have.
So far, the snowflake baskets are still in one piece and the poles show no sign of abuse and look quite new. I have to say that they are VERY easy to find when dropped because of their bright color.
SUMMARY
The TSL poles have been working out well for me. To be honest, I was not expecting them to be that great. They arrived in a plastic pouch that screamed "low end retail product" like the kind of item that hangs from hooks in a discount department store. However, after using them under some pretty tough treks, I have become a fan of this product. They are rugged, feel right, and have been firm and reliable.
CONTINUED USE
I'm going to be headed up to Rocky Mountain National Park in 2 weeks, where there was a fresh 3 ft (.9 m) snowfall a few days ago. There is a snowpack up there in excess of 100 in (250 cm). We are planning a whole week of snowshoeing and I'm counting on the TSL Vanoise Trekking Poles to continue to perform well.
Thank you to BackpackGearTest.org and TSL Outdoors for allowing me to test these poles.
John R. Waters
This report was created with the BackpackGearTest.org Report Writer Version 1.
Copyright 2009. All rights reserved.
Read more reviews of TSL gear
Read more gear reviews by John Waters
|