|
OUTDOOR PRODUCTS HYDRATION RESERVOIR 2L
BY MARINA BATZKE
OWNER REVIEW
August 06, 2017
TESTER INFORMATION
|
NAME:
|
Marina Batzke
|
|
EMAIL:
|
mbbp2013 (at) yahoo (dot) com
|
|
AGE:
|
57
|
|
LOCATION:
|
Los Angeles County, California, USA
|
|
GENDER:
|
F
|
|
HEIGHT:
|
5' 5" (1.65 m)
|
|
WEIGHT:
|
132 lb (60.00 kg)
|
I converted from day hiking and car camping to backpacking in 2013. My backpacking trips are one or two weekend excursions per month in Southern California. The locations range from Joshua Tree National Park desert areas in the cooler months to mountainous elevations in the summer months. I always hike with a group and like the gear talk in camp. While I am looking for ways to lighten my pack, I am not an ultra-lighter: I like sleeping in a tent with a sleeping bag on a comfortable pad. In January 2017, I added snowshoeing to my winter activities.
PRODUCT INFORMATION
Manufacturer: The Outdoor Recreation Group
Year of Manufacture: 2015
Manufacturer's Website: http://www.outdoorproducts.com
MSRP: US$20.99
Listed Weight: N/A
Measured Weight: 6.2 oz (176 g)
Bladder Dimensions flat: 15.5 in x 7.25 in at top and 6 in at bottom x 1 in at valve
(39.4 cm x 18.4 cm at top and 15 cm at bottom x 2.5 cm at valve)
Hose Dimensions: 42.75 in L x 0.39 in diameter (109 cm x 1 cm diameter)
The Outdoor Products Hydration Reservoir is ideal to be inserted in backpacks and hydration packs for water sipping while on the go. The bladder is slightly V-shaped, so the 1.25 in (3.4 cm) narrower bottom slides more easily into the hydration sleeve of a pack. The bladder is dark gray in color and made from Bisphenol A-free (BPA free) silicone. The plastic is soft and slippery to touch. The silicone bladder has 2 L, 1.5 L, 1 L and 0.5 L blue fill marks, and 64 oz, 48 oz, 32 oz and 16 oz blue fill marks imprinted.
 | | Hydration Reservoir 2.0 L |
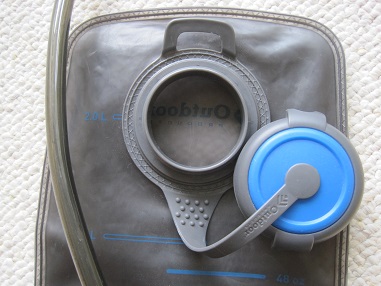 | | Reservoir opening with screw-on cap |
Located 2 in (5 cm) from the bladder top is the 2.25 in (5.7 cm) diameter reservoir opening with its low profile gray-blue colored screw-on cap. The cap is attached to the reservoir opening with a bendable cap handle. This handle makes sure I do not drop or loose the cap while refilling the reservoir. At the top of the reservoir opening is a 1.5 in (3.8 cm) wide hard plastic rectangle. When I insert the bladder into my backpack's reservoir sleeve, I wrap a hook-and-loop attachment to this hard plastic rectangle which holds the bladder upright even when it is near empty.
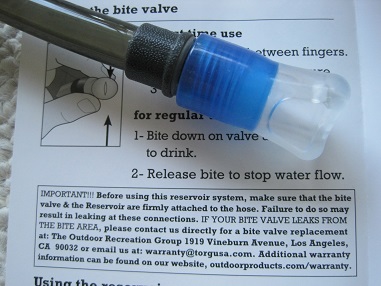 | | The Bite Valve |
At the upper end of the long hose, I screw on the bite valve that is made with flexible Thermoplastic Elastomer (TPE). It is described being molded to allow for easier sipping. I bite down on the valve, which opens the plastic a bit and I sip water. Releasing my bite stops the water flow. I am not a fan of the bite valve. The bite valve has continued to drip after I release my bite and I often notice a dark water stain on my T-shirt where the bite valve keeps dripping. The bite valve has no turn closure. When I notice the bite valve dripping, I hold the bite valve hose end straight up high with an outstretched arm and allow the water to completely run back down the hose into the bladder. That helps stop the dripping until the next time I am drinking and I thereby refill the hose again. Hiking buddies have asked me why I keep raising my arm straight into the air, as it looks like asking permission to say something. As the hike progresses, the water stain grows bigger in diameter. Sure - it is only a water stain and will dry up later in camp but depending on the color of T-shirt I am wearing, the stain can be very noticeable.
This leaking valve must be a known problem, as the manufacturer imprints on the backside of the bladder that users shall contact the manufacturer if the bite valve leaks. I emailed warranty@outdoorproducts.com and did not hear back. I emailed again two more times but did not hear back once. Then finally several weeks later I got three separate envelopes in the mail, each with a new bite valve inside. By that time, I had purchased a new hydration system from a different manufacturer where the bite valve has a twist closure.
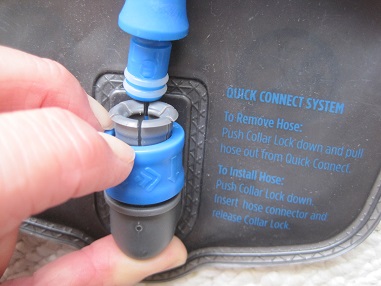 | | Pushing down blue collar to insert hose |
The long hose connects to a hose attachment at the bottom of the bladder. The manufacturer describes this as LAST DROP SYSTEM: the hose attachment opening is just about 1 in (2.5 cm) from the bottom and therefore I can drink til virtually the last drop is sucked out of the bladder. First I insert the hose end through the H2O opening in my pack's fabric. Before I allow the bladder to slide into my pack's hydration sleeve, I attach the hose end to the hose attachment by pushing down a blue collar lock. Then I insert the hose end into the plastic opening, I let go of the pushed-down collar lock and it firmly envelopes the hose end. This seals the two parts securely and I have not once had this easy-to-use quick-connect lock system leak over the past two years.
On the back of the bladder, the cleaning and storage instructions are imprinted, along with bite valve adjustment tips (non-firmly attached components may result in leakage; valve could be a choking hazard for kids six years or younger) and warranty information (if bite valve leaks, contact manufacturer for bite valve replacement).
Cleaning a hydration reservoir thoroughly after each outing is very important, so mold does not form. Outdoor Research describes these steps imprinted on the backside of the bladder. I disconnect the hose from the quick-connect lock by pushing down the blue collar and pulling the hose end out. I then unscrew the bite valve from the hose. I open the bladder cap and pour out any remaining filtered water. Then I clean all parts by filling them with baking soda and tap water. I shake the units, empty and rinse them free of the baking soda solution. Outdoor Research asks for scrubbing with the baking soda/ water solution and that is somewhat possible with a brush inside the bladder but only possible inside the narrow hose if I buy their special cleaning kit (sold separately from the hydration reservoir). Next I add a cup of water with a teaspoon of lemon juice and shake the bladder, then empty and rinse it. Now the more difficult part starts: I have to dry the components before storing them for the next trip. I find it difficult to dry the inside of the bladder, as I cannot insert my hand into the 2.25 in (5.7 cm) diameter reservoir opening. I usually tediously stuff a dish towel into the opening and try to shake it down to the lower base of the bladder. This crumbled dish towel prevents the two bladder sides from clinging to each other. When the silicone plastic sides cling together, the bladder inside cannot dry. I wish the reservoir opening were wider, allowing me to insert my hand to reach inside with a dish towel for drying. Separately, I rotate the long hose at high speed to gravity-force water out.
FIELD USE
Valley Forge Campground, Angeles National Forest, California, USA
Elevation: 3500 ft (1067 m)
2 days/ 1 night backpack
4.6 miles (7.4 km)
Temperatures: 68 - 55 F (20 - 13 C)
Quail Mountain, Joshua Tree National Park, California, USA
Elevation: 5813 ft (1772m)
2 days/ 1 night backpack April 2016
18 miles (29 km)
Temperatures: 74 - 39 F (23 - 4 C)
Shortcut Canyon to West Fork Trail Camp, California, USA
Elevation: 3100 ft (945 m)
2 days/ 1 night backpack
7.5 miles (12 km)
Temperatures: 63 - 53 F (17 - 12 C)
Kearsarge Pass + Robinson Lake, California, USA
Elevation: 9200 - 11700 ft (2800 - 3600 m)
2 day/ 2 night car camp
12 miles (19 km)
Temperatures: 70 - 55 F (21 - 13 C)
Icehouse Canyon via Cedar Glen Camp, Southern California, USA
2 day/ 1 night backpack
Elevation: 5000 - 7600 ft (1500 - 2300 m)
7 mile (11 km)
Temperatures: 70 - 55 F (21 - 13 C)
Henninger Flats, Angeles National Forest, Southern California, USA
2 day/ 1 night backpack
Camp elevation: 1300 - 2600 ft (400 - 800 m)
6 mile (10 km)
Temperatures: 74 - 50 F (23 - 10 C)
This is just a selection of three-season outings that I used the Outdoor Products Hydration Reservoir on. I did not use the Reservoir in freezing conditions, so I cannot report on its performance with winter temperatures.
SUMMARY
THINGS I LIKE
Affordably priced hydration bladder
V-shaped bladder slides easily into pack sleeve
Reliably sealing quick-connect hose to bladder
Use + cleaning instructions imprinted on bladder itself plus on paper instructions inside box
THINGS I DON'T LIKE
Bladder opening not wide enough to insert hand into for better cleaning/ drying
Bite valve leaks and creates water stain on T-shirt front
While the Outdoor Products Hydration Reservoir 2 L is affordable priced and offers several nifty features, I was too disappointed by the bite valve dripping and have since switched to a different brand.
This report was created with the BackpackGearTest.org Report Writer Version 1.
Copyright 2017. All rights reserved.
Read more reviews of Outdoor Products gear
Read more gear reviews by Marina Batzke
|


