|
PLATYPUS INSULATOR
TEST SERIES BY JOHN R. WATERS
LONG-TERM REPORT
April 09, 2009
CLICK HERE TO SKIP TO THE FIELD REPORT
CLICK HERE TO SKIP TO THE LONG-TERM REPORT
TESTER INFORMATION
|
NAME:
|
John R. Waters
|
|
EMAIL:
|
exec@bysky.com
|
|
AGE:
|
59
|
|
LOCATION:
|
White Lake, Michigan USA
|
|
GENDER:
|
M
|
|
HEIGHT:
|
5' 9" (1.75 m)
|
|
WEIGHT:
|
178 lb (80.70 kg)
|
|
CHEST:
|
43 in (109 cm)
|
|
WAIST:
|
38 in (97 cm)
|
My backpacking began in 1999. I have hiked rainforests in Hawaii, Costa Rica, and Puerto Rico, on glaciers in New Zealand and Iceland, 14ers in Colorado and Death Valley's deserts. I hike or snowshoe 6-8 miles (10 km-13 km) 2-3 times weekly in Pontiac Lake Recreation Area, with other day-long hikes on various SE Michigan trails. I also hike in Colorado and am relocating there, which will increase my hiking time and trail variety tremendously.
My daypack is 18 lb (8 kg); overnights' weigh over 25 lb (11 kg). I'm aiming to reduce my weight load by 40% or more.
INITIAL REPORT
PRODUCT INFORMATION & SPECIFICATIONS
Manufacturer: Cascade Designs, Inc.
Model: Platypus Insulator
Year of Manufacture: 2008
Manufacturer's Website: http://www.platypushydration.com
MSRP: 1.8L (60 oz.) - $39.95 USD
2.0L (70 oz.) - $39.95 USD
3.0L (100 oz.) - $42.95 USD
Size Tested: 3.0L (100 oz)
Dimensions on Website: 7.75 x 18.75 in. (19.5 x 47.5 cm)
Dimensions on Hangtag: 8 x 21 in (20 x 53 cm)
Measured Dimensions: 8 x 18.75 in (20.3 x 45.7 cm)
Listed Weight: N/A on website, but 5.4 oz (152 g) is listed on the hangtag
Measure Weight Insulator reservoir sleeve: 4.5 oz (128 g)
Measured Weight w/reservoir, tube and tube sleeve: 13 oz (369 g)
* Includes Big Zip SL reservoir making filling and cleaning a snap.
* Insulation covers reservoir, drink tube and bite valve to help keep liquids cool in summer and delay freezing in winter.
* New SlimeGuard anti-microbial treatment keeps your water fresh and taste-free.
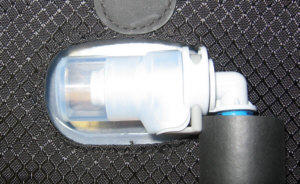
* D-Rings allow for attachment to kayak decks, backpacks or even car seats for road trips. | 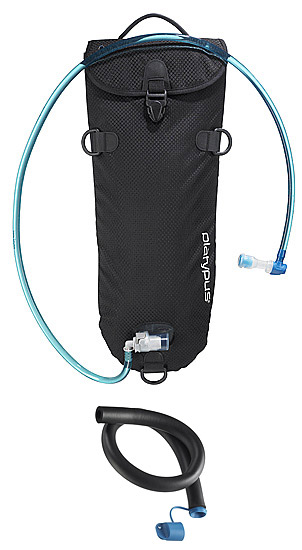 | | Platypus Insulator w/Tube Sleeve (courtesy Platypus Website |
|
LIMITED LIFETIME WARRANTY.
"All Platypus products are guaranteed against defects in materials and workmanship without time limit. Return shipping charges to the consumer for repaired products are covered. Should a product be found defective under this warranty, we will repair it or replace it at our option. "
INITIAL IMPRESSIONS - Nov 08
When the Platypus Insulator - for the rest of my report, I'll use "Insulator" to refer to the total system - arrived, I was pleasantly surprised to see a complete hydration system. I was expecting simply an insulation sleeve for my existing Platypus reservoir. Going back and re-reading the webpage about the Insulator, I can see now the Insulator is a complete hydration system, but I think it could have been more clearly stated on the website. A nice surprise, indeed!
The Insulator consists of a reservoir, in my case a 3 L (100 oz) Platy, a padded sleeve, the hydration tube with a padded sleeve on the hydration tube and a capped bite-valve.
The padded reservoir sleeve and hydration tube sleeve are black, the bite valve is blue and a white "platypus" is stamped vertically on the bottom right of the reservoir sleeve. The reservoir sleeve has a subtle checked pattern to it
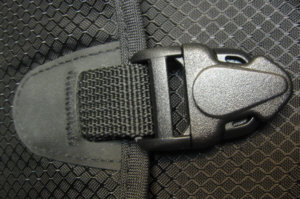 | | Insulator Clip Buckle |
| The back of the reservoir sleeve has a webbed, carrying handle with a rubber-like hand grip. The top of the reservoir sleeve had a 3 in (7.5 cm) fold over flap which fastens to the front of the sleeve plastic clip-type buckle. On either side of the front of the reservoir sleeve there is a plastic "D" ring. There is another "D" ring at the front bottom center of the sleeve. Just above the bottom "D" ring is a roughly 2 X 1 (3 x 2 cm) opening (for the hydration tube). |
| The Platypus reservoir is the standard clear and "made with a durable, multi-layer laminate of urethane and food-grade, taste-free polyethylene film." It has a blue "zipper" at the top and blue text giving graduated measurements down the right side of the bag. There is a thin white plastic handle on the top of the zipper. The Platypus name and logo also appear on the front of the bag, as well as the "Big Zip SL" and size (3L/100 oz) designation. At the front bottom center of the reservoir is the hydration tube connector. The location lines up perfectly with the reservoir sleeve. The connector has a push button to engage and disengage the hydration tube. | 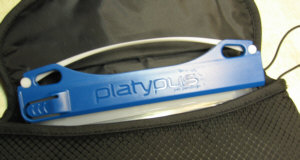 | | Zipper Closure on Reservoir |
|
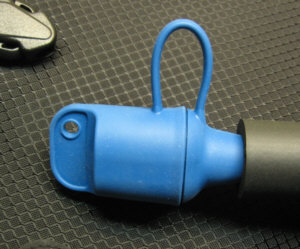 | | Insulator Bite Valve Cover |
| | The padded hydration tube measures 42 in (107 cm) from end to end. Adding the covered bite valve to it makes it 44 in (113 cm). The padded hydration tube is rather thick, almost 1 in (2.3 cm) in diameter and 3 in (7.5 cm) circumference.
The blue bite valve cover is attached to the hydration tube via a loop to prevent loss. |
READING THE INSTRUCTIONS
While there are no instructions included with the Insulator or on the retail hangtag, the Platypus website has a helpful FAQ section which answered any questions I had, most importantly on the care and maintenance of the Platypus reservoirs. I couldn't find anything at all regarding the Insulator itself.
To clean the Platypus reservoir, it is advised for me to "use hot, soapy water and rinse thoroughly with hot water." For tougher cleaning jobs, adding 1/4 cup of baking soda to 3/4 cup of water and shaking for 30 seconds is suggested. Followed by adding 1/4 cup lemon juice, shaking 10 seconds. Venting by loosening cap away from face is necessary to relieve pressure. It is recommended to repeat these steps three times, expel as much air as possible, cap bottle, and allow the reservoir to soak 20 minutes. Next, Platypus instructions call for rinsing three times with hot water. A "Caution" is stated: "When adding lemon juice to baking soda, effervescence occurs and will cause pressure to build in a capped Platypus."
To dry; the Platypus reservoirs can be "dried by blowing a little air into them and letting them stand uncapped until the water evaporates." The Big Zip reservoir which is included in the Insulator can be dried with a dishtowel through the large opening. Of course, the reservoirs can always be propped open with a spoon or other utensil to air dry.
The website FAQ also has helpful easy to read and understand instructions on disinfection, boiling, freezing and using the Platypus reservoir. There is also a very good section on hydration, in general. Again, there is no mention of the Insulator.
Only one addition piece of advice is offered. "Slide shut to secure. Invert to test." This is the only instruction on how to use the zipper closure and is printed on the reservoir itself.
TRYING IT OUT
Checking out the Insulator, I found all materials to be well made with no loose seams, threads, snags, holes or any other imperfections. While some of the connecting parts were very tight or stiff, I was still able to open and close, connect and disconnect them all. I will be interested to see if these parts loosen up over time.
For example: the overflap on the Insulator closes with a plastic clip bucket and it is fairly small and very tight. I wonder if I will be able to manage it when it's cold out or with gloves on in the field. Then, there is the zip lock closure on the reservoir which works on the same principle as common food storage bags. A blue plastic handle slides across the top of the reservoir to seal it tight. Until I tried it a couple of times, the zipper felt very sticky and stiff. I think I've got the hang of it now though. The hydration tube connector (to the reservoir itself) clips in solidly and there's something I hope never loosens up. All in all, I feel reasonably secure about the Insulator's construction and ability to keep my liquids where they belong.
I found when filling the reservoir I need to be careful about balancing the bag. An older model Platypus I own has folds in the bottom so I can actually stand the reservoir on its end while filling and when filled to capacity. This model cannot do that. However, I filled the reservoir up easily thanks to the big opening (6 in/15 cm). The zip closure worked like a charm.
 | | Hydration Tube Connection |
| Despite my misgivings about the fit of the filled Platy into the Insulator, it slid right down into the Insulator. The smooth interior fabric plus the weight of the water made quick work of settling the reservoir into the bottom of the bag. The hydration tube connector matched up with the opening in the Insulator and one push of the hydration tube connecting end and "voila!" the Insulator was ready to pack into my backpack. |
With the insulating material encasing the hydration tube, it is rather thick. I had some concerns as to whether or not I would be able to thread the tube through the hydration ports on my backpacks. My favorite Burton pack probably has the smallest opening, only 1 in (2.5 cm), so that was my first challenge. Try as I might, I could not get the insulated bite valve through the port. Removing the bite valve cover, I was able to barely thread the valve through and then work the cover through separately. I had no trouble at all with the larger (almost 2 in/4.7 cm) hydration port of my Lowe Alpine Summit 65+15 backpack, though.
Now that I have my Insulator loaded, I'm ready for colder weather. Bring it on!
SUMMARY
This concludes my Initial Report of the Platypus Insulator. Please see below for the results of my first two months' testing of this product.
FIELD REPORT
FIELD LOCATIONS/CONDITIONS - Feb 09
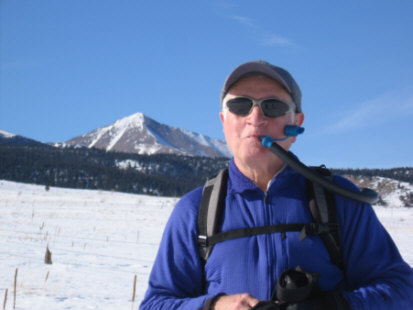 | | Using the Platypus in the Sangres |
| Well it's been a warm winter here in our area of Colorado. The Arkansas River had absolutely no ice on it at all this year. Usually, as the river flows through our town of Canon City, CO., I see ice along the banks and ice chunks floating down from the mountains. Not this year. The river has just been flowing nicely with no sign of any ice at all.
However, there have been a few nights in my county where I was able to test the Platypus Insulator overnight while camping along the trail. I had to travel north to Mount Evans and west to the Leadville area to get some treks in where the daytime temps were below freezing and the night temps went below 0 F (-18 C). The humidity in all the areas I used this hydration system probably never got over 40%. |
Location 1 - Fremont County, CO - Altitude 5,703 ft (1,740 m) above sea level on Cooper Mountain
Location 2 - Westcliffe, CO - Altitude 9,300 ft (2,835 m) above sea level in the Sangre de Cristo Range
Location 3 - Clear Creek, CO - Altitude 11,300 ft (3,444 m) above sea level on Mount Evans
Location 4 - Leadville, CO - Altitude 10,000 ft (3,200 m) above sea level at Ski Cooper
PERFORMANCE IN THE FIELD
Getting ready:
Filling the reservoir from a water tap is pretty easy. I was able to unzip the top (it opens and closes like a large zip lock bag), put the kitchen faucet into the mouth of the bag and fill it up. The challenge is that this bag is very difficult to fill from anything else, like another water bottle or a pot of boiled water. It will not stand up on its own and the opening wants to keep closing. It's not difficult if someone else can pour the water into the bag and I can hold the bag upright and keep the opening open. Doing it alone requires some dexterity and some hope that I do not spill liquid all over myself. Since the bag gets heavier, of course, as liquid is added, it becomes more difficult towards the end. As I write this, I had a brilliant idea that I need to try later in this test. Bring a funnel! Or maybe, something to hold the top open while I pour liquid in. I'll see if that works.
I've been filling the reservoir to about an inch (3 cm) below the top. I never fill a reservoir completely full to avoid putting too much pressure on gaskets. For winter use, the extra air space allows for backflow to work better when blowing into the feed line to clear it out.
The fittings have never leaked on me; something which I dread in cold weather.
It's quite easy to get the reservoir into the insulator pouch. Platypus put a very nice handle on the bag, so I can just open the pouch with the top flap open, pick the reservoir up by the handle and slide it right into the insulator.
I used an old Burton pack that has become one of my favorites because it works so well with strapping on snow shoes. I also used a Lowe Alpine Summit pack. In both cases, because of its size, the bite valve cover had to be flipped off the bite valve and passed through the bag's hydration pack feed line opening prior to passing the bite valve through (it's connected to the bite valve with a tether made from the same material as the bite valve cover). Because the insulator material on the feed line tube is thick, the feed line needs some pushing and pulling to get it in and out of these packs. The nice part is that it stays put where I want it. So I was able to position the tube and know it was going to stay where I wanted it to.
In the field:
As an engineer I studied thermodynamics and heat transfer. I learned that unless there is a secondary source of heat, all things will come to ambient temperature eventually. I also learned that the second law of thermodynamics states that heat moves toward cold. Insulating a pouch full of water will keep the water's temperature from transferring out for a certain amount of time, just like insulation in the walls of a house will keep it warm inside for a period of time when the furnace goes off. I don't have the engineering specifications on the insulator pack, but the results in the field will vary based upon the temperature of the water placed in the bag, the environment the bag is placed in, and the ambient air temperature. Every instance is different. including the dew point and humidity. So what works for me, may not work for someone else.
With both packs I had to position the bite valve under the shoulder strap. Of course, this helped insulate more and kept the valve closer to me.
In all cases, the reservoir was filled with room temperature water to start when we started trekking. I always exposed as little feed line as possible to avoid freezing and always blew into the tube after sipping when the temp was below 30 F (-1 C).
Location 1
We started out at about 33 F (.6 C) and the night time temp reached down to 17 F (-8 C). During the day, I had no issues at all. In fact, there were times I forgot to blowback and I still had no issues with anything freezing. Because the feed line is so thick, it did not fit into either backpack's shoulder strap hydration feed line holder.
At night, I removed the reservoir from its insulator and put the reservoir inside my sleeping bag at the foot of the bag. That kept it from freezing and probably warmed up the water as well. No issues at all with freezing. In the morning, after I used some water for cooking, I then put the reservoir back into the pack.
With less water in the pack, there is less thermal mass, and with less thermal mass, heat transfer happens faster. Fortunately, our morning was sunny. With the sun hitting the pack with the reservoir inside, I had no issues at all with any freezing.
Location 2
This was a snowshoeing day trek of several hours. We started out at 24 F (-4 C) and finished up at 18 F (-8 C). The reservoir was filled up at home before we left and was sitting in the rear of the car for about 2 hours until we put the gear on to snowshoe. I used the smaller Burton pack for this trek. Again, as little feed line out of the pack as possible (at most 9 in. (23 cm) when sipping and always pushing it back in as far as I could when not in use. With the bite valve cover on, I experienced no freezing of the bite valve, the line, or the reservoir. The bite valve did "crunch" when used, which to me indicates that it was frosting up, but I was always able to use it and get a drink. No issues with landing on the pack either, since I did tumble onto the pack when I tripped over my own feet taking a steep snow bank downhill.
Location 3
This was also a snowshoeing trek for a few miles/kilometers at -1 F (-18 C) with wind-chills at about -25 F (-32 C). Although wind-chill, by definition based on the cooling of human skin, does not have an effect on a backpack, what causes the wind-chill, the blowing wind, will cool things faster, just like when I blow on hot soup to cool it off. After 3 hours of exposure to this environment, the reservoir did not freeze and the tube and bite valve did not freeze. Again, I was always keeping exposure of the feed line to the air at a minimum. The bite valve did get crunchy again, but always worked.
Location 4
This was another snowshoe trek for several miles/kilometers at night, with an overnight. The temp when we started was 28 F (-2 C) and went down to 14 F (-10 C). Using the smaller Burton pack and the same procedures, the reservoir, feed line and bite valve never froze, but the exposed part of the bite valve did get crunchy again. Just for kicks, I left the backpack in the tent and did not take it into the sleeping bag with me. In the morning the feed line and bite valve were frozen, but not so solid that I couldn't bend the tube to break up the ice. I estimate about 30% of the reservoir had frozen in sections and the frozen parts were not connected. Since the morning sun was bright and hitting my pack, and since I was able to break up the ice in the frozen feed line by flexing the line, I was able to use the hydration pack within an hour or so. Granted, it was refreshingly cold drinking water, but it was usable.
SUMMARY
The Platypus Hydration Insulator pack is going to give its reservoir use that extra edge and a little more time when dealing with trying to avoid a frozen hydration pack and feed line. It doesn't create any heat. It just insulates a little more than not having any insulation at all. However, using the pack with careful planning can help extend the time before its contents will freeze. The most vulnerable part of the system is any portion exposed to outside air. Keeping as much of the feed line and bite valve in the pack or close to my body will keep the parts just that much warmer and stop heat transfer.
The reservoir itself is hard to fill, especially when wearing gloves. It won't stand up because of its round bottom and the filler opening tends to close up and needs to be manually held open (think about filling a zip lock bag), so extra hands are needed or a great deal of dexterity.
It may not fit through all feed line exit holes in all packs.
On another note, I have left the backpack in my car overnight at times at temps down to 10 F (-12 C) and the reservoir has not frozen completely. In fact, some regular water bottles did not completely freeze. So I need to go back to my thermodynamics and see what is up with that. I am sure the R factor of my Subaru Outback is quite low and that a night at these temps would take the interior pretty much down to equally cold readings as outside the vehicle. I need to try this again and put a thermometer in the car to see if there is a huge difference. Just for kicks.
Look for some empirical testing in the final report. I'll try and determine numerically the added amount of time the system gains with insulation and without. That should be fun.
This concludes my Field Report of the Platypus Insulator. Please see below for the results of my next two months' testing of this product.
LONG-TERM REPORT
LONG-TERM TEST LOCATIONS AND CONDITIONS
Here in Colorado this year we have had very mild winter weather. We had planned on getting more snowshoeing in, but even at the higher elevations there wasn't much cold weather down our way in the southern part of the state. We just had a spring snowstorm that was on everyone's radar for 10 to 12 in (25 to 30 cm) that just fizzled out and dropped barely a dusting.
So here is where we were able to get to over the past 4 weeks:
Location 1 - Sangre De Cristo mountain range - west of Westcliffe, Colorado about 9,000 ft (2743 m) above sea level. Using different trails on 2 different snowshoe treks about 2 or 3 mi (3-5 km) each. Temperature ranged from 5 F (-15 C) to 22 F (-6 C).
Location 2 - Ridgway, Colorado about 7,000 ft (2,133 m) above sea level on a 7 mi (11 km) trek on rock, sand, mud and snow. Temperature ranged from 5 F (-15 C) to 22 F (-6 C).
Location 3 - Canon City, Colorado at 5,635 ft (1,718 m) with temperature at 76 F (24.4 C) bushwhacking through the Cooper Mountain range.
Unfortunately, this report ends before I can test in summer, when temps get up to 120 F (49 C) at times.
PERFORMANCE IN THE FIELD
On cold days' treks, I had no issues with the Insulator reservoir or feed tube freezing up. As long as I can keep the feed tube and bite valve from being too exposed to below freezing ambient temperatures, I can get water out. I have been running as much of the feed line into my jacket and underlayers as I could. There may be a 3 or 4 in (8 to 10 cm) section of the feed tube exposed as it runs out of my pack, across my shoulder and down into my layers. However, the warming of the feedline from my body keeps the entire tube thawed at the temps I've been using it in.
I just get paranoid about the bite valve dripping water under my layers and getting me wet. Fortunately, that did not happen. I always checked the valve to be sure it looked sealed and shook it to make sure it was not going to drip. THEN I stuck it inside under my layers.
I've found a good practice is to blow the water back into the reservoir after each drink as recommended by the manufacturer. This not only warms up the interior of the feedline with my breath, but removes water, which will transfer heat faster than air. Here in Colorado, where the humidity is 20% or less most of the time, blowing back into the tube didn't create much condensation or mist which can freeze up the bite valve really quickly when exposed to below freezing temps.
On the treks in the Sangres I used room temperature water and nothing froze up. On the Canon Ridge treks I used cold tap water up to about 2 qt (2 l) and then poured in ice cubes to keep the contents cool since it was going to be sunny and around 76 F (24.4 C).
In addition, I decided a "laboratory" test would shed some light on the insulation qualities of the Platypus reservoir cover better than random field tests. It's nice to test in the field, but very difficult to get controlled results because each tester has different equipment in different environments. I wanted to know what the outside insulator bag added in time to a reservoir that did not have a bag. It would remove some of the assumption factor and I would have a real picture of what I can expect in the field.
These tests were done in a controlled environment using a freezer at 10 F (-12 C):
With the Insulator bag fully loaded with 3 qt (3 l) of tap water allowed to settle to room temp at 71 F (22 C). Air space of 2 in (5 cm) was kept at the top of the reservoir.
Feed line froze in 2 hours and 6 minutes to the point water could not pass.
Reservoir was showing no signs of freezing.
Reservoir contents went down to 52 F (11 C).
Putting the exact same configuration immediately outside in direct sun starting at 76 F (24 C) at noon Mountain Standard Time:
| Lapsed Time at Ambient Temperature | Measured Temperature | | 5 Minutes outdoors 76 F (24 C) | Insulator 56 F (13 C) | | 15 Minutes outdoors 76 F (24 C) | Insulator 58 F (13 C) | | 30 Minutes outdoors 76 F (24 C) | Insulator 60 F (16 C) | | 45 Minutes outdoors 80 F (27 C) | Insulator 61 F (16 C) | | 60 Minutes outdoors 81 F (27 C) | Insulator 62 F (17 C) | | 90 Minutes outdoors 82 F (28 C) | Insulator 63 F (17 C) | | 2 Hours outdoors 99 F (37 C) | Insulator 86 F (30 C) |
I allowed the entire configuration to settle back to room temperature at 71 F (22 C)
Then I removed the insulator material from the reservoir and feedline and put the reservoir and feedline back into the freezer at 10 F (-12 C) to see what the difference would be.
The feed tube froze in 1 hour and 18 minutes. That's 78 minutes vs. 126 minutes with the insulator on the tube. A lot more than I would have expected on a static test.
The reservoir content was at 38 F (3.3 C). That's 14 F (6.7 C) lower, 48 minutes faster.
Putting this exact same configuration immediately outside in direct sun starting at 82 F (28 C) at 4:30PM Mountain Standard Time:
| Lapsed Time at Ambient Temperature | Measured Temperature | | 5 Minutes outdoors 82 F (28 C) | Insulator 43 F (6 C) | | 15 Minutes outdoors 82 F (28 C) | Insulator 55 F (13 C) | | 30 Minutes outdoors 82 F (28 C) | Insulator 64 F (18 C) | | 45 Minutes outdoors 80 F (27 C) | Insulator 73 F (23 C) | | 60 Minutes outdoors 80 F (27 C) | Insulator 77 F (25 C) | | 90 Minutes outdoors 78 F (26 C) | Insulator 78 F (26 C) | | 2 Hours outdoors 75 F (24 C) | Insulator 76 F (24 C) |
Thus, it appears the Insulator actually does insulate.
More than water?
This reservoir from Platypus will handle just about any liquid I can get into it. Hot or cold. I know it is not a good idea to put a thick milk based product, like hot cocoa, in the reservoir because the mixture will be very difficult to clean as the thick powder and milk harden. My concern would be cleaning the valves.
However, I used energy powder add-ins (designed for hydration systems), herbal tea and white wine (In my book, red wine can stain and I'm not going to take that chance). What I used cleaned up well. I am rather a stickler for odors, so I rinsed well and often until I could not smell the previous contents or the cleaning solution. I did not test this empirically, but Platypus says that when I use powder type add-ins I can actually reduce the freezing temperature of the reservoir, but that will, of course, vary. I guess if it was 100% powder it would never freeze.
Results in the field
All through location 1 and location 2 activity, nothing froze up at all. Mostly because the exposure was only for maybe 6 hours at most on these treks and because I kept the feedline and bite valve covered under my layers.
On location 3, the Platypus Insulator reservoir kept the contents cold and only maybe 1/2 of the ice melted away. I kept the feed line on the outside, passing the tube under my pack strap because, even though my Burton has a hydration clip, it won't fit around the hefty insulated tube. The air temp was less than what my body temp would be even under the light layer I was wearing, and the objective was to keep the enhanced water (I used a powder mix on this trek) cool.
SUMMARY
Without having exactly the same configuration in exactly the same backpack with exactly the same contents, sipped at and used exactly the same way on each trek, coming up with accurate and meaningful comparative results is not possible. From the field tests I can report that it appears the Platypus Insulator is better than having no insulator at all. Insulation in my pack occurs naturally just by putting in clothes and gear. But, when I remove the reservoir and use the feedline, exposing those items to the elements can rapidly cause a temperature change of the contents. So insulation that is part of the hydration's system makes moving it around easier and allows me to have some standard timing elements to work with.
The insulation on the reservoir and feedline can be thought of as a "diver's wet suit", except that humans generate heat, while the contents of a hydration pack only loses heat in winter and gains heat in summer. The whole idea is to stop heat transfer to ambient temperature as much as possible.
I think that using the Platypus Insulator in a heavily loaded pack adds minimal heat transfer protection, although anything more is an improvement, even if slight. I think when used as a stand-alone system, such as for mountain biking, climbing, etc. where the hydration system is not used in conjunction with a backpack, the reduction in heat transfer is significant over a bare reservoir and feedline. For the additional cost, adding this extra layer appears well worth it, especially since in humid areas, having the Insulator on will eliminate condensation drips and a wet back and backpack interior (especially when hiking in hot weather with an ice filled reservoir). I just can not expect the Insulator to do miracles and keep water from ever freezing and ice from ever melting.
My suggestions to the manufacturer for improvement: I would like to see Platypus include a clip of some sort to allow me to clip the bite valve to one of my under layers. It would also be very nice to have the reservoir stand up on its own to make filing it easier.
Also, it would be very useful for shell designers to have a winter feedline hole to allow me to pass through the feedline from my pack but that is a different test.
My sincere thanks to BackpackGearTest.org and Cascade Designs for the opportunity to test this hydration system.
John R. Waters
This report was created with the BackpackGearTest.org Report Writer Version 1.
Copyright 2009. All rights reserved.
Read more reviews of Platypus Hydration gear
Read more gear reviews by John Waters
|


