Platypus Insulator Hydration System
Test Series by Kurt Papke
Tester Information
| Name: |
Kurt Papke |
| Age: |
55 |
| Gender: |
Male |
| Height: |
6' 4" (193 cm) |
| Weight: |
220 lbs (100 kg) |
| Email address: |
kwpapke at gmail dot com |
| City, State, Country: |
Minneapolis, Minnesota USA |
Backpacking background: mostly in Minnesota - I have hiked all of the
Superior
Hiking Trail and Border Route.
My preferred/typical backpack trip is one week, mostly in the
Spring/Fall
seasons. I do periodic day hiking in
Michigan, Wisconsin, Utah,
Colorado and Oregon. I do a fair amount of Winter snowshoeing and
cross-country skiing, so keeping hydrated in cold weather is important
to me.
Initial Report - November 28, 2008
The Platypus Insulator is an insulated water reservoir and drinking
tube designed to keep water cool in the hot sun, and more importantly
for me, to keep water from freezing during outdoor Winter
activities. It is essentially an insulated Platypus Big Zip SL reservoir and drinking
tube.
Product Information
| Manufacturer: |
Cascade
Designs, Inc. |
| Year of manufacture: |
2008 |
| Manufacturer website: |
http://www.platypushydration.com/ |
|
Listed
(Product label)
|
Listed
(Website)
|
Big
Zip SL Listed
(Website)
|
Measured
|
Reservoir
Capacity
|
100 oz
(3 l)
|
100 oz
(3.0 l)
|
100 oz
(3.0 l) |
109 oz
(3.225 l)
|
Dimensions
|
8 x 21 in
(20 x 53 cm)
|
7.75 x 18.75 in
(19.5 x 47.5 cm)
|
7.5 x 17 in
(19 x 53 cm)
|
8.25 x 18.5 in
(21 x 47 cm)
|
Weight
|
5.4 oz
(152 g)
|
Not listed
|
4.5 oz
(135 g)
|
13.1 oz
(370 g)
|
Dimension discrepancy: the difference between the listed product
label and measured length for the reservoir is substantial -- 2.5 in
(64 mm) In fact the dimensions from the website were closer to my
measurements. I thought perhaps the difference was that the
manufacturer measured the reservoir with the top flap open, but that is
22 in (56 cm). The only way I could come up with 21 in (53 cm)
was to measure from the top of the stretched handle to the bottom of
D-ring, with the latter extended downward. I will stick with my
measured length above, as that is the practical limit for fitting the
insulated reservoir into a hydration sleeve. There are some
significant discrepancies between the listed
dimensions on the product label and on their website, and the website
has an entry labeled "Weight:", but it is missing a value.
The weight discrepancy between the label and measured value is even
larger - a factor of approximately
2.5:1. I added a column in the table for the listed specs for
the Big Zip SL reservoir-only, this should be the specs for the
Insulator reservoir and tube without the insulation. The listed
weight for the uninsulated reservoir is quite close to the listed
weight of the Insulator, but still off by approximately 20%.
The manufacturer's specs for this product are a mess.
Product Description
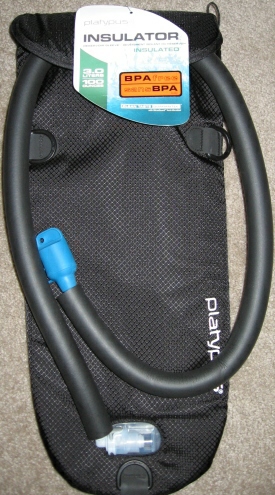 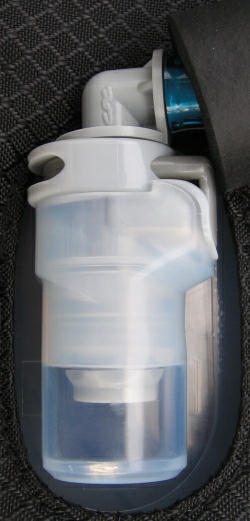 The
picture to the left is the front view of the Insulator. The three
D-rings on the left, right and bottom are readily visible. The
insulated hose is coiled in a loop with the blue bite valve cap at
left. The only portion of the reservoir visible in the photo is
the supply hose fitting just above the bottom D-ring. A closeup
of the fitting is shown at right. Not visible beneath the label
at the top is the insulation flap closure buckle. The
picture to the left is the front view of the Insulator. The three
D-rings on the left, right and bottom are readily visible. The
insulated hose is coiled in a loop with the blue bite valve cap at
left. The only portion of the reservoir visible in the photo is
the supply hose fitting just above the bottom D-ring. A closeup
of the fitting is shown at right. Not visible beneath the label
at the top is the insulation flap closure buckle.
The sleeve insulation appears to be foam with a silnylon cover.
The supply tube insulation seems to be neoprene, with no fabric
cover. The supply tube insulation is approximately 0.25 in (6.3
mm) thick, and the sleeve insulation slight less, though its thickness
is difficult to measure with the fabric cover.
The statement of "BPA free" is readily legible on the label at the top
of the photo. There is a claim near the bottom of the label for
the SlimeGuard anti-microbial
used to
preserve water taste which is not legible in the photo. On the
backside of the label are the
product features and specifications. No instructions were
supplied with the unit.
The back of the unit looks similar, without the hose fitting of
course. The sleeve also has a webbing/rubber handle, allowing the
Insulator to be comfortably carried. On the bottom of the sleeve
back is
a small drain hole.
The reservoir can be removed from the Insulator by disconnecting the
supply hose from the fitting, unbuckling and opening the flap, and
lifting it out. When I tried this, it slid out
nicely. The supply hose is disconnected by pressing on the
gray button shown in the closeup on the right. When I tried this,
the button depressed with a moderate amount of effort, and the hose
popped right off. When the hose is disconnected a valve closes in
the fitting preventing fluids from draining out of the reservoir.
This should make it easier to carry the reservoir to a body of water
for filling without dragging the bite valve and supply tube on the
ground.
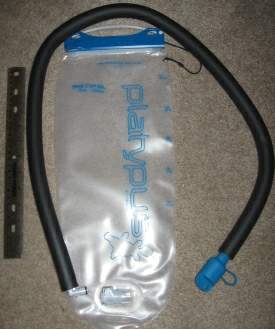  The reservoir
is shown removed from the insulated sleeve and disconnected from the
supply tube in the photo at left with a 12 inch (30 cm) ruler on the
side for scale. Visible on the right of the reservoir are the
fill gradations, in 0.5 l (17 oz) increments. The reservoir
is shown removed from the insulated sleeve and disconnected from the
supply tube in the photo at left with a 12 inch (30 cm) ruler on the
side for scale. Visible on the right of the reservoir are the
fill gradations, in 0.5 l (17 oz) increments.
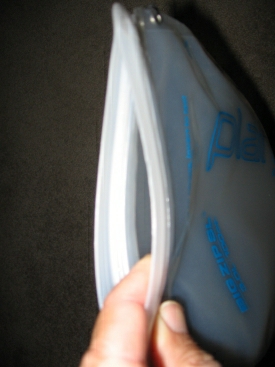
On the top of the reservoir is the blue SlideLock closure and a white
plastic carrying strap for the reservoir itself. To the right of
the SlideLock is a black elastic cord which attaches the removable
SlideLock to the reservoir body. It is good Platypus made this
cord elastic -- every time I open the SlideLock I overshoot and the
elastic cord is very forgiving.
The picture at right shows the reservoir with the SlideLock removed,
and the top opened for filling or draining. The top closure is
similar to a ziplock-style bag, but more heavy-duty. The blue
SlideLock piece keeps the top from accidentally opening. When I
filled the reservoir to capacity, dried it off and held it upside down
I could observe no leakage from the top closure.
Initial Impressions
Backpack
Hydration Sleeve Compatibility
I use my hydration reservoirs
in a variety of backpacks, and have experienced problems with
reservoirs fitting properly. I don't know whether to blame this
on the backpack manufacturers or the hydration system manufacturers,
but nonetheless it is an important issue for me. One of the first
things I did with the Insulator is attempt to fit it into the sleeve of
three backpacks.
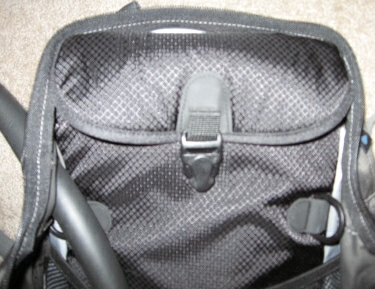 At left is a photo of the Insulator
installed in the hydration sleeve of my REI Traverse daypack.
This is my main pack for single-day trips. It has a good-sized
sleeve and dual supply tube ports. At left is a photo of the Insulator
installed in the hydration sleeve of my REI Traverse daypack.
This is my main pack for single-day trips. It has a good-sized
sleeve and dual supply tube ports.
The Insulator fits just exactly. I was able to zip the top of the
pack closed with no problems, though it was snug. There was no
need to hang the reservoir from the pack hooks due to the snug fit.
The supply tube is shown threaded through the port on the left side of
the photo. Surprisingly, the bite valve cap went through the port
with no problems.
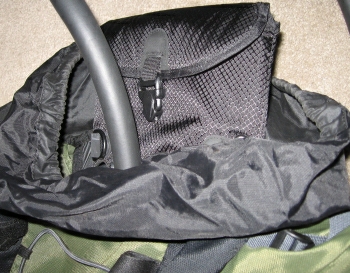 At right is a photo of my attempt to
install the Insulator in my Mountainsmith
Boundary backpack. See my review of this pack on
BackpackGearTest.org. Noted in my review is the fact that this
pack has a hydration sleeve that is much too small for the tall
Platypus reservoirs, and in fact the Insulator doesn't come close to
fitting. It sticks out over 6 in (14
cm). At right is a photo of my attempt to
install the Insulator in my Mountainsmith
Boundary backpack. See my review of this pack on
BackpackGearTest.org. Noted in my review is the fact that this
pack has a hydration sleeve that is much too small for the tall
Platypus reservoirs, and in fact the Insulator doesn't come close to
fitting. It sticks out over 6 in (14
cm).
I have used my 3 l (100 oz) Platy Hoser reservoir in this pack before,
but it
has no insulation, and I was able to fold it over to get it to fit
reasonably. I would not want to fold the Insulator and damage it,
nor was it easy to fold when I tried it.
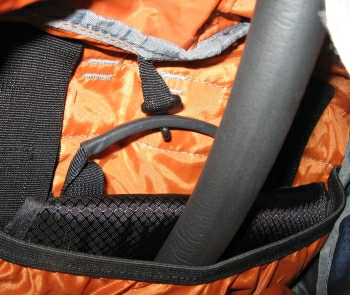 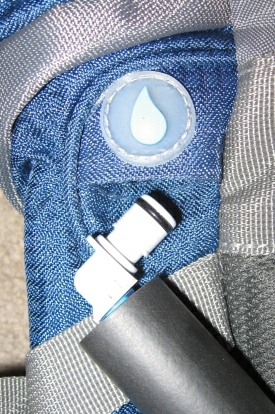 On the left is a photo of the Insulator installed in my Sierra Long Trail 90 backpack.
This pack, as noted in my test report on BackpackGearTest.org, has a
capacious hydration sleeve and the Insulator fit with plenty of room to
spare. On the left is a photo of the Insulator installed in my Sierra Long Trail 90 backpack.
This pack, as noted in my test report on BackpackGearTest.org, has a
capacious hydration sleeve and the Insulator fit with plenty of room to
spare.
Visible in the top center is the handle of the Insulator hanging on the
lone hydration reservoir hook in the Long Trail 90. It seemed to
stay on the hook, but time will tell if it stays there.
In the photo at right is the disconnected end of the supply tube
getting ready to be fed through the hydration port on the Long Trail
90. The insulated bite valve did not
fit through the port, so I had to disconnect it and feed the fitting
end through. This worked just fine. The supply tube
insulation was snug in the port, but fed through with no problems.
Drinking
Platypus claims the HyperFlow
bite valve on the Big Zip "offers the
highest flow rate on the market", though I was not find any data
to substantiate this claim. My first few sips from the reservoir
suggest that indeed there is very little flow resistance from the valve.
As can be seen in some of the earlier photos in this report, the bite
valve is covered by a molded plastic cap, the cover of which is held in
place with a raised flange. The cap pops off pretty easily at
room temperature, but experience will tell if that ease is maintained
at cold temperatures with gloves on.
The bite valve does not come with a clip, but the cover described in
the
preceding paragraph has a hole in it ostensibly for fastening to a
shoulder strap.
Concerns
I have tested one other hydration system with a supply tube fitting
that is
not totally dissimilar to the one on the Insulator. The other one
leaked badly even after replacing the gasket, and eventually I had to
Superglue it shut. The Insulator fitting benefits from having the
supply tube insulation as a stress relief mechanism which should
prevent too much force being applied to the fitting causing
failure. This is certainly something I'm going to be keeping my
eye on in the next four months.
Pleasant Surprises
This seems like a very complete insulation system: the supply tube
insulation seems really beefy, and the bite valve cap looks like it should be
effective. I look forward to testing their performance in the
field.
This concludes my Initial Report on the Platypus Insulator Hydration
System.
Field Report - February 10, 2009
One of the items I neglected to put into my Initial Report is the
functionality in the Insulator for draining the supply tube in the
field. Despite the insulation, it is important at cold
temperatures particularly at night, to drain the supply tube so it does
not freeze solid. The good news is the Insulator makes this
simple: I just detach the tube from the reservoir and suck the water
out of the system. The valve on the connector prevents the water
from draining from the tube when disconnected, but does not prevent
water/air suction up the tube. Using this feature in the field is
not always simple, as disconnecting the supply tube from
the reservoir when it is packed in my backpack
requires removing most of the items in my main pack
compartment to access the reservoir. This constraint of course is
true of any hydration reservoir with a removable supply tube, and not
unique to the Insulator.
Taste Test
Just after filing my Initial Report I filled the Insulator reservoir
with tap water, took a drink to make sure the supply tube was filled
with water, and let the system sit with no activity for over two
weeks. When I took several drinks from the system at the
conclusion of this two-week period I could detect no off-tastes.
Though it is unusual for me to leave water in a hydration system for
extended periods, it's nice to know that it does not impart any flavor
to the water that I could detect.
Field Locations/Conditions
Dates
|
December 8-10, 2008
|
January 11-13, 2009
|
Location
|
Superior
Hiking Trail along the Beaver Bay to Penn Creek section |
Superior Hiking Trail near Finland, Minnesota,
from Egge Lake to Leskinen Creek
|
Altitude
|
750 to 1250 ft (230 to 380 m) |
1322 ft to 1726 ft (400 m to 525 m)
|
Temperatures
|
Low of -2 F (-19 C) to a high of 15 F (-9 C) |
Low of -27 F (-33 C) to a high of 15 F (-9 C)
|
Terrain
|
Forested with rivers
Rolling hills with several steep ascents and descents |
Forested with lakes and rivers
Rolling hills with no steep ascents
|
Observations
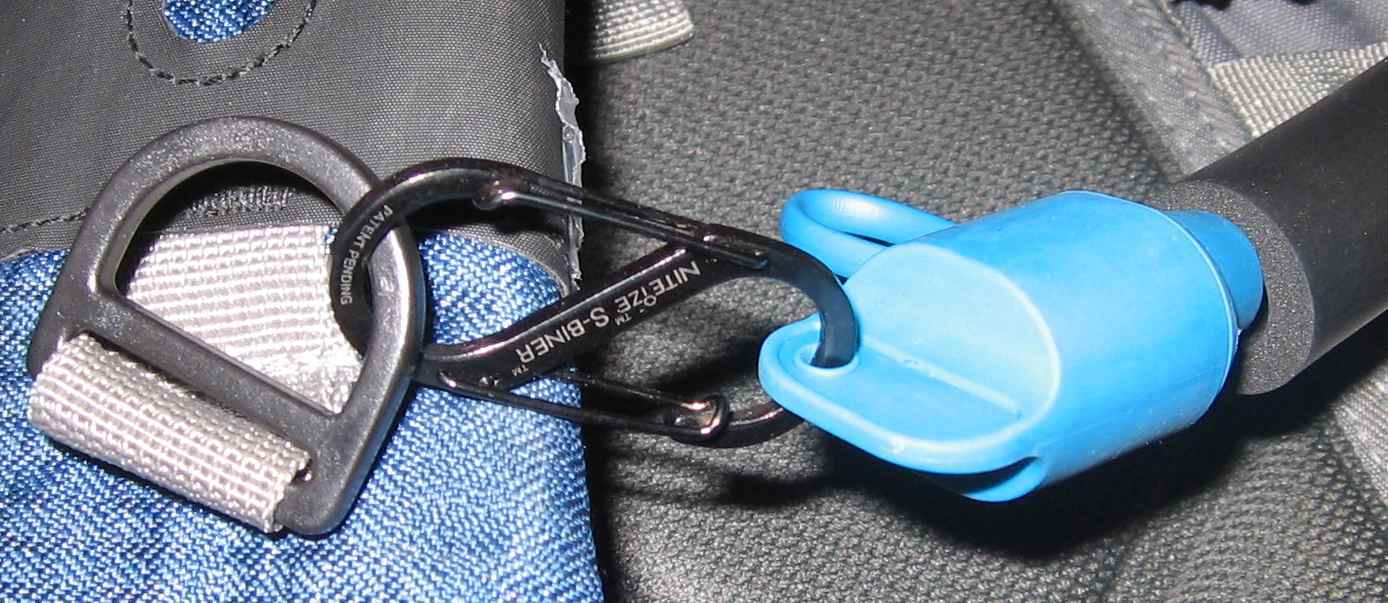
Since the Insulator does not come with standard hardware for attaching
the bite valve to my pack shoulder strap, I used a Nite Ize #2 S-Biner
as shown in the above photo. The hole in the bite valve cover
seemed like it would work great for this purpose. The S-Biner
allowed me to quickly
and easily detach the bite valve from my shoulder strap and move it to
my mouth. On subsequent hikes I found that clipping the hose to
the hole in the cap caused the cap to pop off, and I shifted to using
the cap strap just above the cap hole shown in the above photo.
That worked well as the S-Biner has much less mechanical advantage at
that attachment point, and the problems of the cap popping off
disappeared.
I had read the FAQ on the Platypus website, and one of their
recommendations for cold weather use is to blow any water in the supply
tube back into the reservoir after drinking to minimize the probability
of freezing. I attempted to do this before hitting the trail on
the December trip, but
the reservoir was quite full and tightly packed in the
hydration sleeve, so I was unable to develop enough mouth pressure to
push the water back out of the supply tube.
My first drink from the Insulator on the December trip was
approximately 90 minutes
after getting out of the car. The bite valve was completely frozen up
already, and I was unable to
thaw the valve/supply tube for the rest of the trip.
Despite being able to use the Insulator for hydration while in-motion,
I continued to use the insulated reservoir for water carrying and
storage.
On the January trip I was able to keep the supply tube from freezing up
the entire first day by under filling the reservoir and blowing the
water back into it at temperatures down to about 10 F (-12 C).
However, despite clearing the tube as best I could that night it froze
up and I was once again constrained to using the Insulator as a water
carrier for the rest of the trip.
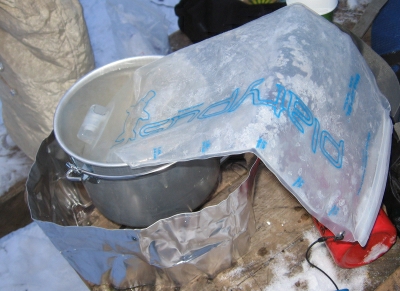 I
was impressed with how well the insulated reservoir kept water in
liquid
form during cold nights. On December night #1 I filled up the
reservoir
with warm water and stowed it in my pack out in the open. The
temperature dropped to 0 F (-18 C) that night, and the water in the
reservoir did not freeze, at least not solid. I was able to
extract enough water for breakfast, and while heating my morning
beverage the remaining water began to freeze, so I immersed the slushy
end of the reservoir in hot water as shown in the photo at left. I
was impressed with how well the insulated reservoir kept water in
liquid
form during cold nights. On December night #1 I filled up the
reservoir
with warm water and stowed it in my pack out in the open. The
temperature dropped to 0 F (-18 C) that night, and the water in the
reservoir did not freeze, at least not solid. I was able to
extract enough water for breakfast, and while heating my morning
beverage the remaining water began to freeze, so I immersed the slushy
end of the reservoir in hot water as shown in the photo at left.
On night #2 it was supposed to get even colder, and indeed the
temperature dropped to -2 F (-19 C). To prevent freezing, I hung
the Insulator from the ridge line of my hammock and kept it inside the
shelter. This worked very well, and I had no problems with slushy
water the next morning.
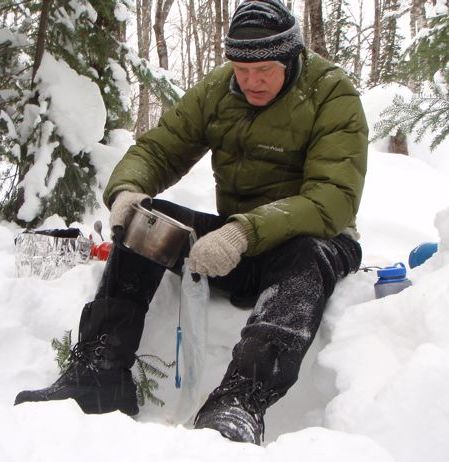 One of the activities I found I had
difficulty with was filling the
reservoir from my kettle (shown in photo at right from the January
trip), which I had to do since I was melting snow
for water on both trips. With its round bottom, it will not stand
up on its
own, so I had to use one hand to hold it up. The SlideLock
closure will also not remain open on its own, so it requires another
hand (or at
least some fingers) to prop it open. My third hand
(!) was used to pour the water from my kettle. I tried using
sticks and other items to prop it open, but nothing stayed in place
very well. Eventually I learned to hold the SlideLock open and
hold up the reservoir by inserting two fingers or my thumb into the
opening on one
of the ends of the SlideLock. This works, but if the water in the
kettle is very hot and my aim is poor this can result in scalded
fingers. One of the activities I found I had
difficulty with was filling the
reservoir from my kettle (shown in photo at right from the January
trip), which I had to do since I was melting snow
for water on both trips. With its round bottom, it will not stand
up on its
own, so I had to use one hand to hold it up. The SlideLock
closure will also not remain open on its own, so it requires another
hand (or at
least some fingers) to prop it open. My third hand
(!) was used to pour the water from my kettle. I tried using
sticks and other items to prop it open, but nothing stayed in place
very well. Eventually I learned to hold the SlideLock open and
hold up the reservoir by inserting two fingers or my thumb into the
opening on one
of the ends of the SlideLock. This works, but if the water in the
kettle is very hot and my aim is poor this can result in scalded
fingers.
Another difficulty I had was opening the insulation flap clasp while
wearing heavy gloves. The clasp is quite small, and I found I had
to
remove
my gloves to open the clasp and flap to remove the reservoir or for
filling. This was very uncomfortable in the cold. I believe
that gear that is intended for cold weather use should be designed to
be used with gloves on at all times if possible. This could be
accomplished with the Insulator simply by using a larger clasp.
The glove configuration shown in the photo at right did allow me to
open the clasp without removing anything. On this January trip I
used a stretch shell glove with wool gloves with no fingertips as a
second layer for camp chores.
Day Hikes
After my problems on the first backpacking trip I decided to experiment
more
locally on some day hikes.
Walk: Wednesday
December 17, Minnesota Landscape Arboretum in
Chanhassen, hiked about 6 miles (10 km). Altitude: 980 to 1100 ft
(300 to 335 m). Environment: 1 to 5 F (-17 to -15 C), light winds
0 to 7 mph (0 to 11 kph), sun was shining brightly. The Insulator
was carried in my REI Traverse pack as shown in the first photo above
in the Backpack Hydration Sleeve Compatibility section.
On this walk I drank approximately every 25 minutes, and after drinking
I blew the water back into the reservoir before putting the cap
on. When taking each drink, I noticed the bite valve was frozen
but
the small amount of ice thawed as soon as I bit down, and the supply
tube never froze up. I noticed I had to be careful not to bite
down too hard, as doing so would restrict the flow.
Walk: Monday December 21, location Minnesota River Valley in
Chanhassen, Minnesota, altitude 750 to 875 ft (230 to 267 m).
Temperature -14 to -5 F (-26 to -21 C), winds were negligible.
The Insulator
was carried in my REI Traverse pack. I was careful to blow the
water out of the hose before departure. I took my first sip of
water about 45 minutes into the hike, and the hose was frozen
preventing any flow.
Summary
The Insulator reservoir does not freeze up during the day in very cold
temperatures inside a backpack. It can be used to keep water from
freezing overnight if topped off with warm water before retiring.
The supply tube can be prevented from freezing for one day by blowing
the water
back into the reservoir after drinking, but the effectiveness of the
tube insulation is questionable. Once the tube freezes up it is
nearly impossible to thaw in the field, as it does not fit into a pot.
I can recommend the system for day hikes where it is unlikely to freeze
up, but not for overnight Winter backpacking. The 3 L (3.2 qt)
capacity is more suited for backpacking, so there seems to be a
mismatch between the capacity and the use to which it is best suited.
Likes:
- The reservoir insulation is very effective at keeping the stored
water from freezing at very cold temperatures.
- The insulation carrying handle is very handy for hanging the
reservoir inside a shelter for additional protection.
- The reservoir can tolerate being filled with hot water, as well
as being immersed in boiling water for thawing the contents.
- By carefully blowing all water out of the supply tube and by
drinking frequently I was able to use the Insulator at temperatures
above 0
F (-18 C) without supply tube freeze-up during the daytime.
Opportunities
for Improvement:
- The supply tube and bite valve insulation are ineffective.
I was shocked at how quickly it froze, and at temperatures below 0 F
(-18 C) I could not prevent the supply tube from immediately freezing.
- Make it easier to fill the reservoir from another hand-held
container. The reservoir should be able to stand up on its own,
and the opening should stay open and not require another hand to hold
it open.
- Make the insulation clasp large enough to operate with gloves on.
- A more robust bite valve shoulder strap attachment mechanism is
needed. Attaching to the bite valve cap makes the cap susceptible
to popping off.
This concludes my Field Report on the Platypus Insulator Hydration
System.
Long-Term Report
Field Locations/Conditions
Dates
|
February 12-14, 2009
|
March 1, 2009, 8AM to noon (dayhike)
|
March 6-8, 2009
|
March 28-April 4, 2009
|
Location
|
Porcupine Mountains Wilderness, Michigan Upper
Peninsula
|
Afton State Park, Minnesota |
Eagle Mountain in the Boundary Waters Canoe Area
Wilderness (BWCAW) in
northern Minnesota
|
Ozark Trail in south-central Missouri located in
the Mark Twain National Forest
|
Altitude
|
778 ft to 1600 ft (237 m to 490 m) |
650 ft to 1000 ft (200 m to 300 m)
|
1700 ft to 2297 ft (520 m to 700 m)
|
925 ft to 1650 ft (280 m to 500 m)
|
Distance
|
About 13 miles (21 km) on snowshoes
|
4.3 miles (6.9 km) on snow without snowshoes
|
8.8 miles (14.2 km) on snowshoes
|
91.3 miles (147 km) on foot
|
Temperatures
|
Nighttime lows of around 15 F (-9
C), daytime highs of 30 F (-1 C) |
The morning began around 0 F (-18 C) and climbed
to 20 F (-7 C) by noon
|
Nighttime lows of 15 F to 20 F (-9.4 C to -6.7
C), daytime highs of 25 F (-4 C) to 32 F (0 C). On March 7 it not
only warmed up to about the freezing point, we had strong spring
sunshine which had considerable warming power.
|
Coldest nighttime low was 26 F (-3 C), warmest
daytime high was about 70 F (21 C)
|
Terrain
|
Forested with lakes and
rivers. The trail was along an escarpment with some steep grades. |
Up-and-down topography, climbing out of the St
Croix river valley with some serious scrambling.
|
The first section was on rivers, lakes and
creekbeds, then a scrambling steep ascent of Eagle Mountain, followed
by a gradual descent on a Forest Service trail.
|
Heavily forested with oak and hickory.
Many streams, one lake. Continual climb & descent of Ozark
mountains.
|
Test Result
|
Froze up the first night
|
Stayed unfrozen throughout the morning hike
|
Froze up the first night, but thawed right
around noon the next day from exposure to the sun
|
Removed all insulation before departure.
No freeze-ups of any kind.
|
Observations
When I set out on the Porcupine Mountains trip I was really hopeful
that the Insulator was going to be more successful in keeping my water
from freezing up than previous outings. The predicted low
temperatures of this trip were supposed to be warmer than the highs of
my prior backpacking trips. Unfortunately, history repeated
itself.
On Day One I set out with a full reservoir. Snowshoeing up the
unbroken Escarpment Trail in 3-4 ft (1-1.3 M) of snow was hard work,
but the Insulator kept me well-hydrated. So far, so good.
That evening before retiring I did everything I could to clear the
supply hose. I detached it from the reservoir and sucked all the
water out and blew it out until I turned blue in the face. As far
as I could tell there was no remaining water that could freeze.
I was wrong. The next morning it was frozen up again, and I could
not even blow air through the hose. I put about 1 L (1 qt) of
warm water in the reservoir to use in camp that night to melt snow, and
filled up my insulated Nalgene for use during the day.
While snowshoe hiking about 6 miles (10 km) that day I struggled to
stay hydrated without the use of the Insulator. I melted snow and
replenished my 1 L (1 qt) Nalgene at lunchtime, and rehydrated in the
evening as best I could. Despite my best efforts I was headachy
all night long from dehydration.
Once again the Insulator reservoir did a great job of keeping my water
from freezing at night by just tossing it into my backpack underneath
whatever clothing I kept there at night.
The Afton State Park hike was a training outing conducted by the trip
leader of the BWCAW backpack trip the following weekend. It was
intended to assess participant conditioning and gear readiness for the
BWCAW. The morning started out very cold; I was concerned the
Insulator would freeze up. It did not, and I was able to stay
hydrated all morning long by sipping from the drinking tube. Of
the six hike participants, I was the only one using a hydration
reservoir. Everyone else relied on insulated Nalgene containers,
often struggling to reach their water container. A 1 L (1 qt)
Nalgene barely fits into most backpack water bottle pockets, but when
insulated they must be clipped to the side or back of the pack making
them impossible to reach. The other hikers asked someone to reach
their water bottle for them or took their packs off, while I smugly
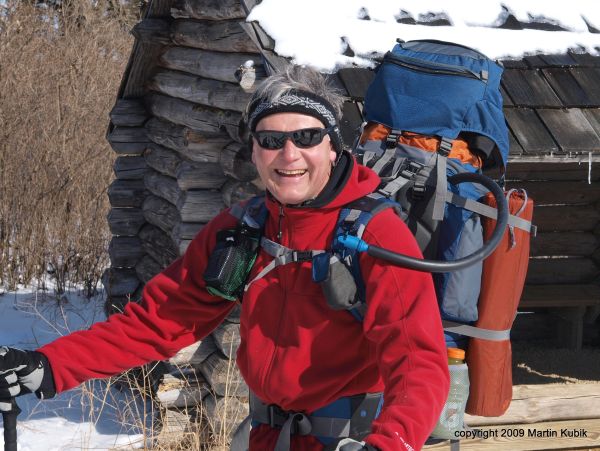
sipped from my drinking tube. Here's a photo of the Insulator at
a break during the hike:
Photo by Martin
Kubik
There were four participants in our Eagle Mountain trip to the
BWCAW. The leader was Martin Kubik, legendary Boundary Waters
hiker and father of the Kekekabic Trail. He advised me to "leave
the (expletive deleted) reservoir at home" because in his experience
reservoirs always freeze up in Minnesota winters, but I wanted to put
it to
the test and took it anyway. The result was mixed. The
supply hose froze up on the first night, but actually thawed out in the
sunshine on Saturday around noon. This was handy, as we were just
getting ready to ascend Eagle Mountain. Martin belatedly admitted
that the "radiator hose" was actually pretty handy in this kind of
terrain, where stopping to take off your backpack to take a drink was
difficult. I was able to stay hydrated easily during the long
ascent, where my companions had to work a lot harder to reach their
water bottles. Finally, I
felt that my many hours and miles of carrying the Insulator in winter
conditions paid off! Here's a pic of the Insulator on the way up
the mountain:
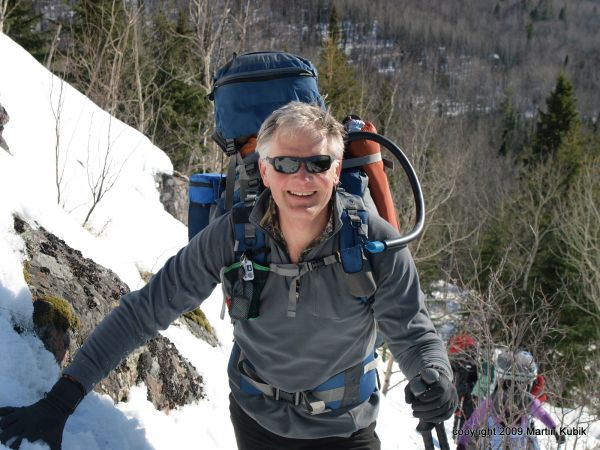 Photo
Photo by Martin
Kubik
For the Ozark Trail hike weather predictions were for a few
sub-freezing nights, but quite warm spring days. I decided to
lighten up and remove bulk by removing all the insulation. I had
no problems with any freezing problems on this trip.
Summary
I don't see any way of keeping the Insulator supply hose from blocking
with ice up at night in freezing conditions without sleeping with it in
my shelter. I am unwilling to put it inside my sleeping bag for
fear that water from it will drain during the night and degrade the
insulating properties of my bag. As a result, I cannot recommend
this system for overnight backpacking hydration in freezing conditions
unless, as my experience on Eagle Mountain showed, daytime temperatures
and sun exposure are such that thawing during the day is possible and
acceptable.
I can heartily recommend the system for day hikes in temperatures above
0 F (-18 C). At these temperatures with a little care in blowing
the supply hose water back into the reservoir after every drink, the
Platypus Insulator can be an effective piece of gear for all-day
hydration.
I appreciated the flexibility of being able to remove all the
insulation for warm-weather use. This allowed me to use the
reservoir and supply tube in all types of warmer weather.
See my list of likes and opportunities for
improvement in my Field Report for additional summary information.
Likes:
- Ability to stay hydrated on an all-day winter hike.
- No mechanical failures of any kind, particularly no leaks from
the seal and fittings. I've owned several hydration reservoirs
that leaked, but I feel I can rely on the Insulator.
Opportunities for improvement:
- I don't think there's a way to provide enough insulation to
prevent the supply tube from freezing at night. I'd like to see a
way to make sure its completely drained in the evening to make this a
non-issue.
Many thanks to Cascade Designs
Inc.
and BackpackGearTest.org for the
opportunity to
test this product.
Read more reviews of Platypus Hydration gear
Read more gear reviews by Kurt Papke
|


 The
picture to the left is the front view of the Insulator. The three
D-rings on the left, right and bottom are readily visible. The
insulated hose is coiled in a loop with the blue bite valve cap at
left. The only portion of the reservoir visible in the photo is
the supply hose fitting just above the bottom D-ring. A closeup
of the fitting is shown at right. Not visible beneath the label
at the top is the insulation flap closure buckle.
 The reservoir
is shown removed from the insulated sleeve and disconnected from the
supply tube in the photo at left with a 12 inch (30 cm) ruler on the
side for scale. Visible on the right of the reservoir are the
fill gradations, in 0.5 l (17 oz) increments.
 At left is a photo of the Insulator
installed in the hydration sleeve of my REI Traverse daypack.
This is my main pack for single-day trips. It has a good-sized
sleeve and dual supply tube ports.
 At right is a photo of my attempt to
install the Insulator in my Mountainsmith
Boundary backpack. See my review of this pack on
BackpackGearTest.org. Noted in my review is the fact that this
pack has a hydration sleeve that is much too small for the tall
Platypus reservoirs, and in fact the Insulator doesn't come close to
fitting. It sticks out over 6 in (14
cm).
 On the left is a photo of the Insulator installed in my Sierra Long Trail 90 backpack.
This pack, as noted in my test report on BackpackGearTest.org, has a
capacious hydration sleeve and the Insulator fit with plenty of room to
spare.
 I
was impressed with how well the insulated reservoir kept water in
liquid
form during cold nights. On December night #1 I filled up the
reservoir
with warm water and stowed it in my pack out in the open. The
temperature dropped to 0 F (-18 C) that night, and the water in the
reservoir did not freeze, at least not solid. I was able to
extract enough water for breakfast, and while heating my morning
beverage the remaining water began to freeze, so I immersed the slushy
end of the reservoir in hot water as shown in the photo at left.
 One of the activities I found I had
difficulty with was filling the
reservoir from my kettle (shown in photo at right from the January
trip), which I had to do since I was melting snow
for water on both trips. With its round bottom, it will not stand
up on its
own, so I had to use one hand to hold it up. The SlideLock
closure will also not remain open on its own, so it requires another
hand (or at
least some fingers) to prop it open. My third hand
(!) was used to pour the water from my kettle. I tried using
sticks and other items to prop it open, but nothing stayed in place
very well. Eventually I learned to hold the SlideLock open and
hold up the reservoir by inserting two fingers or my thumb into the
opening on one
of the ends of the SlideLock. This works, but if the water in the
kettle is very hot and my aim is poor this can result in scalded
fingers.