|
Initial Report October 2007
Field Report January 2008
Long Term Report February 2008
|
Contents
Initial Report
Product details
Test Plan
Field Report
Long Term Report
My Details |
 |
| |
Photo courtesy of Coleman |
Personal Details
Name: Andrew Preece
Age: 46
Gender: Male
Height: 5 ft 8 in (1.73 m)
Weight: 188 lb (85 kg)
Waist: 38 in (97 cm)
Torso Length: 20 in (50 cm)
Email: andrew_at_teamgunnparker_dot_com
City: Perth.
Western Australia.
Australia. |
Testing Locations
Bibbulmun Track: Sea level to 585 m (1,920 ft). Within this region I
backpack along old forestry roads, sandy tracks, and purpose built
walking tracks. The south-west of Western Australia allows for hiking
and backpacking from coastal plains to forested ranges. I hike in
varying conditions from forestry tracks, to sandy tracks to single
purpose walking trails, from rock hopping, to beach walking to
completely off-track through open and dense bush country. |
Backpacking Background
I have done a lot of hiking over the years and now carry a hammock and
all the gear for over night stays of one to two nights duration. I normally carry
approximately 35 lb (16 kg) which includes food and water. I hike
all seasons with winter temperatures ranging from 39 F (4 C) to 64 F (18
C) including periods of heavy rain at times to summer conditions with
the temperature ranging from 68 F (20 C) to 95 F (35 C) and very dry. |
Testing Activities
During the expected test period I will be going on twelve overnight
trips and trips ranging from one to two days of backpacking. I will be
camping out between eight nights and 20 days between October 2007 and January
2007. Each over night hike of two nights duration would
involve approximately 35 km (21 mi) and the day trips would be 12 to 15
km (7 to 9 mi). |
Testing Conditions
It is now well into our spring but we are still experiencing some
unseasonably cool nights with mornings of lows of 10 C (50 F) and
highs of 25 C (77 F). In another two months it will be summer and the
heat will set in. Daytime temperatures in summer will range from a minimum of 14 C (57 F) to
36 C (96 F). The average rainfall for this time of year is, 44 mm (1 3/4
in). |
|
Initial Report
October 6th 2007
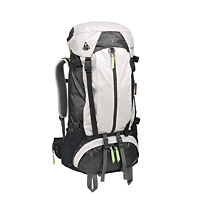
The Coleman Chinkapin X65 Backpack is an internal framed, fairly light weight
back pack made from a combination of different materials. Offering water repellency
with 210Denier Silicone treated nylon diamond rip-stop and a 1000Denier nylon pack
cloth bottom for abrasion resistance.
The pack looked as I expected from the information that I found on the
Coleman website.
|
The pack that I am testing is Model No. 8540-601
Manufacturer: Coleman
Year of Manufacture: 2007
Manufacturer's Website:
www.coleman.com
MSRP: US$ 169.99 |
|
Product details
- Capacity: 2947 - 4440 cu.in. (65 L)
- Pack weight: 4lbs. 2 oz. (1900 gm)
- Harness system adjusts to fit torso range of 14 in - 21 in (35 cm - 53 cm)
- Top loading, internal frame backpack
- Top lid converts easily into a lumbar pack
- Pack fabrics: 210Denier Silicone treated nylon diamond ripstop provides outstanding water repellency and shedding
- 1000Denier nylon pack cloth bottom for abrasion resistance
- Front kangaroo pocket
4 large external side pockets
- Waterproof zippers
- Hydration ready
- Ice axe loops and 4 additional lash points (keepers included)
- Map pocket
- Removable frame sheet and 2 AL stays
- Separate sleeping bag compartment
- Made in China
- Year of Manufacture 2007
|
 |
The Chinkapin pack arrived in good condition but I did find two areas of
the pack I was not happy with.
The right shoulder strap is either sewn incorrectly causing the material
to bunch up and twist a little, or it has been caused by the way that it
had been packed in the plastic bag. If you look at the image to the
right you will see a sharp angle in the strap and it is at this point
were the trouble lies. It may straighten out with use and I will be
monitoring the strap.
The other fault I found was with a seam sewn up through the back of the
padded section on the left hand side. The stitching is loose and when I
saw it and thought it a stray thread I gave it a little pull and it
started to unravel, hopefully it will not become worse. |
 |
Other than the two small areas above the pack looks to
be very well made and has a lot of features, one in particular is the
sternum strap shown at right. It has a little clip that slides up and
down along an edge sewn into the shoulder strap. It is very easy to
adjust along the full range of its travel.
Starting at the top of the pack it has a removable lid that fits onto
the waist belt and is used as a lumbar pack.
The lid has a water proof zipper and inside, the lid is split into two
sections.
|
 |
The pack has one large opening at the top which has an
extendable neck with a pull cord closure and below the neck as a part of
the main pack body is another cord closure. There is also a compression
strap that runs from the top front of the pack to the raer and could be
used to secure items inside the lid.
Inside the main compartment toward the bottom is a divider that can be
opened or closed to allow me to section off the lower part or have it
open to make it larger. The divider has a different way to close and
that is a draw cord closure in the middle which I pull tight to close or
loosen right off to open it.
Inside this main area is a sleeve at the back to hold the hydration
bladder, it has two hook and loop tabs at the top to hold the bladder in
place and has an opening on the right hand side back corner to allow the
hose to exit the pack.
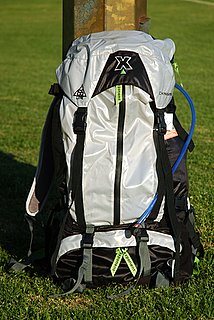
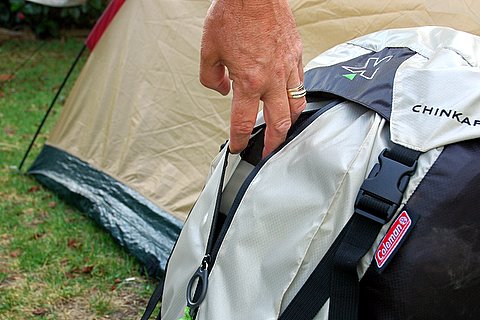
On the front of the pack is the kangaroo pocket which is a large pocket
extending down from the top of the pack to the sleeping bag compartment
at the bottom, the photo
here shows it
in white with a black water proof zip down the length of it. It has
gussets on each side to allow it to open up once the pack is full. It
has
a has a large opening with two smaller pockets inside made of netting
with elastic at the top of each.
|
The sleeping bag compartment on the bottom
has its own two way zip which is not water proof but is covered well by
an overlap of the 210Denier silicone treated nylon. It has two straps here to
tighten the load in the compartment.
The main body of the pack has two compression straps on each side to
tighten up on the load inside it.
The waist belt of the pack is removable to allow me to use it as a
lumbar pack with the lid from the top of the pack. It has a small pocket
on the front left hand side and would be used for keys, identification
or other smaller items. The belt has large buckles that can be adjusted
from either the left or right side.
The pack has two ice axe loops and 4 additional lash points on the front
and has two hook and loop keepers at the top lash points. This will be
good for those times when I want a rest from my trekking poles and I can
lock them up out of the way. |
| |
|
| |
|
| Test Plan
|
|
|
1: Construction.
Constructed of 210Denier Silicone treated rip stop nylon and supposed to
provide outstanding water repellency and shedding should with
stand most bad weather that is thrown at it, But will it? The continuing
of our winter should prove or disprove that point.
The base of 1000Denier nylon pack cloth bottom for abrasion resistance
should be able to cope with all I can throw at it, our bush here has
some very rough bushes and plants because of our very dry summers and so
packs can become ripped on some of our trees.
Is the pack strong enough to be tossed about and man handled by all of
the straps and haul loop. Do all of the stitching have bartack
stitching to ensure the strength? All good packs should have a thicker layer at the base to prevent wear. Does this pack? Is
this pack made of an anti abrasion material? While on the trail it is
important that my load cannot move within the pack, so compression
straps and buckles are critical, are the buckles robust? Are they easily
replaced should one break or become lost? Are they available from my
local hiking store?
|
2: Fit
The Harness system adjusts to fit torso range of 14 in - 21 in. Torso length and hip belt width is critical to a good fitting pack; will
this pack fit my size? Or is it a one size fits most deal? Are there any
small adjustments to be found in the back and shoulder area to ensure
that my fit is just right? Does this pack feel like it is just being
carried, or worn like an old pair of favourite jeans? The shaped back
panel and compression-molded hip belt wing should ensure I will have a
most comfortable pack.
|
|
3: Storage
This pack has a sleeping bag compartment at the bottom. Does it have a
removable inside partition? The side mesh pockets look a little small
but may fit one of my spare hydration bottles. This will need checking
as water is very important in our dry climate. The Kangaroo pocket, is
it large enough to fit very much? what would be the best use of this
pocket?
It has a map pocket. Where on the pack is it? Does it have a clear window to
view your map without removing it from the pocket?
It is Hydration ready but will my 3L bladder fit?
Just how water proof are the zippers?
A very interesting part of this pack is the top lid converts easily into
a lumbar pack. Just how large is this smaller pack? How easy is it to
remove from the main pack and replace?
|
4: Frame
The frame on this pack has a removable frame sheet with 2 aluminum stays. Are these aluminum stays strong enough to hold this pack in shape while full with a load? Just what is a full load with this pack? There is not a maximum load rating quoted on the web site. I could go on and on but there is so much to check with a quality pack, for example.
1. Capacity: which I touched on briefly above.
2. Movement: once the pack is on and secured will I be able to look up or will my head hit the pack?
3. Ventilation: will the pack allow air flow between the pack and my
body? I will have to give it the blow test. Where by I blow air
through the padding to see if moisture collects on it.
4. Hip belt: The hip belt must fit on my hips correctly, the foam must be neither too soft or too hard to distribute the load.
5. Waterproof: Will I need a pack cover to keep my gear dry or does the pack have a built in cover? Will I need a pack liner?
|
| Please bookmark this page
and check back in about two months for my field report where I will
really put this item through its paces. |
|
| |
|
| |
|
|
Back to top
|
|
Field
Report
January 7th 2008 |
|
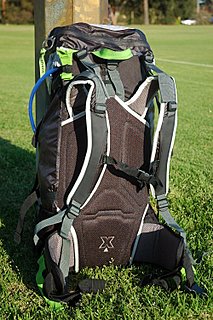
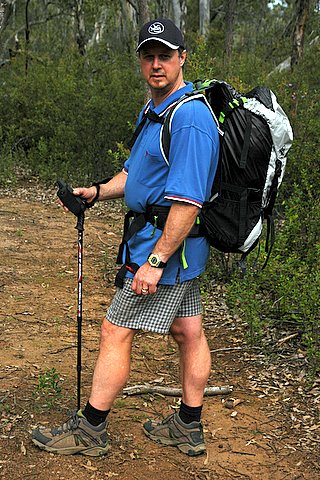
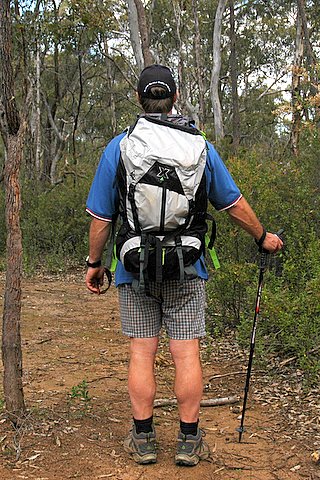
Here I am on one of the first outings with this pack.
Notice the gap at my shoulders between the pack and my back. After a
couple of times out and being a little uncomfortable I took the time to
reread the book that came with the pack and I was able to bend the two
inner aluminium stays to better fit my spine shape. The pack now fits a
lot closer to me and feels a lot nicer to carry.
One of the things that has taken me about 3 trips out over night to get
right is the correct fitting of the shoulder straps. In the book it
tells me how to measure my torso and how to adjust the length
of the straps, but not how to get this size correct on the pack. It
would have been good if there were some incremental marking on the pack
so that I would know exactly where I should have the straps to suit my
size.
Now that I have the shoulder straps at the right height the pack fits a
lot better and feels very comfortable. Adjusting the shoulder straps is
just a matter of undoing the webbing tension strap and sliding my hand
under the shoulder yoke and separating the hook and loop patch. Then
move the shoulder yoke up or down to suit. (It took a bit of trial and
error to get this right).
Once in the right spot I just rethread the webbing through the ladder
rungs and press down to lock in the hook and loop patch. |
 |
The shoulder straps look to be a
little on the thin side, but I have never felt any discomfort while
carrying at times up to 15 kg (33 lb) and over the distance of about 175
km (109 mi). By the end of this test series I will have covered a lot
more ground.
When I first started using this pack it was winter and I was able to get
out and hike in the rain a couple of times to test just how water proof
the pack is. I have found that even walking in quite persistent rain
although not extremely heavy that all of my gear inside stayed totally
dry. And when looking at the wet pack I can see the rain balls up on the
pack and does not seem to soak through.
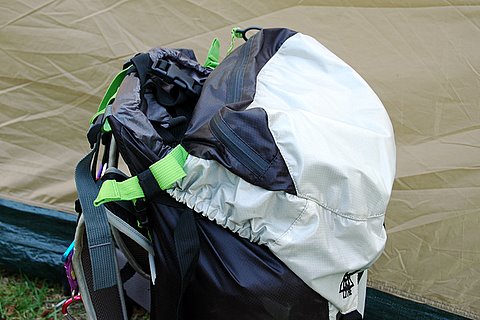
In this photo to the right the lid at the top has pulled to
one side. The next photo down shows a better view
of what does happen with the lid. I have found that if the pack is not
filled to capacity and up into the extendable neck of the pack the lid
will just slip down over the front of the kangaroo pouch when tightening
the straps at the front. |
 |
In this photo here you can really see what can happen.
I tried threading the green straps that hold the lid on to the pack through the
other side of the shoulder straps, but found that just interfered with the
shoulder straps. If the pack is filled high enough I do not get this
trouble, and the lid fits very well as it should, but some days I am not
carrying enough gear to fill the pack.
You can also see the very nice strap that runs over the neck of the pack
and I have been able to use this to strap down jumpers and wet weather
gear when not in use without having to undo the whole pack.
The pack should have a map pocket which I guess is one of the sections
inside the lid, sections are shown
below.
|
 |
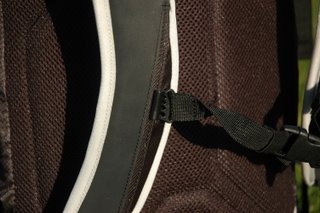
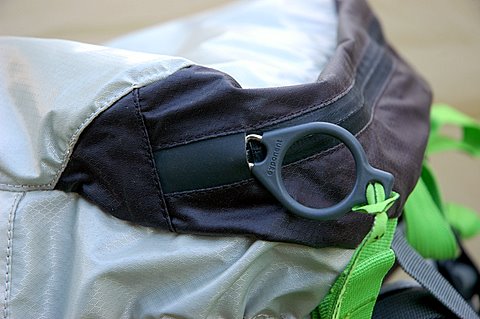
| Here is a close up of the water proof zip and the very
good cover on the the closure. You can see where the handle for the
zip pocks out from under the cover. All zips work very well and have not
snagged or caught on anything and run very smoothly. They feature a
large ring to help with opening or closing the zip. I have found this to
be a very good thing to have on a pack as at times when my fingers are
very cold it saves with fumbling around for a small tag to grasp. All of
the stitching is very good and show no sign of wear or of unravelling.
|
 |
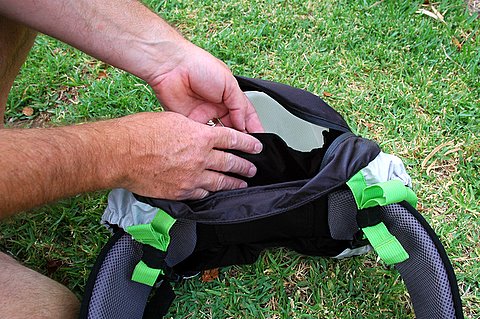
Another thing I wished was a little different is the
kangaroo pouch. I have found that with the inside of the pack full with
items and the side straps pulled in that there is not a lot of space to
be able to take items in and out of the pouch. Although I found that if
I open up the lid of the pack and loosen of the strap at the top it
makes it easier to put my hand inside, but it would have been nice if
the gussets were perhaps larger so to be able to get inside the pouch
with out having to undo everything. On the inside of the pouch are two
smaller mesh pockets with elastic at the tops to keep them closed. There
is a
larger one at the bottom and a smaller one at the top. When I am first
packing my gear into this pouch it does seem to have a lot of space, it
is only once the strap and lid is tightened that it becomes a chore to
remove items from it.
All of the straps on the pack work very well and have never popped open
or come loose at any time. The top side strap has a webbing strap with a
hook and loop closure at each side and I have used one of then to strap
my camera tripod to the pack, it works very well. |
 |
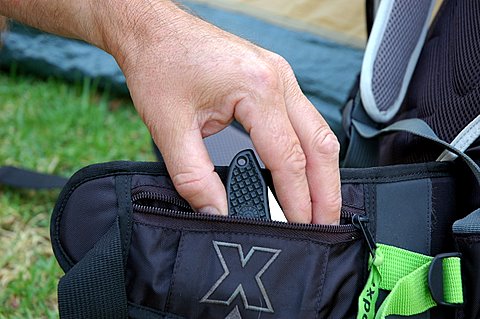
This is the pocket on the left side of the waist belt.
As the photo shows here there is not a lot of room to place much inside.
My folding pocket knife fits nicely but my bunch of car keys would not.
With the pack on it is a tight squeeze to get my fingers in and it would
have been nice if it were larger. The pocket IS placed in a good
position on the belt and is not too far back to the rear at all. I can
reach this pocket with both hands very easily.
The belt is nicely padded without being too bulky, and even from the
first time I wore this pack I never felt any discomfort. The belt is
flexible enough to fit my waist without being too stiff. It has a large,
easy to get at and use buckle at the front, which has not slipped under any
weight that I have carried.
The back of the pack or inside area next to my back is padded well
enough I feel although in the warmer months I have found it to be quite
warm and makes me sweat quite a bit. After one trip when I returned to
the car I changed my shirt as it was so wet.
|
 |
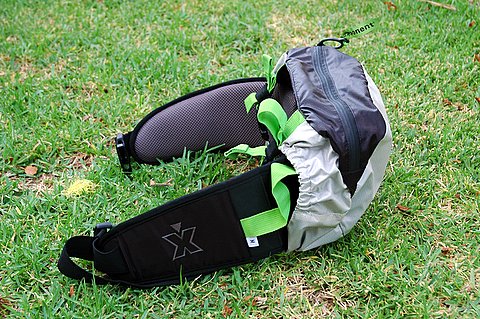
The lid separates from the main body of the pack and
clips onto the waist belt that has been removed from the pack.
The lid just unclips at the buckles and is very easy while the belt has
two load straps, one each side which must be unthreaded through the
buckle first, then I slide my hand between the belt and the pack to
separate the hook and loop. Then I slide out the belt and slide it into
a sleeve on the lid and fold over the two straps on the lid and I'm
done.
The first few times it took a little while to do and to replace the belt
took longer but now that I have done it a few times it is a piece of
cake.
I have used this lumbar pack quite a few times and for testing purposes
I used it every day as my work bag, carrying all the gear I take to
work. It feels very good on and has not become damaged in any way.
|
 |
The photo above right shows the divider
in the lid and the photo to the right shows the whole lumbar pack.
All in all I think this is a very good pack but with only one real
problem and that is of the lid slipping forward if the pack is not full
right to above the inside neck.
I love the feel of the nylon and the pack itself does not weight too
much. I look forward to using this pack for a long time to come.
|
 |
Long Term
Report
February 18th 2008 |
I have now been
using this pack for about four months and during this time I
have worn it in the rain and in the sun. I have used this pack
on five overnight camping trips which would mean a hike into
camp on Saturday and then hike back out on Sunday for a total of
maybe 15 mi (24 km) on each trip.
At times it has been raining but not a real downpour. The pack
kept all of my gear dry in the rain that I did encounter very
well, look here to read more.
At others times it has been quite warm and my back would become
hot, read more here.
I have also worn this pack for day
hikes and I have used the pack as a full pack and also as a
lumbar pack, each of my hikes on these days would total some
where between 6 and 10 mi (10 to 16 km). The pack performs very
well as a lumbar pack and is very comfortable, it also has a lot
of room to carry many things.
The pack shows no sign of any wear but that could be because I
like to look after my gear, so for me it is very sturdy. The
shoulder strap that was bunched up on
arrival has straightened out a lot but still looks a little
wrinkly. The stitching has not become
any worse.
The only sign of any real use is on the webbing near the belt
buckle, where the buckle has slid along the webbing while
tightening and loosening when putting the pack on. The webbing
has not worn at all just softened up a little through use,
certainly nothing to worry about.
All of the zips work just as they did when new, as do the clips
and buckles.
Now on to my likes and
dislikes.
|
|
Likes |
|
*Weight;
I like the fairly light weight of this pack, at 4 lbs. 2 oz.
(1900 gm) it is nice to carry.
*Silicone treated nylon;
The feel of this nylon is very nice, it feels slippery and just
looks very good.
*Comfort;
This pack is very comfortable. Once I had perceived with
the fitting and got the pack adjusted to suit my torso length.
*The large zip rings;
It is very easy to open the zips on this pack with the huge
rings to hold onto.
*The kangaroo pouch;
The large zip opening down the front of the pouch makes it easy
for me to pack items that I need to get to easily.
*The lumbar pack;
This set up is very nice, the pack is large and is comfortable
to wear.
*The mesh side pockets;
The side pockets are quite deep and will hold a large 1.32 qt
(1.25 L) drink bottle with ease.
*The internal divider;
The divider has a centre draw string to open or close the
divider, thereby allowing me to use the full depth of the pack
or to section off the bottom to pack my sleeping bag and hammock
in the lower section using the bottom zipper.
|
| Dislikes |
|
*The lid;
I do not like the way the lid is designed. The design allows the lid to
slide forward when pulled down tight. Only when the pack is not filled
right up above the top of the main body will this will happen. Look
here.
*The small pocket in the waist
belt;
This pocket is too small and does not allow me to place much in
there at all. My pocket knife is about all that fits or perhaps my
car key. Certainly not my bunch of keys attached to my car key
ring. Look here.
*The kangaroo pouch;
Whilst I DO like the zip arrangement at the front of the pocket,
I do not like that for me it is not deep enough. If I fill the
inside of the main body of the pack and then try to get more
items in the pouch there is just not enough space to fully open
the pouch. As I show in this photo here
there is just not enough room to open the front of the pouch to
pack the inside.
I found I had to pack the pouch first then the inside of the
main body, but then it was a little difficult to get items in
and out of the pouch. I think it is a great idea, it just needs
to be deeper. |
Final Word.
So would I recommend this pack to a friend? Yes, but
first I would make sure that they would make good use of the space
in this pack and be able to fill it right into the lid area. Once that was done I am
sure they would be very happy with this pack. |
|
|
Read more reviews of Coleman gear
Read more gear reviews by Andrew Preece
|


