

|
|
 |
Guest - Not logged in | |||||||||||||||||||||||||||||||||||||
Reviews > Packs > Internal and External Framed Backpacks > Lowe Alpine Centro > Test Report by Andrew Buskov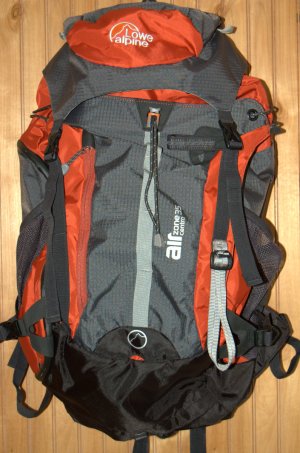 Lowe Alpine Lowe AlpineAirZone Centro 35 Lowe Alpine's new overnight 4 season pack for 2008. Andrew Buskov Field Report: March 11, 2008 Long Term Report: May 13, 2008 Tester Biographical Information
Backpacking Background:I started backpacking and quickly became hooked on the outdoors, hiking various environments from the green mountains of the Appalachians to the barren desert of Arizona. I enjoy the solitude of deep backcountry and prefer colder weather and snow. I’m moving toward becoming a light weight hiker, but am still safety conscious and want to be as prepared and comfortable as possible. My goal is to get my pack weight between 15 to 20 lbs (6 and 9 kg), but right now I'm hovering around 25 lbs (11 kg). Additional information about the author can be found at http://www.corridor9.net. Product Information:
Product Overview: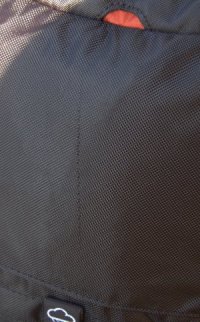 Note: Due to the
fact that this is a pre-production 2008 model, manufacturer specs are
not available at this time. Note: Due to the
fact that this is a pre-production 2008 model, manufacturer specs are
not available at this time.The Lowe Alpine AirZone Centro 35 is one of Lowe Alpine's new packs for 2008. It is designed as a small 4 season overnight pack that can also double as a large daypack. It's also designed to be easily adjustable to the user by way of the Torso Fit Centro System. Because of this system, all Centro packs will fit torso sizes between 16 to 21 in (40 to 53 cm) comfortably. There is minimal padding on the back due to an extensive network of breathable mesh backing that helps the pack ride away from the wearer's back. This allows the heat and perspiration to escape rather than building up due to lack of airflow. The Centro also has an integrated rain cover that folds neatly into a pouch on the bottom of the pack. While technically a top loader, this pack features a large side pocket that allows the user to reach all contents within the main pack body. In addition to the main storage area, there are numerous pockets and pouches for storing gear that may be used more frequently; eight pockets in all including the Hydration pouch and rain cover storage area. Initial Impression: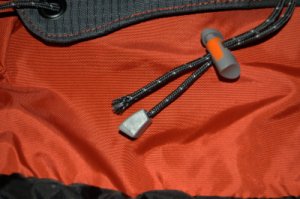 The pack arrived in good condition
with only a few minor flaws. There is a large scratch on the bottom of
the pack body. This scratch is roughly 4 in (10 cm) in length, but does
not appear to have seriously affected the stability of the weave. There
are no holes through this scratched area, nor is there any hanging or
ripped threads. In addition to the scratched area, there was a cord
that was pulled from its plastic end piece as noted in the picture to
the left. Fixing this was relatively easy and I did not encounter any
problems when putting this cord back into the plastic locking
mechanism. Although there were a few minor cosmetic problems with this
pack, it does not appear to have had any previous use in the field.
These problems could easily be attributed to new manufacturing
techniques since this pack is a completely new design for 2008. The pack arrived in good condition
with only a few minor flaws. There is a large scratch on the bottom of
the pack body. This scratch is roughly 4 in (10 cm) in length, but does
not appear to have seriously affected the stability of the weave. There
are no holes through this scratched area, nor is there any hanging or
ripped threads. In addition to the scratched area, there was a cord
that was pulled from its plastic end piece as noted in the picture to
the left. Fixing this was relatively easy and I did not encounter any
problems when putting this cord back into the plastic locking
mechanism. Although there were a few minor cosmetic problems with this
pack, it does not appear to have had any previous use in the field.
These problems could easily be attributed to new manufacturing
techniques since this pack is a completely new design for 2008.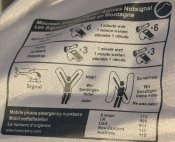 In all, this pack looks very
well designed and built. The seams are nice and tight with no hanging
threads. There do not appear to be any seams that are pulling free.
There are no holes or loose teeth in any of the zippers. All clips and
straps function properly; the mesh appears to be attached to the padded
lower and upper portions of the back in a sturdy manner. Even the
whistle sounds loud, as it should. In all, this pack looks very
well designed and built. The seams are nice and tight with no hanging
threads. There do not appear to be any seams that are pulling free.
There are no holes or loose teeth in any of the zippers. All clips and
straps function properly; the mesh appears to be attached to the padded
lower and upper portions of the back in a sturdy manner. Even the
whistle sounds loud, as it should.When I first removed this pack from the shipping packaging I couldn't help but notice how many bells and whistles this pack has in comparison to other packs I've used. Generally, when I go shopping for a pack I tend to choose minimalistic designs; packs that don't have many exterior pockets, lids, ice pick loops, or extras. I just don't need these things with the type of hiking that I usually do and at times they get in the way more than help out. Having an opportunity to test a pack with as many features as the AirZone Centro 35 is definitely a welcomed change. From the 2 lid pockets, to the wide pouch on the back of the pack, and all the way down to the integrated rain cover I imagine that testing this pack will be a complete joy. 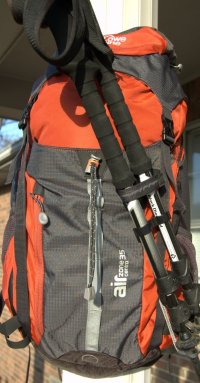 After
gawking at all the nice new features I set about getting weights for
this pack as per the BackpackGearTest.org guidelines. This pack weighted in
at more than 3 lbs (1.3 kg), and I was immediately struck by how heavy
this seemed. I remember reading an article a while back that talks
about choosing a pack and pack weight. The author of the article
mentioned that he never chooses a pack that weights more than 1 lb (.5
kg) per 1000 cu in (16 L). Then I got to thinking about my hiking style
and how the other packs I own have scratches, snags, rips, and tears at
the seam due to my inattentive hiking style and heavy use. After thinking a bit about
my other packs, it was easy to see that the extra weight of this pack
is offset by the quality materials that are used. From the heavy duty
nylon bottom to the ripstop sides and lid, the strap reinforcements,
and even the heavy cinch cords; they all scream durability. In end I
realized that I needed durability and quality more than I needed
something that was light weight. After
gawking at all the nice new features I set about getting weights for
this pack as per the BackpackGearTest.org guidelines. This pack weighted in
at more than 3 lbs (1.3 kg), and I was immediately struck by how heavy
this seemed. I remember reading an article a while back that talks
about choosing a pack and pack weight. The author of the article
mentioned that he never chooses a pack that weights more than 1 lb (.5
kg) per 1000 cu in (16 L). Then I got to thinking about my hiking style
and how the other packs I own have scratches, snags, rips, and tears at
the seam due to my inattentive hiking style and heavy use. After thinking a bit about
my other packs, it was easy to see that the extra weight of this pack
is offset by the quality materials that are used. From the heavy duty
nylon bottom to the ripstop sides and lid, the strap reinforcements,
and even the heavy cinch cords; they all scream durability. In end I
realized that I needed durability and quality more than I needed
something that was light weight.In all there are so many things on this pack that it's hard to grasp exactly what this pack offers. As stated above there are a number of pockets and pouches. In addition to the pockets there are clips and adjusting straps all over the pack, an integrated whistle in the chest strap, a daisy chain on the back of the pack, hydration pouch, a hook and loop strap to attach poles or an ice axe (removable if necessary), and even an emergency distress chart describing hand and whistle signals and emergency contact numbers. While the numerous zippers on the pack are nice and tight, the side zipper appears to be the only water resistant type on the pack. The side straps are also reinforced with a black rubberized material to limit stress to the main pack body seams.  The
rain cover is just like any other standard rain cover. There is an
elastic band running around the edges of the cover that slips over the
body of the pack. There is also a cord lock and clip attached to the
elastic band. This clip slides behind the mesh that rides against the
back and attaches to the cord again through a reinforced hole on the
other side of the cover. The only thing that makes it integrated
really is the fact that there is a special pouch near the bottom of the
pack for the folded raincover to stuff into. In addition to the pouch,
there is a piece of hook and loop material on both the pack and the
raincover that keeps the raincover from being left behind somewhere on
the trail if it happens to drop out of the pouch. This seems like a
very remote possibility though as the hook and loop closure on the
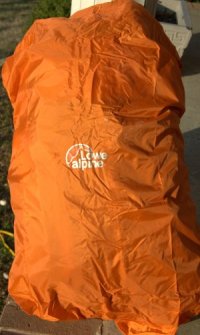
pouch is very tight. The
rain cover is just like any other standard rain cover. There is an
elastic band running around the edges of the cover that slips over the
body of the pack. There is also a cord lock and clip attached to the
elastic band. This clip slides behind the mesh that rides against the
back and attaches to the cord again through a reinforced hole on the
other side of the cover. The only thing that makes it integrated
really is the fact that there is a special pouch near the bottom of the
pack for the folded raincover to stuff into. In addition to the pouch,
there is a piece of hook and loop material on both the pack and the
raincover that keeps the raincover from being left behind somewhere on
the trail if it happens to drop out of the pouch. This seems like a
very remote possibility though as the hook and loop closure on the
pouch is very tight. The pack came shipped to me
adjusted for a person with a torso around 18 in (45 cm). Because I top out at the
high end of the adjustable range, and nowhere near the middle, my first
priority was adjusting the pack to fit me best. I had never been
exposed to the Torso Fit system before and honestly was at a loss for
how to adjust this. I went about opening the internals of the pack,
where the adjustment mechanism is, looking for a way to adjust the
straps. I saw the strap located in the front of the pack around the
neck area that was labeled "CentroAdjust" so I played around with it
for a while. I could get the strap up to the large range, but couldn't
figure out why it wasn't tight and why the shoulder straps didn't move.
Unfortunately most of the Lowe Alpine website was not informative on
the adjustment process. I spent nearly an hour playing with the pack,
searching the net, and trying to find more documentation on the Lowe
Alpine site before I ran across a single picture buried in the
technical pages on the Torso Fit system. It was then that I realized
the shoulder straps were designed to be pulled out from the interior of
the pack to lengthen them. After tugging on the shoulder straps a bit I
noticed that the adjustment strap at the neck area was now tight and the pack fit like a
glove. In the age of internet shopping, I would suggest that the
documentation on pack adjustment be made more easily available to the
end user. It would be especially nice if this were made available in
the packaging so the need for a computer and internet connection is not
necessary. The pack came shipped to me
adjusted for a person with a torso around 18 in (45 cm). Because I top out at the
high end of the adjustable range, and nowhere near the middle, my first
priority was adjusting the pack to fit me best. I had never been
exposed to the Torso Fit system before and honestly was at a loss for
how to adjust this. I went about opening the internals of the pack,
where the adjustment mechanism is, looking for a way to adjust the
straps. I saw the strap located in the front of the pack around the
neck area that was labeled "CentroAdjust" so I played around with it
for a while. I could get the strap up to the large range, but couldn't
figure out why it wasn't tight and why the shoulder straps didn't move.
Unfortunately most of the Lowe Alpine website was not informative on
the adjustment process. I spent nearly an hour playing with the pack,
searching the net, and trying to find more documentation on the Lowe
Alpine site before I ran across a single picture buried in the
technical pages on the Torso Fit system. It was then that I realized
the shoulder straps were designed to be pulled out from the interior of
the pack to lengthen them. After tugging on the shoulder straps a bit I
noticed that the adjustment strap at the neck area was now tight and the pack fit like a
glove. In the age of internet shopping, I would suggest that the
documentation on pack adjustment be made more easily available to the
end user. It would be especially nice if this were made available in
the packaging so the need for a computer and internet connection is not
necessary.When I initially applied for this test I thought we would be testing the AirZone Centro 35+10; another new pack for 2008 that has roughly 2700 cu in (44 l). Due to circumstances beyond the control of BackpackGearTest.org, the Centro 35 was the pack that we received. Based on the documentation available, and a bit of calculating, it appears that this pack is roughly 2100 cu in (34 l). After hearing that we were getting this smaller pack I didn't know if I would be able to adequately test it, especially during the cold winter season when more gear is needed for survival. I seriously debated about letting someone else test this; someone who would have a better opportunity to give this test the review that it deserved. 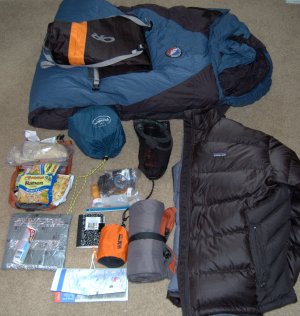 That
was until I realized exactly how much stuff I can cram into a pack this
size. I decided that the best way to see whether this pack would have
enough room for me was to pack it as full as
I could get it with everything I thought I might need during a 2 night
outing. After about 10 minutes of packing, I still had room. It seemed
as if this was some sort of magical Bag of Holding as it kept
swallowing up everything that I was feeding it. After about 20 minutes I
finally had a pack filled with the following items: That
was until I realized exactly how much stuff I can cram into a pack this
size. I decided that the best way to see whether this pack would have
enough room for me was to pack it as full as
I could get it with everything I thought I might need during a 2 night
outing. After about 10 minutes of packing, I still had room. It seemed
as if this was some sort of magical Bag of Holding as it kept
swallowing up everything that I was feeding it. After about 20 minutes I
finally had a pack filled with the following items:
 Let
me remind you, this is just the first time I had packed the AirZone
Centro 35. I didn't organize my equipment at all; I simply grabbed
everything I thought I'd need and shoved it in the pack. I
certainly don't need 2 pots for an overnight, and I can probably
get away with water treatment rather than a filter. However, knowing
that these items can fit if I needed them was the deciding factor in my
testing this pack. Let me also point out that these were only the contents
of the main pocket. I didn't even bother filling the other pockets with
stuff as I knew that I would have adequate space for the miscellaneous
little things that I needed in addition to what I already had packed. Also note that I have not packed a shelter yet. Let
me remind you, this is just the first time I had packed the AirZone
Centro 35. I didn't organize my equipment at all; I simply grabbed
everything I thought I'd need and shoved it in the pack. I
certainly don't need 2 pots for an overnight, and I can probably
get away with water treatment rather than a filter. However, knowing
that these items can fit if I needed them was the deciding factor in my
testing this pack. Let me also point out that these were only the contents
of the main pocket. I didn't even bother filling the other pockets with
stuff as I knew that I would have adequate space for the miscellaneous
little things that I needed in addition to what I already had packed. Also note that I have not packed a shelter yet.In short... this thing holds a lot! In addition to the above contents I had a 3 lb (1.4 kg) tent, 1 extra set of clothing, and an extra Nalgene bottle in my 4800 cu in (79 l) pack just 2 weeks ago on an overnight. I don't know if the pack design was causing me problems or what, but I had more trouble loading that pack than I did the AirZone Centro 35. I'll definitely be taking another picture of the contents for an actual trip in the near future to show exactly what I fit in the pack on various outings. All things considered, I am definitely pleased to be testing this pack. The quality workmanship, numerous features, adjustability, fit, and sheer volume of this pack make it a very appealing pack. I'd like to thank Lowe Alpine and BackpackGearTest.org for the opportunity to test the AirZone Centro 35 backpack. Field Report: March 11, 2008
During
this testing phase, I was able to use this pack for a couple of day
hikes. Both hikes were in the Pennyrile State Forest, a 14,000 a (5600
ha) section of forest that has roughly 23 mi (37 km) of trails. The elevation for the area is between 400
-700
ft (122 - 213 m) with slow rolling hills and steep cliffs in some
areas. Both hikes were around relatively small loops. The first I took
with my daughter around the Cane Trial. The precipitation was in the form
of snow. There were big flakes falling during the start of out
outing, but most of the snow was blowing off the trees as opposed to
falling from the sky. While it was only a 1.75 mi (2.82 km) loop, it
took us almost 2.5 hours since we were taking our time for her first
hike. The area was fairly hilly with moderate climbs. We had to stop
and catch our breath halfway up a few of the hills due to the steep
angle. The second trip was around the Lake Trail this past weekend. We
received an unusual amount of snow fall, 8+ in (20+ cm), the night
before so this was quite an opportunity for me. However, there was no
precipitation that day. The trail was roughly 3 miles in total with
gentle rolling hills as the trail wound around the lake and not really any steep sections to get tired on.
While it took us 3 hours to complete the loop, there was a good deal of
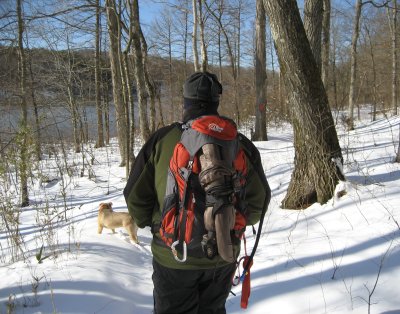
downtime as we setup my hammock for the first time in the field. | ||||||||||||||||||||||||||||||||||||||
 Field Locations:
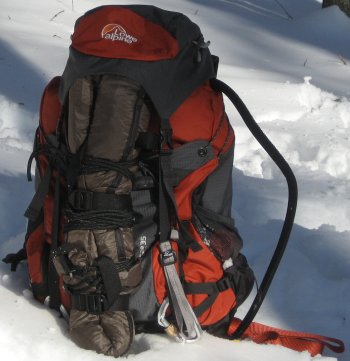 During
both hikes I wore nothing more than a synthetic breathable long sleeve
tee shirt, a fleece vest, and either a down or fleece jacket. I needed
the down jacket during my hike with my daughter because I wasn't moving
fast enough to generate heat. However, I didn't overheat at all on
either trip which was very exciting for me. Because I sweat quite a
bit, my back is almost constantly soaking no matter how few layers I
have on. Even in the winter I've found myself sweating on my back side
while I was shivering from the cold my arms and chest were feeling. It
was so nice to be able to wear a pack that allowed my back to breathe.
During
both hikes I wore nothing more than a synthetic breathable long sleeve
tee shirt, a fleece vest, and either a down or fleece jacket. I needed
the down jacket during my hike with my daughter because I wasn't moving
fast enough to generate heat. However, I didn't overheat at all on
either trip which was very exciting for me. Because I sweat quite a
bit, my back is almost constantly soaking no matter how few layers I
have on. Even in the winter I've found myself sweating on my back side
while I was shivering from the cold my arms and chest were feeling. It
was so nice to be able to wear a pack that allowed my back to breathe.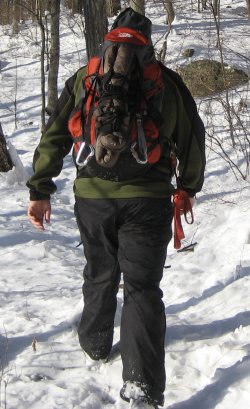 In
the end, I found it a good opportunity to acquire more gear. I have
been wanting to get a hammock for some time so for an early birthday
present I purchased a Hennessey Expedition Asym. I've found that while
using the Snake Skins with the Hennessey, I am now able to lash the
hammock to the ladder on the front of the pack without adding too much
bulk to the outside or changing my center of gravity too much. When I
tried lashing my tent in this fashion, I found that the pack was
swaying side to side more than I liked due to the bulk of the tent
being farther away from my back.
In
the end, I found it a good opportunity to acquire more gear. I have
been wanting to get a hammock for some time so for an early birthday
present I purchased a Hennessey Expedition Asym. I've found that while
using the Snake Skins with the Hennessey, I am now able to lash the
hammock to the ladder on the front of the pack without adding too much
bulk to the outside or changing my center of gravity too much. When I
tried lashing my tent in this fashion, I found that the pack was
swaying side to side more than I liked due to the bulk of the tent
being farther away from my back.