Mountainsmith Boundary Pack
Test Series by Kurt Papke
Initial Report
April 6, 2008
Tester Information
| Name: |
Kurt Papke |
| Age: |
54 |
| Gender: |
Male |
| Height: |
6' 4" (193 cm) |
| Weight: |
220 lbs (100 kg) |
| Email address: |
kwpapke at gmail dot com |
| City, State, Country: |
Minneapolis, Minnesota USA |
Backpacking Background: mostly in Minnesota - have hiked all of the
Superior
Hiking Trail, starting on the Border Route.
Preferred/typical backpack trip is one week. Dayhiking in
Utah,
Colorado and Oregon. Mostly Spring/Fall seasons.
Comfort-weight hiker: I try to carry as few items as possible, but do
not go to extremes to reduce weight of items carried.
Product Information
| Manufacturer: |
Mountainsmith, LLC.
|
| Year of manufacture: |
2008 |
| Manufacturer website: |
http://www.mountainsmith.com |
| Listed weight: |
4 lbs 6 oz (1.98kg)
|
| Weight as received: |
4 lbs 5 oz (1.950kg)
|
Standard volume:
|
4577 in^3 (75L)
|
Size/color tested:
|
Pinion Green
|
| MSRP: |
$149.95
|
Product Description
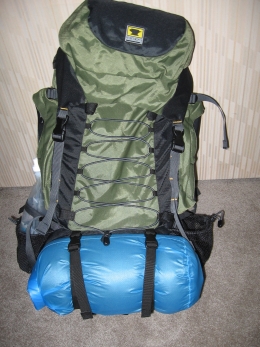 The
Mountainsmith Boundary pack is moderately lightweight with a volume
designed for trips of a weekend or longer and apparently targeted at
the "green" consumer: it prominently displays a "recycled" icon on the
lower front of the pack and comes tagged with a card that says "you and
this pack saved 48 plastic bottles from the landfill". The label
states that 100% of the webbing, binding and fabric is 100% recycled
PET. The
Mountainsmith Boundary pack is moderately lightweight with a volume
designed for trips of a weekend or longer and apparently targeted at
the "green" consumer: it prominently displays a "recycled" icon on the
lower front of the pack and comes tagged with a card that says "you and
this pack saved 48 plastic bottles from the landfill". The label
states that 100% of the webbing, binding and fabric is 100% recycled
PET.
The Boundary achieves its volume by segmenting space and extending
horizontally. There is a separate sleeping bag compartment with
drawstring separator behind the blue sac in the picture on the left,
and
above the water bottle holders are two fully zippered narrow vertical
side pockets. The collar is spacious and removable for conversion
to a lumbar pack. I was a little surprised that there are no
hipbelt pockets.
From the front view the bottom panel compression straps can be seen
holding my bagged OCF pad and the elastic rigging above it. The
elastic rigging is not particularly wide (6.5 in on the top, 7.5 in on
the bottom = 16.5 and 19 cm respectively), certainly not enough for my
bear canister or the like.
The two water bottle pockets with their drawstrings can also be seen on
each side in the picture. The left pocket is holding a 500mL
(17 fl oz) Platypus bottle which can be seen extending well past the
side
pockets. These side pockets are described by Mountainsmith as
"pass-thru", which indicates that they are attached to the pack at
their edges only with the top and bottom open allow tent poles or a
very tall bottle to be tucked behind the pocket.
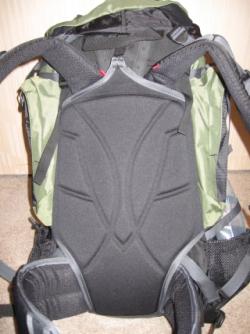 The
picture to the left shows the back view including the substantial
molded foam back. The air channels to allow the back to breathe
are clearly visible. Note that the shoulder straps and hip belt
are generously padded. The
picture to the left shows the back view including the substantial
molded foam back. The air channels to allow the back to breathe
are clearly visible. Note that the shoulder straps and hip belt
are generously padded.
Not visible on the picture is an self-tensioning sternum strap that
combines an elastic with an
inelastic strip that limits the stretch. Though it was
comfortable when
trying the pack on, I wonder how much the elastic will contribute to
comfort when the
pack is under full load, as I during my initial tests the elastic strip
was stretched to its fully capacity so the inelastic webbing was
carrying the full tension.
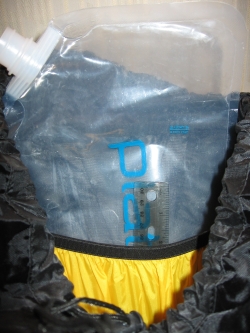 All hydration sleeves are not created equal. The
picture on the left shows my 3L (100 fl oz) Platypus hydration
reservoir positioned
in the sleeve with about half of it poking out through the top.
The ruler shows the scale and rough dimensions - it is about 10 inches
(25cm) deep. Clearly I will not be using this size reservoir with
the pack. All hydration sleeves are not created equal. The
picture on the left shows my 3L (100 fl oz) Platypus hydration
reservoir positioned
in the sleeve with about half of it poking out through the top.
The ruler shows the scale and rough dimensions - it is about 10 inches
(25cm) deep. Clearly I will not be using this size reservoir with
the pack.
Initial Impressions
Quality of materials and "fit and finish" of the pack are
excellent. I could find no instances of poor workmanship, missewn
seams, nor frayed threads.
After filling the pack with gear I hoisted it up onto my back and
walked around the basement. I was favorably impressed with the
comfort - the hip belt padding felt very pleasant and supported
the pack weight well. The back panel was also a good fit with no
pressure points. All the strap adjustments were obvious in their
use and allow the pack to accommodate varying torso lengths, waist and
chest sizes.
It seems like the biggest challenge with this pack will be optimizing
the use of space. The shallow and narrow side pockets present a
puzzle that a large front pocket avoids: what can I fit in two pockets
that are approximately 12 x 6 x 2 inches (30 x 15 x 5 cm) each?
The combined volume of the side pockets is roughly 6% of the pack
volume so it has to be used effectively. Will I get a smaller
hydration reservoir to fit the small sleeve or just use bottles?
I have a small shoulderstrap accessory sac that might work for easy
access to my camera, GPS, snack bars, etc. to work around the lack of
hipbelt pockets. The packlid holds my Jetboil with a lot of room
to spare - what else will I pack in there that won't fall out when I
access my stove for a hot lunch? The clear map pocket is about
half the folded size of my McKenzie maps for the Boundary Waters - will
I be able to use the pocket efficiently? I tried to get my
snakeskinned hammock stuffed into the front elastics, but it wouldn't
fit. Perhaps I should try putting my hammock into the sleeping
bag compartment for easy access during the day for lunch or nap
breaks? What can I fit into the front elastics that won't fall
out? They are wider on the bottom than the top, though my pad
strapped on the bottom may prevent things from falling through.
The Boundary pack seems very full-featured with the exception of the
hipbelt pockets already mentioned and perhaps a zippered pocket with
keyring attachment for car keys and valuables.
Test Plan
April is a difficult month for backpacking in Minnesota, but I have
plans for a week-long May trek through the Boundary Waters (Border
Route
Trail) and a segment of the Superior Hiking Trail. My goal is to
complete the hike without resupply, so the pack will be heavily
weighted with food. This trip should be long enough to assess
comfort levels over a moderately long period as well as getting an
initial indication of durability. I will attempt to assess:
- Comfort: are the shoulder straps comfortable? Does the
lumbar pad rub my lumbar raw like my current pack does? How well
do the hip belts carry 75
liters (4577 in^3) of gear including lots of food? Mountainsmith
seems proud
of the molded foam backpanel - how well does it mate with my back and
shoulder blades after a week? I have a tendency to play with the
load lifters
in the afternoon as I get tired - am I able to vary the load with this
pack?
- Usability: how easy is it to pack my gear in the various
compartments? How easy is it to attach my trekking poles in the
afternoon when I often stop using them? How easy is it to get a
reservoir in the hydration sleeve and thread the tube? Detachable
lumbar lid: on weekend outings to state parks, how easy is it to
detach/reattach the lumbar pack?
- Accessibility: can I actually reach my water bottles in the two
provided pockets without a rotator cuff injury? How easy is it to
access the map case, or is it too much hassle? How well placed is
the bite valve catch for my platy tube?
- Reliability & robustness: the BRT is covered with brambles
and brush - how well does the pack survive the abrasion? I am not
gentle when hoisting my pack - how well do the straps hold up?
There are lots of zippered pockets - do they snag or break? This
pack seems light for a 75 liter (4577 in^3) pack - did they cut corners
on
sturdiness?
- Functionality: how effective is the compartment design? Am
I able to use the various compartments effectively with no wasted
space? How flexible are the sleeping pad compression straps -
can I get my Hennessey SuperShelter in there? How well does the
collared storm shield keep water out of the pack (I do *not* use a pack
cover).
- Aesthetics: its a clean-looking pack from the picture, does it
still look that way after 4 months of wear and tear?
This concludes my Initial Report on the Mountainsmith Boundary
backpack.
The Field Report will be appended to this document in two months.
Field Report
June 5, 2008
Test Conditions
The principal test during the field report period was an eight-day,
100-mile (160 km) backpacking trip through northern Minnesota on the
Border Route and Superior Hiking Trail on May 23-30, 2008.
Altitudes ranged from 2300 ft (700 m) to 600 ft (183 m). Daytime
temperatures were as high as 65 F (18 C) to nighttime lows of 23 F (-5
C). Weather conditions included several sunny days, rain, sleet
and a snowstorm (yes, in late May!) The environment was mostly
heavy forest, lakes, rivers, creeks, ponds and one short segment of
Lake Superior shoreline.
The most significant aspect of the test conditions to pack performance
was the heavily overgrown (brush) and downed trees on the Border Route
necessitating 100's of excursions over, under and around fallen trees
with all the attendant opportunities for snags and abrasion.
Packing Strategy
As mentioned in the test plan, the trip on which this field report is
based was not intended as a model of lightweight backpacking.
Contents included two Ursacks filled with food for ten days.
Item
|
Weight
(lb)
|
Weight
(kg)
|
Base
|
27.2
|
12.1
|
Food bag 1 (bag included)
|
8.8
|
4.0
|
| Food bag 2 (bag included) |
11.0
|
5.0
|
Total food
|
19.8
|
9.0
|
Water/electrolyte drink
|
3.0
|
1.4
|
Total consumables with packaging
|
22.8
|
10.4
|
Total weight
|
50.0
|
22.5
|
The Mountainsmith Boundary pack has many packing options with the
various partitions, pockets, and external straps. My attempt to
use the space efficiently is as follows (from the bottom of the pack
up):
Pack
use
|
Components
|
Placement
|
Sleeping bag/stuff sack
|
Sleeping bag compartment
|
OCF pad
|
Pad straps
|
Beverage containers
|
Water bottle pockets
|
Raingear
|
Tucked into elastic rigging on
pack front
|
Camp shoes
|
Strapped on top of raingear with
accessory shock cords
|
Food bags (2)
|
Main compartment - bottom
|
Clothing: spare and cold-weather
|
Stuff sacs on top of food bags
|
Spare fuel and toiletries
|
Left side pocket
|
Water filter, camp supplies
(tent stakes, rope, etc.), spare Jetboil cannister
|
Right side pocket
|
Hammock and SuperShelter in
snakeskins
|
Folded and tucked under packlid,
some length tucked under side compression straps
|
Lunch, Jetboil, gloves, hat
|
Packlid
|
Current day's maps, compass
|
Map pocket
|
Prior/future day's maps
|
Hydration sleeve (just the right
size!)
|
GPS, camera, bug dope
|
Shoulder strap accessory sac
(not supplied with pack)
|
Cat hole trowel
|
Pass-though behind side pockets
|
In my Initial Report I had expressed some concern about the ability to
use the side pockets, but this turned out to be unfounded and I packed
them to capacity with no problems. I also found that my folded
rain jacket and pants tucked nicely into the front elastic straps, and
were quite accessible there in the event of precipitation.
Test Observations and Results
This is a pack designed to carry 50 lbs (22.5 kg). The hipbelt
and lumbar pad was very comfortable during the entire 8-day hike with
no pressure points. I did find my shoulders became quite sore in
the afternoons on the top near my neck, but I believe the pack was
somewhat undersized for me as I have a very long torso. After
all, carrying this kind of weight for 10 hours/day is not going to
happen without some soreness. I found all the straps
straightforward to adjust with the pack on, and experienced no slippage.
I changed my packing strategy only very little during the course of the
week. It quickly became apparent that access to the map pocket in
the lid was ill-advised with the hammock held down with the pack lid
and its straps. I quickly shifted to keeping my daily maps in my
pockets, and storing small items that I wanted to see were still there
(wallet, cellphone, etc.) in the transparent pocket.
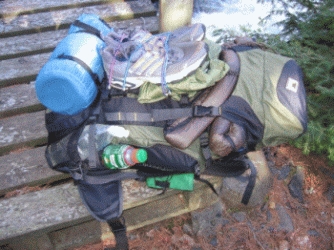 On that note I found
the pack lid and its 4 adjustable straps very effective in retaining my
coiled hammock in place on top of the main compartment as can be seen
in the photo at left. The first day I was paranoid about it
falling out and checked it often, but after that I stopped worrying
about it. This arrangement allowed me to exceed the pack capacity
substantially. This was required until the last day when I had
eaten my food supply down to the point that I could actually get the
shelter into the main compartment. On that note I found
the pack lid and its 4 adjustable straps very effective in retaining my
coiled hammock in place on top of the main compartment as can be seen
in the photo at left. The first day I was paranoid about it
falling out and checked it often, but after that I stopped worrying
about it. This arrangement allowed me to exceed the pack capacity
substantially. This was required until the last day when I had
eaten my food supply down to the point that I could actually get the
shelter into the main compartment.
Also apparent from the photo are my camp shoes strapped to the front,
and the bright green should strap accessory pocket at the bottom of the
photo.
As mentioned in the Test Conditions section, perhaps the biggest
challenge to the pack on this test hike was surviving the plethora of
abrasion and snag opportunities presented by the number of down trees
on the trails. The majority of the Border Route is through the
Boundary Waters Canoe Area Wilderness which prohibits use of motorized
equipment which means chainsaws cannot be used to clear down trees, and
I was also out early enough in the Spring that the Superior hiking
trail had not yet been cleared of Winter treefalls. The pack
survived numerous front scrapes from crawling under some trees, bottom
abrasion from straddling other trees, and side snags from dense brush
during bypassing of trees too dense to go over or under. It
weathered the abuse with no apparent ill effects.
I really appreciated the roominess of the water bottle pockets and the
associated strap for securing bottles. As can be seen in the
above picture, I often stored a Platypus 1L bottle plus an electrolyte
bottle in one pocket. During my entire trip with all the battles
with fallen trees I never had a bottle fall out of a pocket.
I did occasionally have some slippage of the OCF pad (in the blue stuff
sac in the above picture) out of one of the two straps. I thought
I had it in there pretty tight, but the Cordura bags are pretty
slippery and on occasion I did have the pad slip out of one of the
straps. Perhaps putting the straps a bit closer together would
prevent this from happening, as the straps seemed pretty close to the
edges of the bagged pad.
The other item I struggled a bit with was the trekking pole
straps. I often like to strap my poles to my pack in the late
afternoon when my shoulders get tired so I can use my hands to lift the
load off my shoulders. I found that the hook-and-loop straps for
the poles were a bit too short to securely hold my Black Diamond Spire
poles, and on one occasion I had a pole fall out of the straps.
This particular pole model is elliptical and has a reasonably large
diameter, but I would expect it would not be too much trouble for
Mountainsmith to add some length to the straps to accommodate heftier
poles.
Pack features not tested: I did not use the hydration tube ports.
I brought my hydration tube with me, but ended up finding the external
pockets so convenient that I chose to not use it. I also did not
use the packlid as a detachable lumbar pack - I traveled with the full
pack at all times.
Summary
Likes:
- All-day comfort
- Flexibility of pockets - side pockets allowed me to access items
I would normally store in a front pocket without removing items
strapped across the pack front.
- Roomy and secure water bottle pockets
- Four-strap floating pack lid allows gear to be stowed under the
lid outside the pack
- Roomy packlid allowed me to cram it full of daytime use items,
e.g. lunch
- Durable
- Well-sized for a one-week trip
Areas for improvement:
- Longer trekking pole straps
- More secure (closer together?) straps for external sleeping pad
- Hipbelt pockets - I was able to work around this with the
shoulder strap accessory pocket, but I really didn't care for that
solution as the accessory pocket flopped around every time I took the
pack off
Long Term Report
August 4, 2008
Test Conditions
During months three and four most of my pack use was during my July
month-long trip to Oregon. Locations include: Columbia River
Gorge, foothills of Mt Adams and Mt Hood, Oregon Coastal Range (mostly
in the Tillamook State Forest), the Wallowa Mountains, and Theodore
Roosevelt National Park in North Dakota.
Elevations ranged from 200 ft (60 m) to approximately 8400 ft (2560 m),
temperatures ranged from lows at night about 35 F (2 C), to daily highs
around 85 F (30 C), and peaked out in the low 90's F (32 C). Much
of the use was car camping and
dayhiking, but also included several 2-3 day backpacking trips.
The terrain was mostly mountainous including some very steep trails
(Elk Mountain), nicely switchbacked trails (PCT), and some very arid
conditions in Roosevelt NP. Most areas
were heavily forested with the exception of Roosevelt.
Pack weights during the LTR period were much lighter: approximately 30
lb (14 kg), as I was carrying only 2-3 days of food, and I had no need
for raingear during July in Oregon. One weighty exception was an
overnight in Roosevelt NP, where I was carrying 5 quarts (5 L) of water
which boosted my pack weight to about 35 lb (16 kg).
Lumbar pack
My dayhikes gave me ample opportunity to use and test the removable
packlid as a lumbar pack on several day-long hikes and a few shorter
trips as well. Detaching the packlid is quite easy using the two
buckles, though they can be a little hard to reach if the straps have
been tightened down too much "hiding" the buckles behind the pack back
foam panel. Once detached, the hip straps are easily extracted
from behind the map pocket. I found that when re-attaching the
packlid, the best way to repack the straps was to roll them up around
the belt buckle and push the roll back into the slot.
The packlid/lumbar pack was appropriately sized for a day trip. I
could easily carry a 1 qt/L water bottle, snacks or lunch, camera, GPS,
plus a light fleece. Access to the pack contents from the dual
zippers was convenient.
The lumbar pack was very comfortable and rode well on my hips with no
interference from the pack attachment buckles. The only
discomfort I experienced was on warmer days the plastic map pocket was
right against the small of my back which would perspire due to my
skin's
inability to breathe.
One item of note: using the packlid as a lumbar daypack meant I had to
jockey contents, stashing the items I normally carry in the packlid
into the pack and re-packing the items for the daytrip, then reversing
the process at the end of the day. This is the price one pays for
multi-tasking the gear.
Carrying Water
During the LTR period I did use the hydration sleeve with my Platypus
gear: 1L bottle with the hose. The 1L bottle fit nicely in the
sleeve, the hose was easily threaded through one of the two pack ports,
and the bite valve clipped conveniently to a shoulder strap. I
did manage to spill a bunch of water when hooking this all up, which
promptly drained through the sleeve to the bottom of my pack - the
sleeve is clearly not waterproof. The system worked fine
overall, but I was a little frustrated that my 3L Platy did not fit
into the sleeve and could not be easily used (see comments/photo in the
Initial Report). However, I was desperate for water capacity
during my overnight in Roosevelt NP and did use my 3L Platy in the
sleeve on this one occasion. It can be made to work as long as
sufficient gear is stacked in front of the reservoir to support it and
prevent the packlid from collapsing it. In this configuration I
was able to comfortably carry 5L/qt of water: 3L/qt in the sleeve, and
1L/qt in each of the side pockets.
I did find the perfect water container for the pack side pockets: a 1
qt (946 ml) Gatorade
bottle. It is wide enough to use most of the bottle sleeve
diameter, short enough to fit under the side pockets, and reasonably
high capacity. Once I started using the Gatorade bottles I
stopped using my 1L Platy's with the pack. The Gatorade bottles
were easily removed from and restored to the sleeve while wearing the
pack as along as I didn't overtighten the sleeve elastics. Their
rigidity made them easier to replace in the side pockets after drinking.
Other Observations
As I was doing a lot of car camping, I found I was loading and
unloading the pack from my trunk on a daily basis as I camped mostly in
walk-in sites that required up to a 1/4 mile (0.4 km) walk from my car
to the campsite. My trekking poles often fell off the pack during
loading/unloading from the car due to
the short hook-and-loop straps, and my sleeping pad fell off several
times as
well. The latter is packed in a Cordura dry pack which is quite
slippery, but I was a little frustrated that it kept popping off.
During the LTR test period I often carried Chaco sandals as my camp
shoes. These fit nicely into the pack back elastics (I didn't
carry rain gear in Oregon), though they were a little hard to get
in/out as the straps and treads would catch on the cords.
I found I had no need to alter my packing strategy during the LTR
period, though I was able to pack my hammock in the bottom of the pack
instead of under the packlid as I was never overloading the pack with
food.
I did use my tent once during the LTR period in Roosevelt NP as there
are no trees there to hang a hammock, and I did find that the
pass-thru pockets are in fact ideal for tent pole storage. The
poles extend down into the side pockets, and were the same height as
the pack so they were well-protected in the pass-thrus.
Durability: after four months, not a scratch, not a frayed strap, no
zipper problems, no failures whatsoever. This despite the abuse
of my Boundary Waters trip and dozens of times being thrown into or
yanked out of my car trunk.
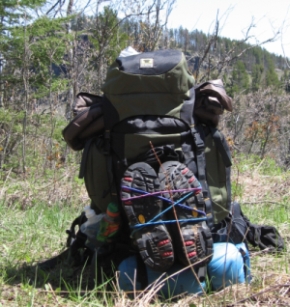
The Boundary Pack in the Boundary Waters!
Final Conclusions
Things I liked:
- Roominess and flexibility of space use. I liked not having
to struggle to cram my gear into my pack, and despite the large loads
my gear was always easy to access, even with lots of gear strapped to
the front as in the above photo.
- Durability: the pack held up remarkably well.
- Comfort: the shoulder and hipbelt padding are good for week-long
hikes with large loads.
Areas for improvement:
- The map pocket is not really useful for that purpose, and causes
perspiration in the low back when using the packlid as a lumbar pack.
- Better accommodation of larger (taller/narrower) Platy hydration
reservoirs in the sleeve.
- Add hipbelt pockets - I really found the shoulder strap accessory
sac a pain to use for camera, GPS, etc.
- Move the sleeping pad straps slightly closer together to minimize
possibility of the pad escaping the straps, and make the trekking pole
hook-and-loop straps longer.
Many thanks to Mountainsmith and BackpackGearTest.org for the
opportunity to
test this product.
Read more reviews of Mountainsmith gear
Read more gear reviews by Kurt Papke
|


 The
Mountainsmith Boundary pack is moderately lightweight with a volume
designed for trips of a weekend or longer and apparently targeted at
the "green" consumer: it prominently displays a "recycled" icon on the
lower front of the pack and comes tagged with a card that says "you and
this pack saved 48 plastic bottles from the landfill". The label
states that 100% of the webbing, binding and fabric is 100% recycled
PET.
 The
picture to the left shows the back view including the substantial
molded foam back. The air channels to allow the back to breathe
are clearly visible. Note that the shoulder straps and hip belt
are generously padded.
 All hydration sleeves are not created equal. The
picture on the left shows my 3L (100 fl oz) Platypus hydration
reservoir positioned
in the sleeve with about half of it poking out through the top.
The ruler shows the scale and rough dimensions - it is about 10 inches
(25cm) deep. Clearly I will not be using this size reservoir with
the pack.
 On that note I found
the pack lid and its 4 adjustable straps very effective in retaining my
coiled hammock in place on top of the main compartment as can be seen
in the photo at left. The first day I was paranoid about it
falling out and checked it often, but after that I stopped worrying
about it. This arrangement allowed me to exceed the pack capacity
substantially. This was required until the last day when I had
eaten my food supply down to the point that I could actually get the
shelter into the main compartment.