

|
|
 |
Guest - Not logged in | ||||||||||||||||||||||||||||||||||||||||||||||||
Reviews > Packs > Internal and External Framed Backpacks > Osprey Kestral 48 Pack > Test Report by Andrew Buskov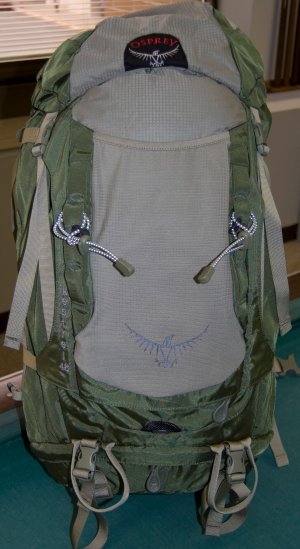 Osprey's go anywhere, do anything multi-day lightweight pack Andrew Buskov Field Report: March 15, 2008 Long Term Report: May 15, 2008
Backpacking Background:I've been hiking since I was around 10 and have hiked in all kinds of environment and terrain: snow, rain, and steamy heat; desert, mountains, as well as grasslands. I prefer hiking in the colder weather and snow, but will get out any time of the year. My typical pack weight is roughly 25-30 lbs (11-14 kg) and usually includes a tent or hammock. I prefer comfort over going ultra light, though having lightweight items in my pack sure makes the hike more enjoyable. Additional information about the author can be found at http://www.corridor9.net. Product Information: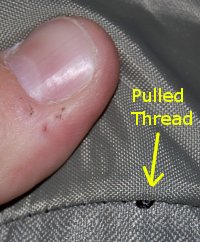
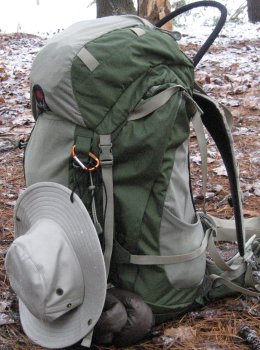
Product Overview:As stated above, the Osprey Kestrel 48 is Osprey's light weight multi-day pack. It's designed in such a way as to be comfortable, completely adjustable to provide a custom fit, yet have superb comfort and ample room to pack not only the necessities but also the items that make the trip enjoyable. Available in two torso sizes, the Kestrel 48 is adjustable for various frames and sizes. Designed with the wearer in mind, the Kestrel 48 includes a peripheral steel spring rod for comfort, and a unique attachment system for stowing hiking poles on the fly. Multiple attachment points on the top, back and bottom allow for lashing gear to the outside of the pack if you simply can't fit it inside. While there are twin stretch Lycra pockets that are big enough to hold wide mouthed water bottles with ease, the Kestrel 48 is still designed with an integrated hydration pouch for bladder style hydration systems. An integrated rainfly helps protect against inclement weather and being stowed in its own pouch brings that extra bit of luxury that Osprey is known for.Initial Impression: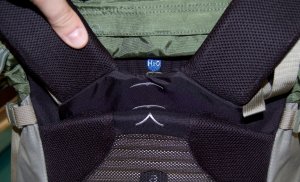 The
Osprey Kestrel 48 pack arrived at my house wrapped inside a protective
plastic sleeve and in a slightly oversized shipping box. It was well
packaged to prevent damage while shipping. Attached to the pack were
two hang tags, while the owner's manual was stuffed into the front
outside pocket. Unfortunately, because of the way the backpack was
packaged, when I removed the pack from its plastic bag and took it out
for examination the first thing that I noticed was a loose thread. In
the front center of the pack, just underneath the lid, there is a lose
thread that is easily noticeable as seen in the picture above. It
doesn't appear that it's going to
pull out, and is tucked between the fold of two other fabrics. The only
other imperfection that I could find was just below the integrated rain
cover pouch. It appears that something rubbed the fabric and scuffed
it. It's only about 1 mm (0.04 in), and only lightly scuffed. It was
noticeable though, so I thought I'd better document it. I'll
definitely keep my eye on these though and provide information on this
for my Long Term report if they begin to pose a problem. The
Osprey Kestrel 48 pack arrived at my house wrapped inside a protective
plastic sleeve and in a slightly oversized shipping box. It was well
packaged to prevent damage while shipping. Attached to the pack were
two hang tags, while the owner's manual was stuffed into the front
outside pocket. Unfortunately, because of the way the backpack was
packaged, when I removed the pack from its plastic bag and took it out
for examination the first thing that I noticed was a loose thread. In
the front center of the pack, just underneath the lid, there is a lose
thread that is easily noticeable as seen in the picture above. It
doesn't appear that it's going to
pull out, and is tucked between the fold of two other fabrics. The only
other imperfection that I could find was just below the integrated rain
cover pouch. It appears that something rubbed the fabric and scuffed
it. It's only about 1 mm (0.04 in), and only lightly scuffed. It was
noticeable though, so I thought I'd better document it. I'll
definitely keep my eye on these though and provide information on this
for my Long Term report if they begin to pose a problem.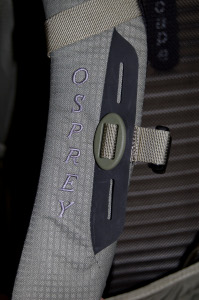 After
inspecting and obtaining a weight, I thoroughly looked over the pack
and
all its features. I was surprised at how many features were stuffed
into this pack. From the key clip inside the three pocket lid, to the
integrated rain cover tucked in its own pouch on the front of the pack,
all the way down to the breathable hip belt I couldn't help but notice
little extras everywhere I looked. It's obvious, however, that Osprey
didn't just cram a bunch of useless stuff into the pack. All the
features I found are items that I've used in various other packs, or
items my other packs lacked that I wished were included. I'll go over
the
features in detail further below. After
inspecting and obtaining a weight, I thoroughly looked over the pack
and
all its features. I was surprised at how many features were stuffed
into this pack. From the key clip inside the three pocket lid, to the
integrated rain cover tucked in its own pouch on the front of the pack,
all the way down to the breathable hip belt I couldn't help but notice
little extras everywhere I looked. It's obvious, however, that Osprey
didn't just cram a bunch of useless stuff into the pack. All the
features I found are items that I've used in various other packs, or
items my other packs lacked that I wished were included. I'll go over
the
features in detail further below.I guess the best place to start discussing this pack would be with initial fitting. The Osprey Kestrel 48 pack uses a hook and loop style system making it easy to adjust, or change on the fly, without tools. On the shoulder strap assembly is a set of markings resembling a bird that when aligned with the chevron on the pack body indicate specific measurements. One of the things that is missing from all documentation though is the rate of adjustment; what are the increments at the different indicator marks? I ended up calling Osprey's customer service and speaking with Eric to figure out exactly how the measurements are. He was very nice and quickly looked over his documentation and informed me that the markings are set 1 in (2.54 cm) apart. Since I have a M/L pack, when the top bird is aligned with the chevron the pack is setup for a person with a 19 in (48 cm) frame. There are 4 additional markings on the shoulder harness assembly allowing for 5 in (13 cm) of travel. 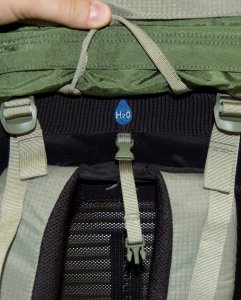 Something to note though is the
fact that when adjusting for a larger frame, more of the strap assembly
is outside the body, and therefore less of the hook and loop closure is
available to secure the strap assembly to the pack. As I have this pack
setup for a 20 in (51 cm) torso size, I don't foresee a problem, but
I'll keep an eye on this throughout the test. Also, to note, while I am
technically a 21 in (53 cm) torso, I am able to shorten it a bit and
still be extremely comfortable. Because the torso sizing is done
with hook and loop closures, the sizing can be tweaked to the smallest
increments if I wanted, and I'm not limited to 1 in (2.5 cm) minimum
spacing. Something to note though is the
fact that when adjusting for a larger frame, more of the strap assembly
is outside the body, and therefore less of the hook and loop closure is
available to secure the strap assembly to the pack. As I have this pack
setup for a 20 in (51 cm) torso size, I don't foresee a problem, but
I'll keep an eye on this throughout the test. Also, to note, while I am
technically a 21 in (53 cm) torso, I am able to shorten it a bit and
still be extremely comfortable. Because the torso sizing is done
with hook and loop closures, the sizing can be tweaked to the smallest
increments if I wanted, and I'm not limited to 1 in (2.5 cm) minimum
spacing.In addition to the adjustable shoulder harness, the chest strap is also adjustable. Unlike the shoulder harness though, there are only three available settings for the chest strap as seen in the picture above. Having only 3 settings isn't really a problem for me as I tend not to use the chest strap all that much anyway. However, this is definitely something to note for those who need a finer adjustment than this. In addition, it must be noted that adjusting the torso length also moves the positioning of the chest strap. This could potentially be a problem if the wearer is at the either end of the shoulder harness adjustment limits. 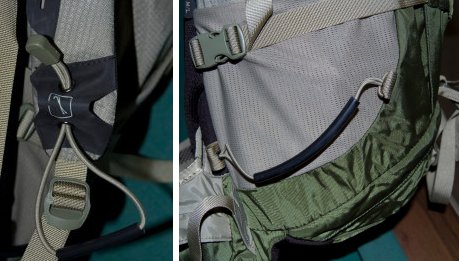 Adjustment
of the hip belt was a breeze thanks in part to the way the belt is
designed. Most traditional belt designs have the straps sewn to a part
of the hip belt then threaded through a cinch on the buckle.
Because of this the user is forced to pull the straps towards their hip
and rearward to tighten the belt buckle. This is very
inefficient
and not necessarily the easiest way to tighten a belt. Osprey
has
designed a system that actually loops the hip belt in a V shape from
the hip belt, to the buckle, and back to a plastic cinch sewn
to
the hip belt. This makes tightening the hip belt much easier as
the strap ends are facing away rather than toward the rear of
the
wearer. Pulling these is a simple matter of grabbing the straps and
pulling them forward away from the user. Much easier, and more user
friendly. Adjustment
of the hip belt was a breeze thanks in part to the way the belt is
designed. Most traditional belt designs have the straps sewn to a part
of the hip belt then threaded through a cinch on the buckle.
Because of this the user is forced to pull the straps towards their hip
and rearward to tighten the belt buckle. This is very
inefficient
and not necessarily the easiest way to tighten a belt. Osprey
has
designed a system that actually loops the hip belt in a V shape from
the hip belt, to the buckle, and back to a plastic cinch sewn
to
the hip belt. This makes tightening the hip belt much easier as
the strap ends are facing away rather than toward the rear of
the
wearer. Pulling these is a simple matter of grabbing the straps and
pulling them forward away from the user. Much easier, and more user
friendly.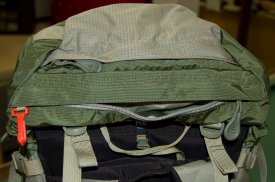 This
pack is hydration compatible, a definite plus. However, rather than
having the bladder stowed inside the body of the pack, there is a
bladder compartment that is accessible from the outside of the pack
just behind the shoulder adjustment harness. This makes filling the
bladder much simpler as the user doesn't need to fuss around with
the gear inside the body to remove the bladder. The back side of the
bladder compartment is actually the front side of the main compartment
body. Since this is the case it's only natural that if a larger
hydration bladder is used, less main compartment space will be
available. I'll have to see if this poses a problem throughout the life
of the test. The pack has a small hang clip at the top of the hydration
pouch to hold the bladder up and prevent it from sinking to the bottom
of the compartment. This helps keep the liquid flowing smoothly rather
than allowing the bladder to collapse upon itself or kink up around the
hose coupling. The clip is rather small though and can be difficult for
large hands to operate. Being as how the clip is roughly the same size
as my thumbnail, I found it really hard for my fat fingers to release.
As the bladder I use has an open ended hook, disconnecting this clip
repeatedly will not be a problem for me, but it is definitely something
to consider. This
pack is hydration compatible, a definite plus. However, rather than
having the bladder stowed inside the body of the pack, there is a
bladder compartment that is accessible from the outside of the pack
just behind the shoulder adjustment harness. This makes filling the
bladder much simpler as the user doesn't need to fuss around with
the gear inside the body to remove the bladder. The back side of the
bladder compartment is actually the front side of the main compartment
body. Since this is the case it's only natural that if a larger
hydration bladder is used, less main compartment space will be
available. I'll have to see if this poses a problem throughout the life
of the test. The pack has a small hang clip at the top of the hydration
pouch to hold the bladder up and prevent it from sinking to the bottom
of the compartment. This helps keep the liquid flowing smoothly rather
than allowing the bladder to collapse upon itself or kink up around the
hose coupling. The clip is rather small though and can be difficult for
large hands to operate. Being as how the clip is roughly the same size
as my thumbnail, I found it really hard for my fat fingers to release.
As the bladder I use has an open ended hook, disconnecting this clip
repeatedly will not be a problem for me, but it is definitely something
to consider.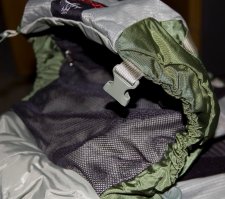 Another
feature of the Osprey Kestrel 48 is the integrated Stow on the
Go pole attachment system. With two elastic straps, the user
has
an easy way to attach poles while walking, without stopping, and
without removing the pack to cinch the poles to the daisy chain as with
other packs. The elastic straps are located on the left shoulder strap
and around the left hip area. Using the system is as easy as grasping
the elastic cord around the hip, inserting the pole tips in between the
cord and the pack, grasping the cord at the shoulder area and inserting
the pole handles in between the cord and the shoulder strap. If
necessary a cinch adjustment is available at the shoulder strap to
provide for a tighter hold. I often hike without poles, but
have
found that I have a tendency to do this even when I need them simply
because I don't want to keep stopping to strap or unstrap my poles from
the back. Having a system such as this might make that a thing of the
past. Another
feature of the Osprey Kestrel 48 is the integrated Stow on the
Go pole attachment system. With two elastic straps, the user
has
an easy way to attach poles while walking, without stopping, and
without removing the pack to cinch the poles to the daisy chain as with
other packs. The elastic straps are located on the left shoulder strap
and around the left hip area. Using the system is as easy as grasping
the elastic cord around the hip, inserting the pole tips in between the
cord and the pack, grasping the cord at the shoulder area and inserting
the pole handles in between the cord and the shoulder strap. If
necessary a cinch adjustment is available at the shoulder strap to
provide for a tighter hold. I often hike without poles, but
have
found that I have a tendency to do this even when I need them simply
because I don't want to keep stopping to strap or unstrap my poles from
the back. Having a system such as this might make that a thing of the
past. There are numerous pockets on this pack allowing for ample placement of gear; a total of 11 including the main compartment. In the lid of the pack alone there are three separate compartments; two on the outside of the pack and an additional mesh one located on the inside. A red key clip is located in one of the outside compartments. Also on the top of the pack are four 1 in (2.54 cm) straps sewn in as additional lashing points for external gear. On either side of the pack there is one full length zippered compartment as well as one 1/4 length mesh stretch pocket. This same stretch material is used for a front pocket that spans roughly half the pack's length. One either side of the hip belt is an additional small compartment that is good for trail bars or small cameras. 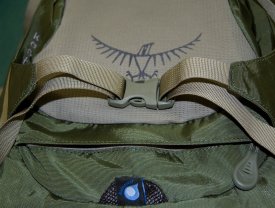 The
top lid is not removable, and therefore does not double as a fanny pack
as some tops. This isn't a problem for me as I have never used a top in
this way, and prefer carrying an additional shoulder style daypack as
opposed to this system. However, one thing that I did note about the
top portion is the elastic curve it has. Rather than leaving the top
material loose and allowing the compression straps to tighten the top
down, Osprey has embedded a stiff elastic cord on either side of the
top section. This creates a noticeable curve as seen in the picture
above, and makes it difficult to get the top cover to fit the pack when
it is fully stuffed. I have packed the Kestrel a couple of times and
have noted that getting the top lid to fit snugly can take a bit of
time, but I'll be reporting on this more in depth over the life of the
test. The
top lid is not removable, and therefore does not double as a fanny pack
as some tops. This isn't a problem for me as I have never used a top in
this way, and prefer carrying an additional shoulder style daypack as
opposed to this system. However, one thing that I did note about the
top portion is the elastic curve it has. Rather than leaving the top
material loose and allowing the compression straps to tighten the top
down, Osprey has embedded a stiff elastic cord on either side of the
top section. This creates a noticeable curve as seen in the picture
above, and makes it difficult to get the top cover to fit the pack when
it is fully stuffed. I have packed the Kestrel a couple of times and
have noted that getting the top lid to fit snugly can take a bit of
time, but I'll be reporting on this more in depth over the life of the
test.The compression straps are designed in such a way as to operate easily and without binding. This is especially noticeable around the side mesh pockets. The straps, while extending over the outside mesh pockets, do not seem to prevent use of the pocket. More on this aspect throughout the test. On the plus side, I have noticed that the straps are designed to be reversed. In what Osprey calls the Reverse StraightJacket Compression system, I am able to not only use the compression straps to tighten gear, but also to lash gear to the back of the pack without changing the clips. The picture above right shows the compression straps reversed in lashing mode. While the strap pulls are on the inside, they are still easy to pull and tighten. This makes it easy to lash a tent or extra pad to the back of the pack with ease. 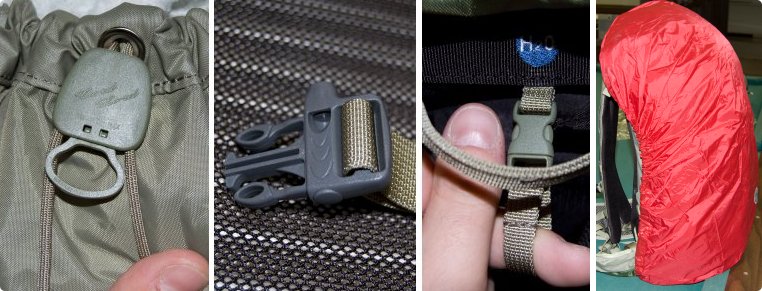 Additional bells and whistles include the Cord Lord system of closing the skirt around the main body of the pack. This system does a good job of keeping the skirt closed and not allowing the drawcord to slip as with some other systems. In addition, there is a whistle on the chest strap that is integrated into the clip providing a backup, or primary for the daring. The integrated rain cover can be used without removing it from the pack. It is attached via a hook and loop closure to a keeper cord inside its dedicated pocket. This is a definite plus as I have found the rain cover to not fit as snugly as I would like. From the packing that I have done, I have found that the elastic drawcord that holds the rain cover around the circumference of the pack slides off the bottom rather easily. I would hate to see this rain cover fall off somewhere on the trail. In short, I am very pleased with the quality of construction that Osprey uses in the Kestrel 48 pack. I have found that I am able to pack the little extras that make a hiking trip safer and more comfortable. I haven't found any negative aspects so far, and am really looking forward to putting some miles on the trail with this pack and the extra space it provides me. I'd like to thank Osprey and BackpackGearTest.org for the opportunity to test the Kestrel 48 pack. Field Report: March 15, 2008
During
the Field Report phase of testing, I was able to use the Osprey Kestrel
48 on two different occasions for a total of three days of
use. My primary backpacking trip occurred in late November
when I took a 2 day jaunt to the Red River Gorge area of
Kentucky. As part of the Daniel Boone National Forest, Red River Gorge has
roughly 36 mi (58 km) with an elevation ranging from 700
to 1300 ft (200 to 400 m). We traveled approximately 16 miles of trails. Temperatures for this trip ranged from
40 F to 20 F (4 C to -6 C) with precipitation in the form of
freezing rain and snow. Additional testing occurred on a day trip
to the Pennyrile State Resort Park area of the Pennyrile
State Forrest, a 14,000 acre (5600 hectacre) section of forest that has roughly
23 mi (37 km) of trails. The
elevation for the area is between 400
-700 ft (122 - 213 m). The
temperature for most of my trips was around 50 F (10 C) with no
precipitation. My pack weight for this trip started out at 28 lbs (12.7
kg). Naturally this got lighter as water and food was removed from the
pack. | |||||||||||||||||||||||||||||||||||||||||||||||||
 Field Conditions:
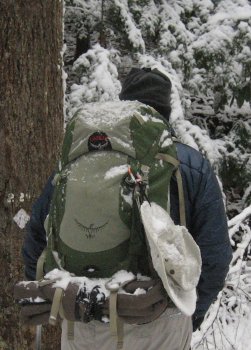 I was
able to comfortably carry roughly 45 lbs (20 kg) worth of gear.
Anything more than that and I started feeling the pack more; the
shoulder straps would dig in my shoulders a bit, the hip belt would
want to slide down. However, as I tend to pack light, this isn't going
to be a problem for me especially as this pack wasn't designed to carry
loads that heavy. When hiking with my load around 30 lbs (13.5 kg) the
pack was nice and stable, didn't shift around on my back, and I didn't
feel much gear shifting around on the inside of the pack either.
I was
able to comfortably carry roughly 45 lbs (20 kg) worth of gear.
Anything more than that and I started feeling the pack more; the
shoulder straps would dig in my shoulders a bit, the hip belt would
want to slide down. However, as I tend to pack light, this isn't going
to be a problem for me especially as this pack wasn't designed to carry
loads that heavy. When hiking with my load around 30 lbs (13.5 kg) the
pack was nice and stable, didn't shift around on my back, and I didn't
feel much gear shifting around on the inside of the pack either. 15 F (-9 C) sleeping sag