Osprey Kestrel 48
"go anywhere, do anything overnight pack"
Initial Report 16th December 2008
By Mark McLauchlin
* Reviewer Information
Name: Mark McLauchlin
Age: 30
Gender: Male
Height: 1.76 m (5 9)
Weight: 80 kg (176 lb)
Email: mark at swanvalleyit.com.au
City: Perth, Western Australia
* Backpacking Background
I have been hiking since 2006 with most of my hiking consisting of day walks averaging 16 - 22 km (10 - 14 mi) and short overnight trips where
possible.
Most of my hiking is along the Bibbulmun Track and Coastal Plains Trail. I consider myself to be a light hiker with an average pack weight of 13 kg (29 lb),
which I am working to reduce. I generally sleep in my tarp tent or huts
that are often scattered along the various hiking trails.
* Product Information
Manufacturer: Osprey Packs Inc
Year of Manufacture: 2008
Manufacturer's Website:
www.ospreypacks.com
Listed Weight: 1.87 kg (4 lbs)
Measured Weight: 1.87 kg (4 lbs)
Size: S/M
Volume: 46 L (2800 cu in)
Carrying Capacity: 5 - 15 kg (11 - 33 lbs)
Colour: Twilight Blue
Colour Variants: Paprika & Lichen
Materials: 420D Nylon Pack Cloth, 210D x 330D Nylon Shadow box, Nylon
Spun Mesh
Frame type: Internal peripheral steel spring
MSRP: not listed
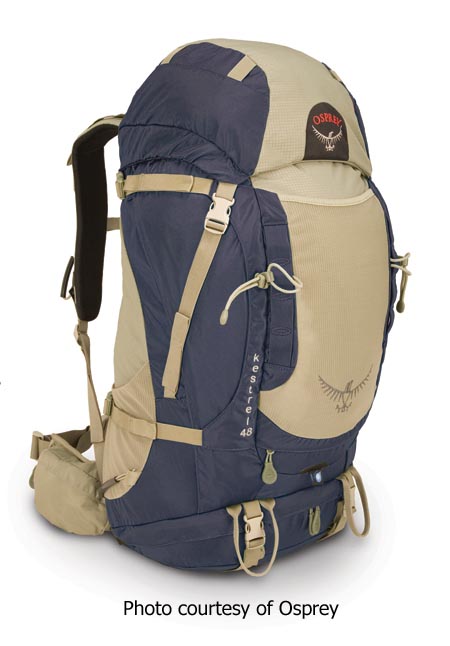
* Product Description
The Osprey Kestrel 48 is described by the manufacturer as "the
ultimate go anywhere, do anything overnight pack". The pack is light
in weight yet boasts as heap of features that make it ideal for the
experienced backcountry hiker. The Stow-on-the-go trekking pole
attachment, large stretch woven pockets, integrated pack cover are some
of the features that make this a truly unique pack. Two torso sizes are
available and combined with the adjustable harness system this provides
for a very comfortable custom fit.
* Initial Impressions
The Osprey Kestrel 48 arrived as expected after its trip from the US,
the package was complete with all tags and instructions. Upon opening
the pack I did find some damage to the plastic protective bag it was
enclosed in and subsequently "dirty" marks on a few of the straps.
Fortunately or unfortunately depending on which way you look at it, this
gave me the opportunity to test how easily the pack materials cleaned
and what was the best method to do this. With a soft cloth, dampened in
soapy water and a little elbow grease I was quite surprised a how easily
the stains were to remove. So far I am very excited about testing this
pack and can already see that it will become my preferred pack. It
looks great, fits well, provides great comfort and has some very cool
and unique features which will be explained.
 |
Main compartment and Extension Collar
The main body of the Kestrel is a single, top loading
compartment rectangular in shape. This is the largest volume
compartment, approximately 35 Litres (2136 cu in) and
features an extension collar with a Cord Lord draw string. The
height of the extension collar measures 14 cm or 5.5 in and
would probably increase the volume of the main body by
approximately 8 to 10 L (488 - 610 cu in). The material is a
420D Nylon Pack Cloth and appears to be very well made and
robust. There is very little to say regarding this part of the
pack suffice as to say that is should comfortably hold and
secure all my hiking gear.
|
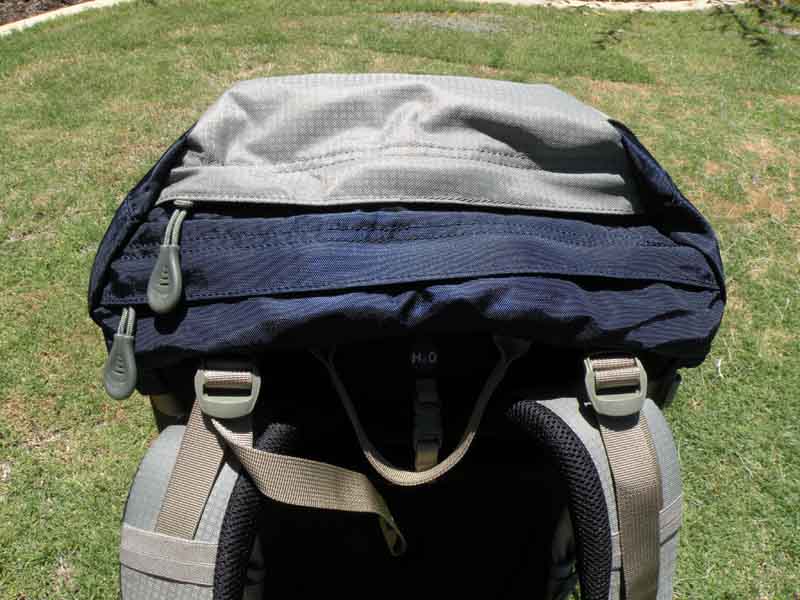 |
Zippered Top Pocket
The Zippered Top Pocket is a place I usually
store my medical kit, small snacks, and torch for easy access.
In the case of the Kestrel there are three pockets, two of which
have a zipper that is positioned near where my head would be
when carrying the pack. The third pocket is located on the
underside of the top pocket and is made from a mesh material.
The pocket is not removable and is secured by two side mounted
compression straps. I will be testing to see if I am able to get items in and out without taking the pack off (something
I can do now). How well the zipper works and how well the whole
pocket sits on top of the main body of the pack. The pocket fits
very snug which adds to the style of the pack, however I am
interested to find out if this may cause any issues when the
pack is full or overfull as it maybe. Upon opening
the bottom of the two pockets there is a nice small red clip or
key fob
attached to the body of the pack, very useful for locating and
securing items such as car keys. From looking at the key fabrics
chart this is made from 420D Nylon Pack Cloth. I would also
estimate the volume to be approximately 10 litres (610 cu in). I
am also interested to find out if this pocket is water
resistant or water proof as the material on the inside is quite
different and feels as though it may provide some protection.
This is not such a big issue as the pack comes
with a rain cover, however in light mist or rain I may not need
to use it. |
|
|
<<TOP>> |
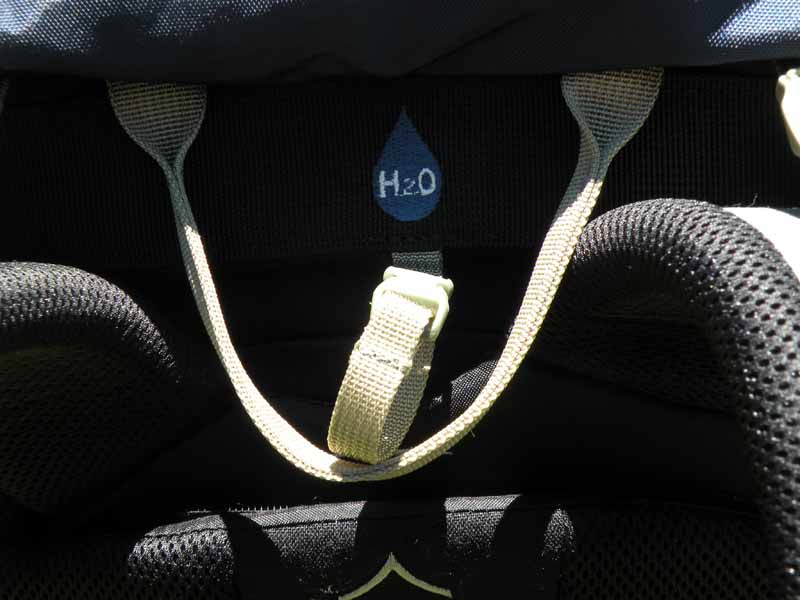 |
Hydration compatible
Hydration
compatibility is a strong selling point for me on any pack due to the
need to efficiently pack quite large amounts of water. The temperatures
on the West Coast of Australia can reach up to 40 C or 104 F so the
ability to remain hydrated is vitally important. The Kestrel's hydration
compatibility means that with the right bladder and valve, water is always
easily accessible. The feature is identified with a water drop and the
chemical symbol for water "H2O". Once the bladder (not supplied) is full
of liquid it is inserted into the cavity between the AirScape Backpanel
and the outer lining of the main body of the pack, it is
then supported by a small clip and loop setup that is both
functional and easy to use. This setup seems to be a way to keep the bladder contents
cooler by allowing air to pass over it. The bladder hose can
then be guided through the elastic routers on the left or right
harness, depending on preference.
|
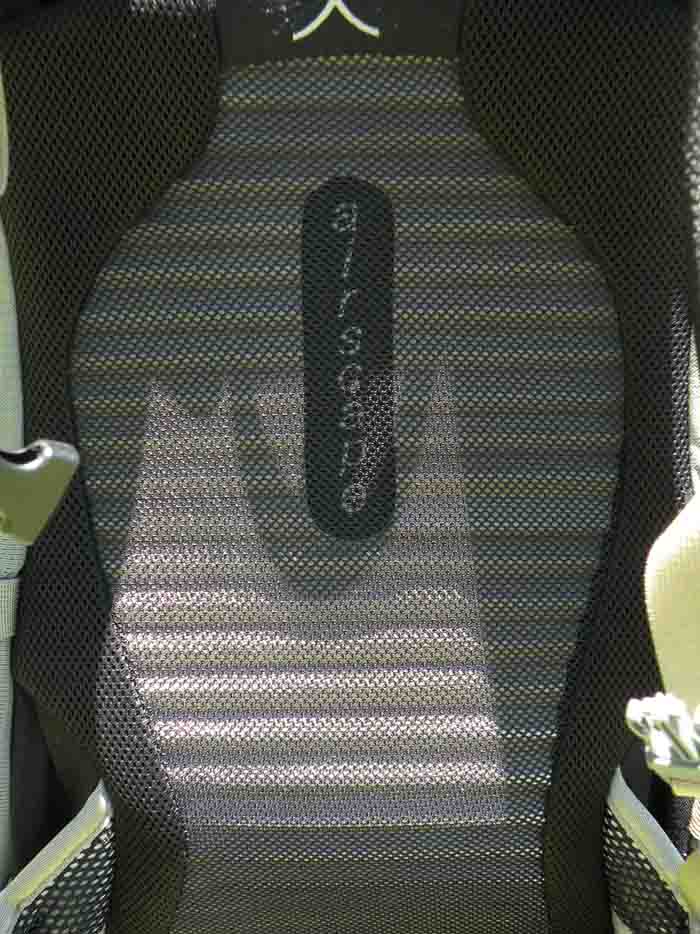 |
The AirScape Backpanel
The AirScape Backpanel is perhaps one of the features
that intrigue me the most about this pack. When I initially laid eyes on
it I thought to myself WOW this is really cool and literally thats
what it is there for. The feature is there to create a gap between the
main body of the bag which carries the gear and the back of the hiker.
This gap that is created enables air to flow through which in turns
helps to reduce heat and sweat build-up. The panel itself is has a layer
of mesh supported by a 0.5 cm (0.2 in) ridge moulded foam. The torso adjustable harness and hipbelt are also attached to this Backpanel. During the test period I
will carefully monitor how well heat is reduced on my back and at the
same time if any comfort is gained or reduced. I will also look for any
signs of wear to the mesh.
Torso Adjustable Harness
The Kestrels Torso Adjustable Harness has several
points of adjustment that make it truly unique. The harness including
shoulder straps are perhaps the most crucial part of any pack. If the
pack is not comfortable then the whole experience is darkened. The main
shoulder straps are fixed to the body of the pack via a hook and loop
material mechanism
so that the torso length can be adjusted (i.e. the difference in length
between the hip belt and top of shoulder straps). Under load I will be
monitoring how well the hook and loop hold up ensuring it doesnt give way. As
with most packs the shoulder straps can be adjusted for length by way of a
buckle. There is also some adjustment at the top of the shoulder straps
to pull the top of the pack closer into the body. There seems to be
sufficient padding in
the shoulder straps to provide comfort and I do not foresee any points that
may cause irritation or sore points on my shoulders. |
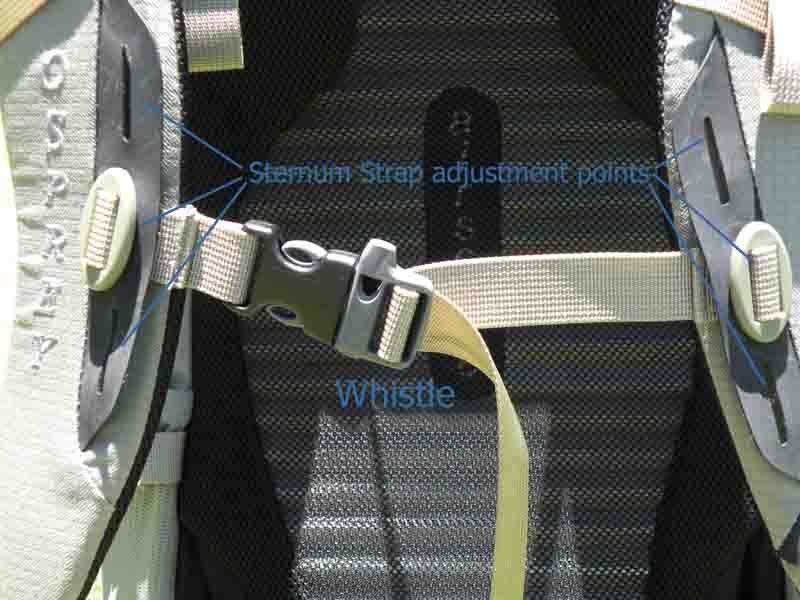 |
Adjustable
Sternum Strap
This setup is quite interesting and provides a few features.
It can be seen from the image that the Sternum Strap has three
available positions, each approximately 3.8 cm or 1.5 in apart.
The oval sternum buckle on the ends of the webbing straps
are rotated and pushed
through the holes in a similar fashion to a button on a piece of
clothing. Once in a suitable position the strap can be tightened
by pulling on the excess cord, shown hanging down in the image.
One other item I find very unique about this is the dual purpose
clip, it also doubles as a Whistle, now there is a great idea.
This is one less item I have to worry about now as I usually
have one hanging from the shoulder harness (reaching distance
for my lips) for safety reasons - really well done! |
|
|
<<TOP>> |
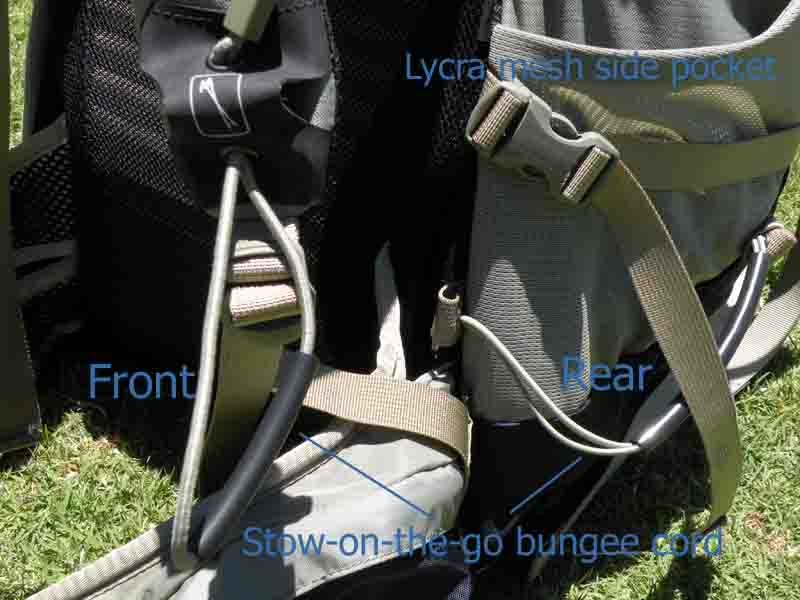 |
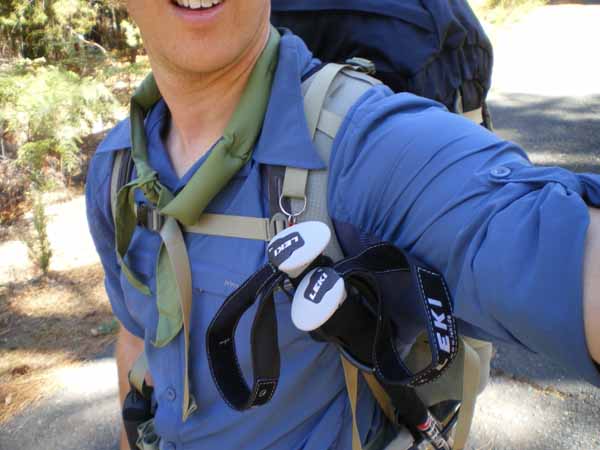
Stow-on-the-go trekking pole attachment
This
neat feature is designed to enable the hiker to tuck away their trekking
poles so that both hands are free for use in situations such as
climbing. The idea is simple as utilises two sets of bungee cords, one
located on the side of the main compartment, and the other on the
shoulder harness strap. Stowing of the poles takes only a few seconds and
is as simple as pulling the bungee cord to the left bottom of the pack
and inserting the ends of the poles. The left harness bungee is then
pulled over pole handles and tightened. I have only recently started
hiking with trekking poles and as I am still getting used to them I can
see that having an easy way of storing them whilst hiking (so I don't
have to think about timing the movement of the poles with my feet) is a
great idea. I have been able to take the pack out on one hike during my
initial report period which comprised of lots of photo taking and really
liked the easy of using this feature.
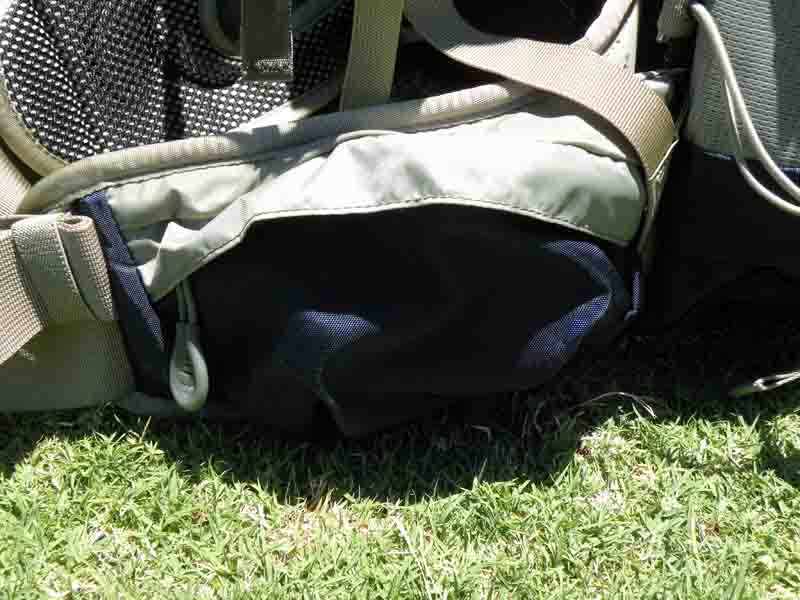
Stretch Lycra mesh front and side pockets
The pockets are made from Nylon
spun mesh and have a very soft feel about them. Each has an elastic
opening to ensure the contents are secure. The side pocket measures 16
cm (6 in) deep and 15 cm (5.9 in) wide and stretches varyingly along the pocket.
To give an idea of the size I have easily been able to fit my wide mouth
Nalgene 1 L (34 fl oz) bottle without having to over stretch the
pocket. There is also a side compression strap, as can be seen from the
image, that helps with both securing the items in the pocket and
providing an overall compression to the pack. The
front mesh pocket is made from the same materials and is approximately
25 cm (10 in) deep by 22 cm (8.5 in) wide. This pocket also has an
elastic opening and will be ideal for storing my
rain jacket/jumper and my maps. Due to the very soft feeling
fabric and the probability of becoming caught on shrubs and branches I
have concerns about the short-term durability of these and will be
monitoring very closely.
|
 |
Hipbelt
The Hipbelt is considered part of the Torso Adjustable Harness.
This item is fixed to the main body of the pack and features an
adjustable strap and buckle at the front to suit different waist
sizes. Padding in this area will be examined and tested as most
of the pack weight is carried on the hips so it is a vital item
for the manufacturer to get right. I will be looking for how the hipbelt
sits on my hips, how comfortable it is under heavy and light loads, does
it keep the pack stable on my back when bending over, climbing, walking
and rock hopping. Initial trial
of the pack leads me to believe the hipbelt will provide comfort
and be very functional despite the appearance of limited
padding. As the pack is smaller than my current 60 L (3661 cu
in) hopefully
this will lead me to pack and carry less, thus reducing the load
on my hips and in turn meaning less padding is needed.
Hipbelt pockets
As the name suggests these are integrated into
the hipbelt, and one can be found on each side. They are fairly
small and like most of the other compartments on the pack are
opened and closed by way of a zipper. By looking at the key
fabrics chart on Osprey's website these are made from a 420D
Nylon pack cloth. These are also another feature that I have not
been exposed to before and are very interested to see how
functional and useful these are. From the initial trial run my
Pentax digital camera with the StickPic will fit in one pocket
and my keys and lip balm will fit in the other. Perhaps a
handful of lollies or trail mix would also be a good idea. I
will as best as I can measure the pocket size and performance of
this. Do my arms rub up against them when I am walking? Will the
Nylon material suffer any punctures or wear from items either
inside the pocket or external? |
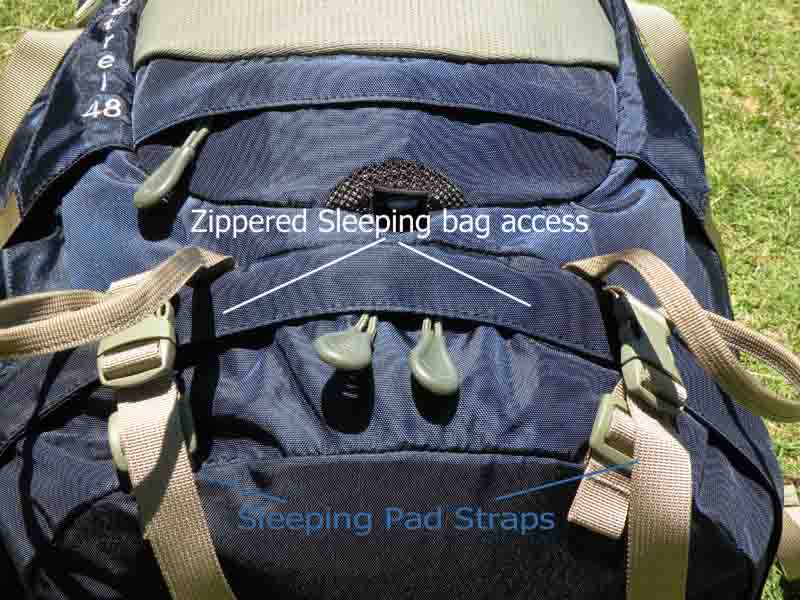 |
Zippered Sleeping bag access and Sleeping Pad Straps
The
Zippered Sleeping bag access is feature that none of my previous packs
have so I am very curious to see how this will perform and the
advantages or disadvantages. I consider my 900 fill down sleeping bag to
be of an average size and see no initial issues with fit or
functionality. This is basically a bottom opening for the pack, it is
not a separate compartment. To best utilize the full opening the
sleeping pad strap clips need to be released. The zips can then be
pulled to the left and right all the way around to the back panel and to
the base of the internal frame. Perhaps the advantage I can see with
this feature is that when setting up camp and bedding for the night the
entire contents of the pack do not need to be emptied to get to my
sleeping bag. As most will testify a sleeping bag or quilt is most
effective with a degree of loft which often takes time to achieve. Being
able to pull my sleeping bag out as soon as I arrive at camp will give
this extra time. The only concern which I have is the possibility that
my sleeping bag becomes damaged by the zipper either when stuffing it in
or zipping the compartment closed. |
|
|
<<TOP>> |
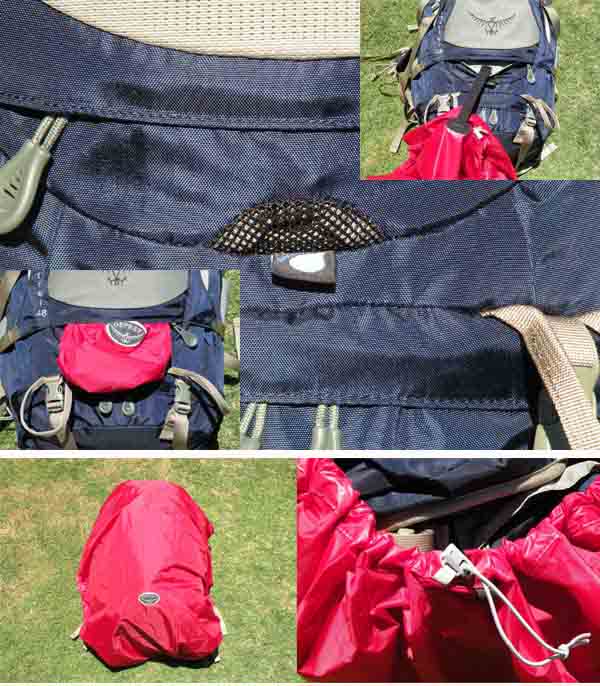 |
Integrated rain cover
The
Kestrel comes with a bright red rain cover and when deployed completely
encompasses the pack to provide full protection. The manufacturer's
website does not identify the material that this is made from however making
a judgment I would say this is a waterproof nylon. Deploying the rain
cover simple and effective and takes seconds. As can be seen from the
images to the left the cover is contained in its own pocket, symbolized
with a raindrop, which also has a mesh covered drain hole to allow any
water to escape if the cover is packed wet. I would also see this
providing a mechanism to ensure the cover and pocket do not suffer from
any mound or mildew. Once the zipper is opened and the cover pulled out
it can then be pulled over the pack. The bungee cord and tightening clip
ensure that cover and pack are a snug fit which reduces the potential
for water to leak in. It is also worth noting the pack cover is secured
to the pack compartment via an elasticized strap to prevent loss. With
the pack full the cover was both easy to remove and was not compressed
by the internal contents and it also fit well with no effort needed to
make it stretch. |
* Initial Trial
Packing the Pack

I was very keen to try the pack out and make sure
that all my gear was able to fit in without any problems or having to
leave anything behind so the first night after receiving it I set to
work. The above image shows a typical shot of my gear which I would
normally take out on an overnight hike. The only thing that really
changes when multi-day hiking is the amount of food as water is generally
easily topped up along the trails. Packing the bag was really straight
forward with all of my gear finding a home except for my tent, which
could have easily been strapped to the outside. This is not a preference
for me so I will more than likely leave it at home and make alternate
sleeping arrangements such as the 3 sided huts which can be found along
the Bibbulmun Track. After packing for the first time I am still a
little cautious of the zipper on the sleeping bag access ripping a hole
in my sleeping bag, hopefully with some practice my confidence will
build.
Trying on the pack was my next move and it felt great. Only a small
amount of adjustment was needed on the torso length to ensure the
hipbelt was sitting comfortably and a little tweak of the shoulder
harness and I was set to go - with no place to go! I will mention the
adjustment of the pack slightly here and then further explain in the
field report. Basically my adjustment was as simple as pulling apart the
hook and loop that holds the torso adjustment in place and moving it up and
down until I found a happy medium, I then firmly pushed the hook and
loop back into
place. Like most packs the shoulder harness adjustment is made by
pulling down on the excess cord until comfortable.
The table below shows the gear which I packed and its location inside
the pack, no real surprises there.
| Sleeping Gear |
Item |
Packed Location |
| |
Thermarest Prolite 4 mat |
Main body |
| |
Mountain Designs down fill bag |
Zippered sleeping bag access |
| |
Tyvex ground sheet |
Main Body |
| Cooking |
|
|
| |
Vargo Decagon Stove |
Main Body |
| |
Denatured Alcohol |
Main Body |
| |
Orikaso Flat-bowl |
Main Body |
| |
MSR Titan Kettle Ti Pot |
Main Body |
| |
Spork |
Main Body |
| Misc |
|
|
| |
Pentax Optio S40 Digital Camera |
Hipbelt Pocket |
| |
StickPic |
Hipbelt Pocket |
| |
UCO MightyLite |
Top zippered pocket |
| |
Trail journal |
Stretch woven front pocket |
| |
Mobile phone |
Top Zippered pocket |
| |
Water purification tablets |
Top Zippered pocket |
| |
Small medical kit |
Top Zippered pocket |
| |
Maps |
Stretch woven front pocket |
| |
Towel |
Main Body |
| |
Mozzie Coils |
Stretch woven front pocket |
| Food |
|
|
| |
Dehydrated meals home made |
Main Body |
| |
Fruit Bars. |
Top Zippered pocket |
| |
Trail Mix. |
Main Body |
| |
3 Litre water in Bladder. |
Bladder pocket |
| |
1 Litre of water in Nalgene Wide Mouth
bottle |
Stretch woven side pocket |
| |
Porridge.
|
Main Body |
| |
Wine for my evening meal. |
Stretch woven side pocket |
| Clothing |
|
|
| |
Beanie |
Main Body |
| |
Hat |
Worn |
| |
Spare socks |
Main Body |
| |
Thermal baselayer |
Main Body |
* Reading the Instructions
There is an abundance of instructions
provided with the Kestrel that describe the use of the shared features
that are common to all Kestrel series packs. This includes the AirScape
Backpanel, Torso Adjustable Harness, the adjustable sternum strap and
the external hydration compartment. The inside two pages of the booklet
(which is four pages in length) describes many of the key features that
have already been addressed in this report. They provide detailed
instructions on how to use each of these features. The back cover shows
a comparison between the Kestrel 38, 32 and 28 packs highlighting each
of their weights and capacity. I was also pleased to see a website link
on "How
to pack your pack", this has provided some great tips.
Included with the instructions was a warranty card stating;
"Osprey will repair for any reason, free of charge, any damage or
defect in our product - whether it was purchased in 1974 or yesterday.
If we are unable to perform a quality repair on your pack, we will
happily replace it. We proudly stand behind this guarantee, so much so
that it bears the signature of the company founder and head designer,
Mike Pfotenhauer."
The instructions provided have been clear, concise and easy to
understand.
* Summary
Things I liked
The construction of the pack seems very well made and thought out.
The unique features of the torso adjustment, AirScape Backpanel and
whistle.
Things I disliked
None as yet, it continues to impress me.
This concludes my Initial Report. The Field
Report will be amended to this report in approximately two months from
the date of this report. Please check back then for further information.
Field Report
28th March 2009
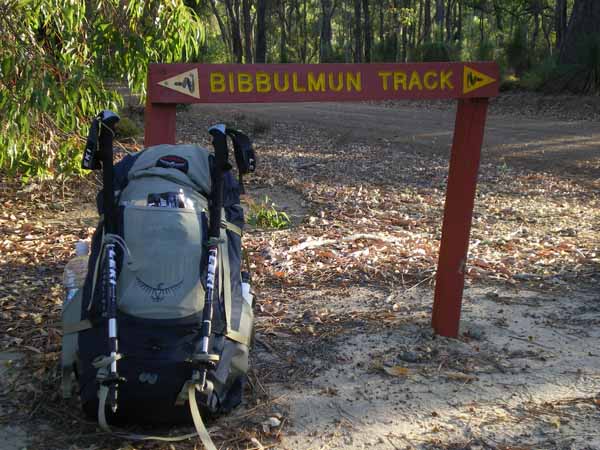
Pack resting up against one of the Bibbulmun Track
signs.
* Field
Conditions
The Osprey Kestrel 48 has accompanied me on several day walks and three
overnight hikes during from the time my last report was posted. My
first outing was along the Heritage Trail in the John Forrest National
Park which was a round trip of 17 Km (10.5 miles). Elevation ranged from
50 m (164 ft) to 260 m (853 ft). Temperature on the day was around 17C
(63 F), with some precipitation.
The first overnight hike was along the Coastal Plains Trail in the
Yanchep National Park where I camped in one of the three sided huts. The
temperature wasn't too low during the night, I would estimate down to
about 8 C (46 F). The day was a little different with the temperature
being extremely high, sitting on around 35 C (95 F).
The next overnight hike was out to my favourite place, Helena Hut on the
Bibbulmun Track. This loop walk is 22 km (13.7 miles) and can be
completed either in one day or the night can be spent at the campsite
which consists of a shelter, toilet and fire ring. The shelter at this
location is also a three sided hut. Temperatures again were high, I
estimate approximately 30 (86 F).
My final hike with the Kestrel 48 was a walk in the Helena National Park
on a day where the temperature upon commencement was 27.5 C (77 F) and
reached a low overnight of 7 C (44 F) with a mighty cold and
strong wind. This was a 22 km (13 miles) round trip on which I stayed
the night at the half way point.
* Field Performance
Packing and unpacking of the pack was
nice and easy as I had expected from my dummy runs in the Initial
Report. The main compartment is large enough to fit my gear for an
overnight stay (list of gear can be seen in Initial Report). I tried
packing several different ways each with their pros and cons and found
the most suitable method to be the same as my other packs. The first
piece of gear I pack is my Therm-a-Rest mat, which I insert to form a
large cylinder and the remainder of my gear is packed inside of that.
Heavy gear in the middle, lighter at the top and bottom. The Zippered
sleeping bag access was good to use when my sleeping bag was inside a
stuff sack however I did find that the zipper caught on my quilt which I
do not use a stuff sack on. Over all packing and unpacking was easy and
I did not run into any major concerns.
During the test period I experimented with different methods of carrying
the pack, funny as that may sound. Generally, like most people, I carry
my pack on both shoulders with the hipbelt and sternum strap in
position. The pack performed well like this and was very comfortable
even after extended hours of use. I would also like to mention the pack
carried well on one shoulder without the use of the sternum or hipbelt
straps. I found this to be very comfortable and provided much needed
ventilation to my back during the warm temperatures. The AirScape
Backpanel did perform well in keeping my back cooler and reducing the
amount of sweat created. I did also notice that the design allowed for a
increase in airflow across my back, again keeping me cooler and reducing
sweat.
My average pack weight for an overnight trip is approximately 7 kg (15
lbs) and the pack supported this very well. It was comfortable to wear
and I did not develop any sore spots. Stability of the pack was also
great at this weight range.
I found that the side mesh pockets underperformed and was a little
disappointed with how difficult it was to remove my water bottle while
the pack was on my back. I tried with both a standard 1 L (34 fl oz) Nalgene wide-mouth and also with a taller 2 L
(69 fl oz)
generic plastic water bottle and still could not remove them easily. The
issue does not lie with how physically hard the bottles are stuck in
there but with the position of the pockets. My arms were just not long
enough and for me this was a big disappointment. On the topic of water and
hydration I also note that the bladder sleeve is very tight and for it
to work I found that it had to be filled with water and inserted into
the sleeve before the pack was packed, trying to do this after was not
achievable. Once the bladder was in and the pack full it performed as
expected without issue.
In contrast to the side mesh pockets I found the hipbelt pockets to be
very functional and well designed. This is the first pack I have owned
which has these and is definitely something I will be looking for in any
future purchases. On all occasions I stored my digital camera and
Stickpic (trekking pole mounted camera stand) in one pocket and snack
foods in the other. It is great to have easy of access to these items
without having to remove the pack. I even managed to get some photos of
the wildlife as I didn't have to fumble around trying to get my camera
out.
|
The stow-on-the-go trekking pole
attachment is a great little idea which I really enjoyed using. I found
it to give much greater flexibility in how and when I use my trekking
poles. Using the feature was exceptionally easy and performed just
great. Why don't all packs have something like this? One issue that I
did find with this was that I felt perhaps the top loop adjustment cord
lock was perhaps a little too small and well covered and on occasion I
found it a little difficult to release. But that was minor and really
didn't cause me concern.
As yet I have not been able to water test the pack cover or the general
resistance to water of the pack however I expect to be able to do this
during the last phase of the test series as we are moving out of Summer
here and expecting some precipitation.
At this stage I still have no dislikes about
the pack and would recommend this to anyone that is looking for
a feature abundant pack, it gets my two thumbs up.
The pack has performed well in the field and met my expectations. Great work
Osprey!
I leave you with a picture of a Native Fig tree I encountered on
my last hike. |
 |
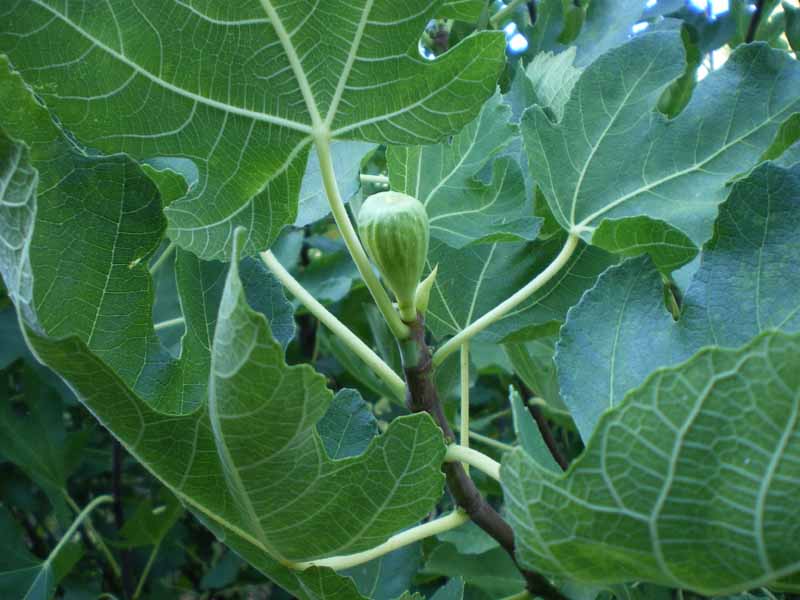
Native Fig Tree found along the trail.
This concludes my Field Report for the Osprey
Kestrel 48 Pack.
Long-Term Report
30th May 2009
My next few days of testing the Kestrel were on multi-day
hike from Gringer Creek along the Bibbulmun Track to the Canning hut
some 60 km's (37 miles) away. I managed to cover this distance in two days. The
first day I departed at 9:45 am and arrived at a place known as Nerang,
15.7 (10 miles) km from the start, where I ate my lunch and was back on the
trail by 1:15 pm. I arrived at camp for the night at Mt Cooke just
before 6 pm for a total distance of 29.3 km (18 miles).
The following day was a little difficult; my body was nice and sore. I
departed around 8 am and headed towards Monadnocks where I stopped for
lunch. At this point my total distance traveled was 42.6 km (26 miles). I moved on
from Monadnocks and arrived at Canning hut at 7 pm, this was a long days
hiking. The original plan was for this trip to be 4 days, however at the
half way point I suffered an injury that would leave me having to get
off the trail and return home totally devastated.
From the time I commenced first use of this pack until my Long-Term
Report trip my gear list has changed significantly, as has the weight.
With 4 days of food, enough water to last me one day and my other gear I
hit the trail now at 9 kg (20 lbs). The biggest items I have swapped out include
my air mattress and sleeping bag, I now use a Therm-a-rest NeoAir and
Golite Ultra 20 Quilt. A lot of smaller incidentals also got the turf.
The Kestrel also accompanied me on two overnight hikes of approximately
22 km (13 miles) each in the John Forrest National Park. These trips were for me to
assess how light weight I would be able to hike and what gear was truly
needed as opposed to being thrown in just because there is space
available in the pack.
Over the above identified trips, 6 days covering over 100 km's (62
miles), the
Osprey Kestrel proved to be a great pack that was truly comfortable. I
did not feel any discomfort from prolonged wearing of the pack (up to 14
hours). Again I found the stow-on-the-go to be very handy as with the
hydration sleeve.
I still haven't been able to test the effectiveness of the integrated
pack cover, however I can attest to it fitting over the pack easily
enough when full. The rain is starting to settle in now so perhaps I
will get a chance to test that out. If I find any issues or concerns I
will post an amendment to this report. If you don't hear back from me
please assume that it functions as it should and my gear has remained
dry.
The pack shows no signs of wear and tear and is holding up well. I have
needed to clean the pack a few times with a damp sponge to remove dirt
and charcoal stains (charcoal from resting the pack up against burn
trees) both of which are removed relatively easy.
I will continue to use the Osprey Kestrel 48 as my primary overnight or
multi-day pack as it remains very functional and dependant.
* Summary
The Kestrel performed excellent over the
past five months and I still have no complaints that would warrant me
not recommending this pack to anyone on the lookout. The Kestrel is
light, robust, feature packed and above all it carries a load perfectly.
I give this pack a five out of five star rating.
This concludes my Long-Term Report and the test
series for the Osprey Kestrel 48 Pack.
Thank you to Osprey Packs and BackpackGearTest.org for the
privilege of testing the Kestrel 48.
|


