 Osprey Atmos 35 Osprey Atmos 35
Osprey's redesigned light and fast series pack for true backcountry
adventure.
Andrew Buskov
Initial Report: September 25, 2009
Field Report: November 30, 2009
Long Term Report: January 26, 2010
Tester
Biographical Information
| Name: |
Andrew Buskov |
| Age: |
34 |
| Gender: |
Male |
| Height: |
5 ft 9 in (1.75 m) |
| Weight: |
223 lbs (101 kg) |
| Chest: |
44 in (112 cm)
|
| Waist: |
38
in (97 cm) |
| Torso
Size: |
21 in (53 cm) |
| Email: |
Rescue(at)Corridor9(dot)net |
| City, State Zip |
Madisonville, Kentucky
USA |
Backpacking Background:
I’ve been backpacking for years now,
and have
slowly started
developing my ideal style. I’ve gotten my pack weight down to roughly
25 – 30
lbs before water, and am whittling it down every hike. Day hiking is
nice, but
getting out over multiple nights is really what I enjoy. I like to take
my
time and enjoy the scenery as opposed to hiking hard. I also like being
comfortable and insist on an air mattress. I usually tent or hammock,
but stay in shelters when needed.
 Product
Information: Product
Information:
| Item: |
Osprey Atmos 35
|
| Manufacturer: |
Osprey
|
| Website |
http://www.ospreypacks.com
|
| Year of Manufacture: |
2009
|
| MSRP: |
N/A
|
| Listed Weight: |
3 lbs 0 oz (1.36 kg)
|
| Actual Weight: |
3 lbs 0 oz (1.36 kg) |
| Color: |
Aspen Gold
|
| Additional Colors: |
Green Apple, Graphite Grey |
Product
Overview:
Osprey
redesigned the Atmos 35 for the 2009 hiking season. Starting with their
spacious interior ranging
from 1900 - 2300 cu in (32 - 38 L), and a manufacturer recommended
usable load range between 25 - 35 lbs (11 -16 kg), the new packs
include refined improvements including a LightWire alloy
frame
with breathable tensioned mesh back panel for superior ventilation,
multiple options for hydration setup, and even the much raved about
inside/out compression system With three color options, three sizing
options, and even a women's specific model (Aura), the Osprey
Atmos 35 really does appear to be the all around light and fast
backcountry pack.
Initial Impression:
 The
Osprey Atmos 35 (herein referred to as the Atmos or pack) arrived to my
door intact, with all equipment, and with no signs of damage or poor
workmanship. Upon opening the packaging, I glanced over the pack with a
renewed sense of excitement toward the upcoming hiking
season. I
took special interest in some of the new features that I hadn't seen on
other packs, and found some nice design changes from the last Osprey
pack I tested. The
Osprey Atmos 35 (herein referred to as the Atmos or pack) arrived to my
door intact, with all equipment, and with no signs of damage or poor
workmanship. Upon opening the packaging, I glanced over the pack with a
renewed sense of excitement toward the upcoming hiking
season. I
took special interest in some of the new features that I hadn't seen on
other packs, and found some nice design changes from the last Osprey
pack I tested.
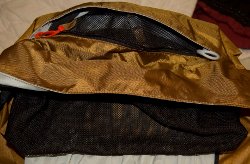
Starting from the top I found the single main
compartment to be roomy and easy to access. The dual zippers run
halfway down both sides allowing a majority of the interior
compartment to be accessed. Because of the long zippers, it's
considered a panel loading style pack, versus a top loading pack that
just has an opening at the top. There is no sleeping bag compartment
and,
other than this main zipper, no other way of accessing the
interior main compartment of the pack. However, during initial packing
of the Atmos 35, I found it easy to access all items that I packed
without much problem. Even the items that were placed at the bottom of
the pack were easily reachable from the main zipper. Because of the
dual zipper configuration, I was also able to over stuff the main
compartment and still reach items without everything falling out due to
the ability to shift the zippers to either side of the pack. The
ability to reach items without losing gear all over the ground is
definitely a plus over some of the other panel loading packs I've used.
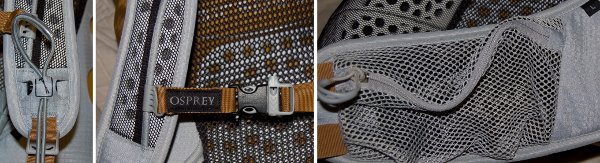
In
addition to the main compartment, there are 7 more exterior
compartments or pockets located in different places on the Atmos 35.
Four of these compartments are zippered while the remaining three are
more pouch type than anything. At the top of the pack, closest to the
back frame is a rather large, single zipped, mesh compartment with
enough space to easily fit two standard size wide mouth
Nalgene
bottles along with various other small items. Attached to the mesh
panel is Osprey's standard key ring holder. Further down the front side
of the pack is another large, double zipped, exterior pocket roughly
the same size as the mesh one listed above. Entry into this pocket was
a bit tighter due to the smaller entry point, but I was still able to
stuff two wide mouthed Nalgene bottles into this compartment as well.
The additional two zippered pockets are made of mesh and located on
each side of the hip belt. Both are fairly large and sewn in such a
fashion so that their contents will not be crushed while wearing the
pack. They will both easily accommodate a camera, small GPS unit,
various snacks, and compass while still having room for additional
items if necessary.
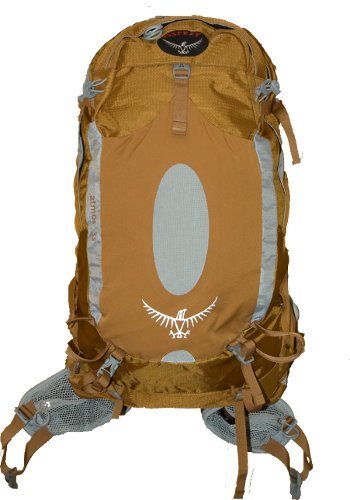
 The
large stretch panel covering the front and found on a majority of
Osprey packs is easily big enough to hold a pair of camp shoes, running
shoes, entrenching tool, or rain gear if necessary. It is secured near
the top by a quick clip that is fairly easy to operate. There is a mesh
oval located in the center of the panel, and a small mesh semi-circle
located at the bottom of the panel for drainage. Both have welded seams
and feel very secure. There are also two pockets on the sides of the
pack for water bottles or various other items. Both of these pockets
have a mesh fabric sewn into the bottom to facilitate drainage. In
addition, they are designed in such a way as to allow the bottle to sit
in the traditional upright position, or the new more accessible
diagonal position as seen in the pictures above. Also incorporated is
the new Inside/Out compression system. This allows the me to decide
how I want the compression straps run. On older packs, the
compression straps were on the outside of these pockets. This made it
rather difficult to access bottles or other equipment without loosening
the straps. With the new system, I have the ability to run the
compression straps along the inside of the pocket, thus giving me the
ability to reach my bottle without loosening the compression straps.
This also means a reduced chance for the interior load of the pack to
shift every time I need a drink; a much desired feature indeed. The
large stretch panel covering the front and found on a majority of
Osprey packs is easily big enough to hold a pair of camp shoes, running
shoes, entrenching tool, or rain gear if necessary. It is secured near
the top by a quick clip that is fairly easy to operate. There is a mesh
oval located in the center of the panel, and a small mesh semi-circle
located at the bottom of the panel for drainage. Both have welded seams
and feel very secure. There are also two pockets on the sides of the
pack for water bottles or various other items. Both of these pockets
have a mesh fabric sewn into the bottom to facilitate drainage. In
addition, they are designed in such a way as to allow the bottle to sit
in the traditional upright position, or the new more accessible
diagonal position as seen in the pictures above. Also incorporated is
the new Inside/Out compression system. This allows the me to decide
how I want the compression straps run. On older packs, the
compression straps were on the outside of these pockets. This made it
rather difficult to access bottles or other equipment without loosening
the straps. With the new system, I have the ability to run the
compression straps along the inside of the pocket, thus giving me the
ability to reach my bottle without loosening the compression straps.
This also means a reduced chance for the interior load of the pack to
shift every time I need a drink; a much desired feature indeed.
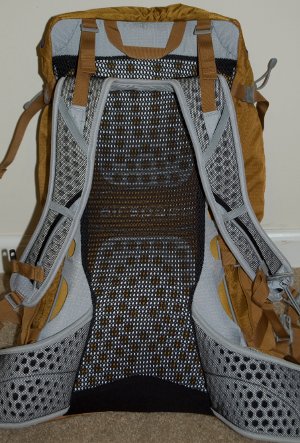
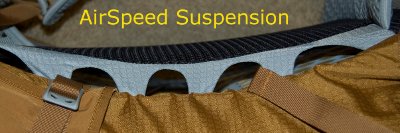
 The
LightWire alloy frame and stretched mesh backing of the Atmos creates a
spacious ventilation cavity that covers the entire back of the wearer.
This AirSpeed cavity is made of a mesh material with half-moon shapes
along the sides to greatly improve air movement. While it's made of
mesh, it's rather rigid and feels very comfortable. Because of this
design, the ability to vary the pack size is gone. Thus the importance
of correctly sizing the pack prior to purchase becomes all the more
important. The
LightWire alloy frame and stretched mesh backing of the Atmos creates a
spacious ventilation cavity that covers the entire back of the wearer.
This AirSpeed cavity is made of a mesh material with half-moon shapes
along the sides to greatly improve air movement. While it's made of
mesh, it's rather rigid and feels very comfortable. Because of this
design, the ability to vary the pack size is gone. Thus the importance
of correctly sizing the pack prior to purchase becomes all the more
important.
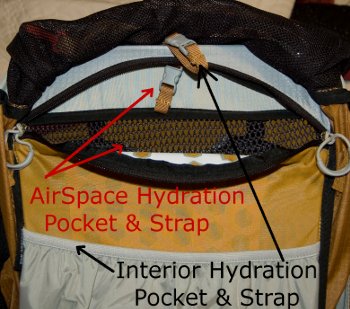
The hydration setup, seen on the left, is quite
intriguing. Starting with the standard setup, the interior compartment
of the pack includes a fairly sizable pocket for a variety of hydration
bladders. There is a mini quick clip located at the top of the pack to
allow me the ability to hang my bladder so that it doesn't slide down
to the bottom of the pouch. However, there is an additional method that
allows me to hang the bladder in the AirSpeed cavity. While the
manufacturer states that this method may not work for all models of
hydration bladders, it does appear to be a useful feature. Not only
does hanging the bladder in the AirSpeed cavity give me additional room
in the main compartment, but I also see the ability to use this method
as an active cooling/heating system during extreme temperatures.
Because the bladder sits right against the mesh, and therefore against
my back, the ability to have hot or cold water against my back may
prove to be useful. This will have to be weighed against the loss in
ventilation though.
Additional
bells and whistles include the Stow On The Go attachment system which
allows me to attach my trekking poles to the bottom of the
pack and shoulder harness without stopping. This is a feature I've used
on my other Osprey pack and it really does save time and function well
during periods where the ability to use trekking poles changes often
due to terrain. Also included is an adjustable chest strap with
integrated whistle. A nice feature seen all over the pack is the new
design of the zipper pulls; they are rounded allowing them to be easily
grasped even with the thickest gloves on. This is wonderful as I prefer
hiking in the winter and hate taking off my gloves to get into my pack.
 There
are a couple of things that I'm concerned about or feel could be
changed just from my initial observations of the Atmos 35. During my
initial packing of the Atmos I closed the zipper in such a way as to
create 4 instances of zipper disease within a 6 in span. While I
understand that I may not have been as careful as I could have, this
still concerns me as I don't feel the zipper was subject to enough
strain to cause this. One thing I don't want in a pack is the need to
be gentle with it. I feel it should stand up to some light abuse and
still remain functional. Another quirk that really bothers me is the
adjustable chest strap. While this is a wonderful design in theory, the
ability to easily remove and replace the chest strap is missing. The
molded plastic connectors ride snugly up and down over a plastic insert
inside the shoulder strap. Because they are so snug, removing them is
difficult. However, I have found that replacing them back on the
shoulder strap to be extremely difficult. I wish there was a way to
more easily remove these straps as I often like to go without a chest
strap depending on the weight my load. There
are a couple of things that I'm concerned about or feel could be
changed just from my initial observations of the Atmos 35. During my
initial packing of the Atmos I closed the zipper in such a way as to
create 4 instances of zipper disease within a 6 in span. While I
understand that I may not have been as careful as I could have, this
still concerns me as I don't feel the zipper was subject to enough
strain to cause this. One thing I don't want in a pack is the need to
be gentle with it. I feel it should stand up to some light abuse and
still remain functional. Another quirk that really bothers me is the
adjustable chest strap. While this is a wonderful design in theory, the
ability to easily remove and replace the chest strap is missing. The
molded plastic connectors ride snugly up and down over a plastic insert
inside the shoulder strap. Because they are so snug, removing them is
difficult. However, I have found that replacing them back on the
shoulder strap to be extremely difficult. I wish there was a way to
more easily remove these straps as I often like to go without a chest
strap depending on the weight my load.
In all, the Osprey Atmos
35 appears to be a well thought out, very well designed pack for the
light and fast crowd that still craves breathability along with some of
the bells and whistles found on larger packs.
I'd like to thank BackpackGearTest.org and Osprey for allowing me to
participate in this test.
Field Report: November 30, 2009
Field Conditions:
I was able to use this pack a total of four occasions within this
testing phase. A multiple night session in Rocky Mountain National park
served as the first test. Temperatures during the outing ranged
from 70's (21 C) during the day to below freezing (-0 C) during the
night and at an elevation around 9000 - 10,000 ft (2750 - 3050 m)
throughout the trip. I was also able to use this on a couple of day
hikes in the Western Kentucky area. The temperature for the outings
ranged from 50 - 65 F (10 - 18 C) over the period of 3 different days.
Elevation here is roughly 400 ft (120 m) with little change in terrain
as opposed to RMNP.
Performance:
As I was able to use this pack on both multi-night hikes and day hikes,
I was able to get a better feel for the range of use that the Osprey
Atmos 35 provides. Starting off with a multi-night trip to Rocky
Mountain National Park I was able to fit a wide variety of gear inside
the pack. Because I needed more gear due to the vast weather changes I
was to expect at various altitudes, I found that I quickly ran out of
usable space in the main compartment. Let me begin by listing the gear
that I was able to take:
- 15 F (-9 C) Big Agnes Lost Ranger sleeping bag
- Outdoor Research Hydroseal DryComp AirX compression sack
- Exped SynMat Lt 7 air mattress
- Hennessy Explorer Ultralite A-Sym
- MSR MicroWorks water filter
- Montbell UL Thermawrap Parka
- Jetboil PCS Stove
- Thermal Underwear
- 2 L CamelBak Insulated StoAway
- 50 ft (15 m) rope bag for hanging food
- Map, Compass, and Rite in the Rain Outdoor Journal
|
- Navigational Guide
- Toiletries
- Food Cozy & Thermal Seat Pad
- Petzl Tikka Plus Headlamp, Extra Batteries
- Various medical supplies
- 3 days food & cooking supplies
- Rain cover
- 2 changes of clothing (socks, undies, pants, shirts)
- Other miscellaneous items (keys, brochures, etc.)
|
While I was able to cram all of the above gear into my pack, finding
and shuffling gear inside the stuffed pack proved to be a major
problem. I initially thought that having a large front opening would
prove a better option for finding gear at the bottom of my pack.
However, I found the opposite to be true. So many
times I dumped almost the entire pack contents on the ground due to
trying to find something near the bottom. It was as if my pack was
vomiting its contents all over the place. I eventually got fed up and
decided not to dig around in my pack unless it was absolutely
necessary. This is not how I want my trips to go. I prefer comfort and
will only sacrifice if absolutely necessary.
That being said, I found exactly the opposite true on my day hikes
where the pack wasn't as full. Having a large zippered opening did
indeed allow me to reach gear at the bottom of my pack without too much
trouble. I was able to get out a jacket, snacks, and even my heavy down
coat without having gear fall all over. I think the difference is
definitely due to the way items were packed and the shuffle room that I
had when the pack was not stuffed to the brim with necessary cold
weather gear.
I found that during my multi-night outings the best place for my
hydration bladder was in the air space between the pack and my back as
opposed to inside the main compartment. I did feel a bit cooler as the
colder water was against my back, but this also provided a bit of
extra cushion against the overstuffed pack. On the flip side, having it
in the main compartment proved to be best during day hikes. My back was
able to breathe more, and the pack just felt more comfortable during
the whole trip. However, having the ability to change whenever I want
is definitely a plus, and something that I would have considered if I
were purchasing this in a retail store.
I have not had any additional problems with any of the zippers during
this testing phase. I feel that I might have been a bit more gentle
than normal, but it was nothing that was overly difficult. It was more
of a mindset since I had experienced problems in the beginning. I'll
continue to keep an eye on this throughout the testing phase, but I'm
inclined to think it was just a fluke based on the experiences I've had
to date.
I'm still very pleased with the operation of the Osprey Atmos 35, and to date I have not found anything I haven't liked.
Long Term Report: January 26, 2010
Field Conditions:During
this testing phase I was able to get an additional 3 days worth of use
out of the Osprey Atmos 35. Due to the weather all three uses were on
day hikes in 2 different recreational areas in Western Kentucky.
Elevation here is roughly 400 ft (120 m) with little change in terrain,
some rocky sections, but mostly a lot of mud and muck this time.
Temperatures that I experienced during the outings ranged from 35 - 55 F
(2 - 13 C). All three trips were during overcast skies, but there was
no precipitation at all. In total, over the life of the test I've used this pack for seven to eight days of use.
Performance:During this testing phase I found that I much
prefer this pack as a day hiking pack during the winter months. This
may change during the spring & summer, but trying to pack the cold
weather gear I needed for an overnight into this pack just wasn't
feasible this testing phase. I didn't have enough room and I felt like
the pack was bulging at the seams. I ended up having to take a
different pack for my overnight trip.
However, as I already
mentioned, using this as a daypack served me well. Because it
rides so nicely on my shoulders and hips, I was more than happy to take
it with me. I was able to pack a good amount of layerable clothing into
this pack and still not feel like I was carrying too much, or feel like
my pack was overstuffed. Having the ability to take a couple of
different sweaters, jackets, a heavy coat for the times I stopped
completely (lunch), and over-pants made layering a breeze. Also I found
that the zipper did indeed continue to work better when the pack wasn't
stuffed and I was able access clothing easily. I found out the definite
advantage to this was my comfort level and ability to retain heat.
Because I wasn't digging around in my pack looking for clothing, I lost
less heat when I needed to stop and don or doff layers. Such a nice
change from times I was freezing while digging in my other packs.
The
fit of the Atmos 35 on my back continued to be extremely
comfortable. While it felt good even when overstuffed, it was all that
much more comfortable on days when it wasn't packed with heavy gear. I
didn't find myself fiddling with the straps as much trying to shift
weight, nor did I feel the usual pain in my hips or in the area of my
clavicle. The padding continued to remain intact, which was something I
was worried about after seeing the honeycomb design. My zipper problems
seem to have all but vanished. Only once during the
testing phase did I notice a problem, and this was due to
my snagging
the zipper on some fabric inside the pack.
In closing, I
continue to remain very pleased with the quality, design, usability,
and comfort of the Osprey Atmos 35. I have found that it lives up
to the quality that I've come to expect in the Osprey packs that I
already had. It will definitely be one of the front line packs in my
arsenal. I'd like to thank BackpackGearTest.org and Osprey for allowing
me to participate in this test.
Read more reviews of Osprey gear
Read more gear reviews by Andrew Buskov
|