|
HAMMOCK BLISS SKY BED BUG FREE
TEST SERIES BY STEVEN M. KIDD
LONG-TERM REPORT
November 28, 2016
CLICK HERE TO SKIP TO THE FIELD REPORT
CLICK HERE TO SKIP TO THE LONG-TERM REPORT
TESTER INFORMATION
|
NAME:
|
Steven M. Kidd
|
|
EMAIL:
|
ftroop94ATgmailDOTcom
|
|
AGE:
|
44
|
|
LOCATION:
|
Carmel, Indiana
|
|
GENDER:
|
M
|
|
HEIGHT:
|
5' 9" (1.80 m)
|
|
WEIGHT:
|
185 lb (83.90 kg)
|
|
SHOE SIZE:
|
10.5 Wide (US)
|
Backpacking Background: I've been a backpacker on and off for over 30 years. I backpacked as a Boy Scout, and then again almost every month in my twenties, while packing an average weight of 50+ lb (23+ kg). In the last several years I have become a hammock camping enthusiast. I generally go on one or two night outings that cover between 5 to 20 mi (8 - 32 km) distances. I also do several annual outings lasting four to five days covering distances between 15 to 20 mi (24 - 32 km) per day. I try to keep the all-inclusive weight of my pack under 20 lb (9 kg) even in the winter.
INITIAL REPORT
PRODUCT INFORMATION & SPECIFICATIONS
 | | Sky Bed Bug Free Hammock |
Manufacturer: Hammock Bliss
Year of Manufacture: 2016
Manufacturer's Website: http://www.hammockbliss.com
MSRP: US $119.95
Listed & Verified Weight: 32 oz (900 g)
Listed & Verified Dimensions: 125 in x 53 in (318 cm x 135 cm)
Color Availability: Black
Warranty: 2 Years
Extra Long Tree Straps
MSRP: US $19.50
Listed Weight: 5 oz (142 g)
Measured Weight: 4.8 oz (136 g)
Listed & Verified Dimensions: 106 in x 1.5 in (269 cm x 4 cm)
Color Availability: Black
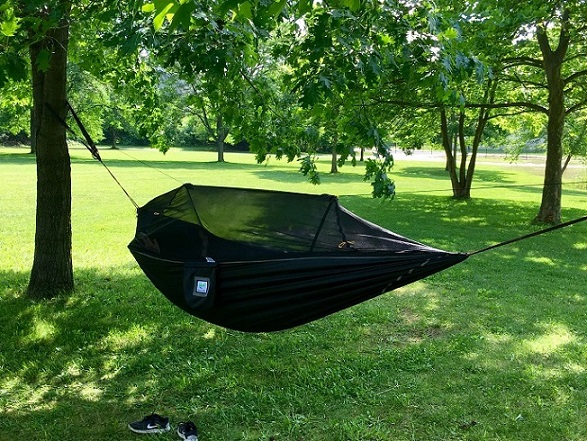
The Sky Bed Bug Free Hammock is a gathered end, asymmetrically designed, camping hammock with integrated netting. The website and hang-tag state hammock is designed to handle a load of up to 350 lb (175 kg). I found these conversions to be a little loose, as that weight in pounds is actually closer to 159 kilograms, which I calculate to be about a 36 lb conversion variance. The company appears to have operations in both the United States and Australia, so this could potentially be the reason for the rounded conversions. Hammock Bliss has recently redesigned the Sky Bug Free. The manufacturer claims this is the first such hammock with a truly FLAT lay. To create this experience the hammock has a sewn channel made with nylon parachute material that is designed to accommodate a 20 in x 72 in (51 cm x 183 cm) inflatable sleeping pad. The use of the pad offers the dual function of creating a flat resting experience as well as allowing for thermal protection underneath the resting hammocker.
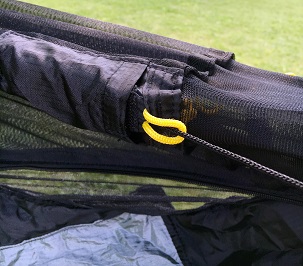 | | Pocket for guy lines |
The integrated bug net is made with a no-see-um mesh that has 2100 holes per square inch. The mesh is designed to resist tears and snags while keeping even the smallest insects at bay. The occupant enters the hammock via a full length zippered entry on the side. The netting was separated into three distinct panels during the redesign to allow for more flexibility and the zippers were lengthened to allow for sitting in the hammock with the netting flipped away. Also updated are six interior loops and four functional pockets for storage and gear attachment inside the netting and body of the product.
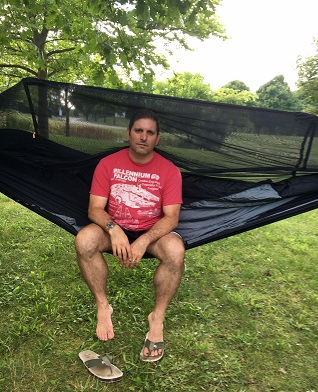 | | Full length zippers & sitting option |
On the exterior of the netting near the apex are attached guy lines that are stored in a small pockets secured with hook and loop closures. There are also attachment loops just outside these pockets. The lines are designed to keep the net above your sleeping space by attaching to the same trees from which the hammock suspends.
The actual body of the hammock is made with a rip-stop nylon material that has webbing sewn in for protective reinforcement at the structural seams. The hammock uses 0.25 in (6 mm) diameter climbing grade rope on the gathered ends for suspension. Technically the ropes could be secured directly to the tree for suspending the hammock, but doing so can easily damage the bark. In order to protect a tree, tree straps should always be used when suspending a hammock. Hammock Bliss provided a set of Extra Long Tree Straps for use during this test; however, they are not included when purchasing the Sky Bed Bug Free. These webbing straps are made of polypropylene, think seat belt material, and have sewn loops at each end that are approximately 1 in (2.5 cm) in diameter. The hammock's rope may be tied directly to each loop if the tree distance is close enough. If the trees are farther apart and more length is needed, one end of the strap may be fed through the other and the hammock's rope may be tied to that single sewn channel.
INITIAL IMPRESSIONS
After receiving the hammock and tree straps and a thorough inspection of the Hammock Bliss products, I found them both to be well made. There minimal loose threads, the stitching was straight and well sewn and it appears to be durable. The parachute style material was very soft to the touch and will be very comfortable to lie on.
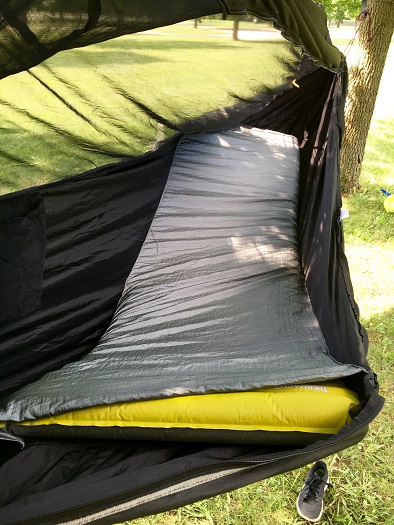 | | Pad inserted into hammock sleeve |
I've been a hammock camper for nearly a decade and owned dozens of commercially available hammocks as well as Do-It-Yourself (DIY) versions. Although I own several hammocks with integrated bug netting, I rarely use them these days in lieu of a traditional simple gathered end hammock. I'd also estimate that it has been close to five years since I've used a hammock with rope suspension. I primarily mention this because I can typically deploy a hammock in less than five minutes with most of the current suspension methods that I own. That stated, when I first set up the Sky Bed Bug Free it took me close to 15 or 20 minutes to comfortably dial it in. I'm sure I will grow more comfortable and faster with repeated use over the course of the test series, but I was certainly a little rusty with this suspension method at this point in time.
The hang-tag that came on the hammock had no instructions and when I went to the website I didn't notice any on the page dedicated to the hammock. After I tested it out and went back to the website I did see a link to multiple instructional videos that I found handy and interesting. One of the videos suggested tying the rope to the tree straps with a shoe lace like knot. Technically, this is basically a square knot with a slip knot added for quick release. I'm sure this secure and safe or the manufacturer wouldn't suggest it publically on their website, but such a simple knot personally makes me a little nervous when suspending my body above the ground several feet. A fall to the ground from a hammock can be painful on the backside! Because I hadn't reviewed the videos prior to test hanging the video I used half hitches to secure the rope to the tree straps.
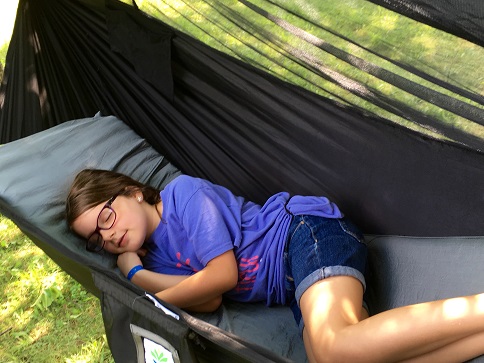 | | A happy occupant resting in fetal position! |
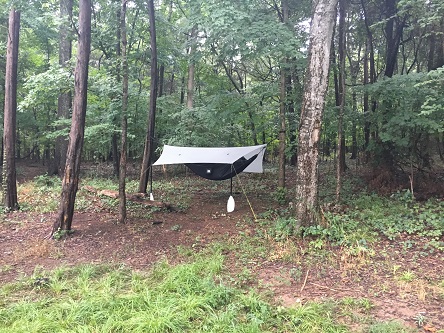
I had to run down to the local park to give the hammock its first test hang as my back yard isn't conducive to hanging. The closest trees I could find were approximately 16 ft (4.9 m) apart. That is about the maximum distance that can be used with the rope and tree strap suspension provided and ideally I'll be looking for trees no farther apart than 14 ft (4.3 m) during the test. There are several reasons I suggest this; first at the distance which I set up the hammock the straps had to be higher on the tree to create a comfortable distance off the ground. Also, I used every bit of the guy line designed to keep the netting away from the occupant when suspended at that distance. Later, I reviewed the accompanying hang-tag again and realized they suggested trees at an 11 - 13 ft (3.4 - 4 m) distance. My mistake!
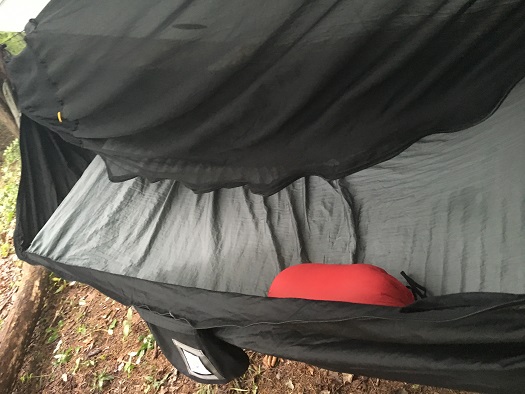
I hopped in the hammock without a pad and found it extremely comfortable, but wanted to test out the pad sleeve. I've owned double layered hammocks in the past. Before I began using under quilts for insulation I used air mattresses with that design. What is different with this hammock is the sleeve is specifically designed for a pad and there is no opportunity for it to slide around at all. There was some possibility for this when placing a pad inside a fully double layered hammock. Hammock Bliss stated that sleeve would handle almost any inflatable pad and I found it would take a three inch thick air pad I own. This pad did take a little maneuvering to get into the sleeve, but with a little effort I was able to insert it fully into the sleeve.
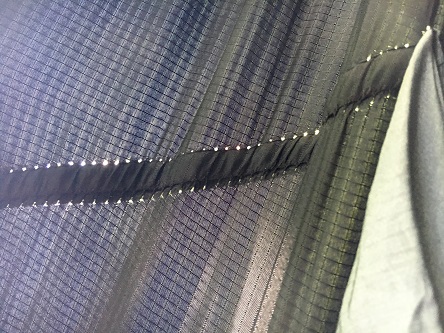 | | Holes along the sewn portion & reinforced webbing |
Once I had the pad secured I hopped in and found it very comfortable. The stiffness of the air mattress definitely creates a feeling of flatness when lying in the hammock. My assistant found it so comfortable that she quickly curled up into the fetal position in the hammock and began resting. I've tried this in a hammock myself, but never truly found it comfortable. I will be interested to see if I find lying on my side effortless and easy. I sometimes do this in a hammock through the night, but don't generally do so the entire evening.
I have one primary question that concerns me with the hammock. The design of the hammock has the sleep pad insert sewn into the body of the hammock. There is reinforced webbing sewn along this channel to that appears to be designed to strengthen the sewn stress points. When the hammock is loaded with my weight I could see pin-sized holes all along the webbing. I know this is the design and I understand that it is made this way to apparently strengthen the hammock; however, holes in a hammock inherently terrify me. A small hole in a hammock can lead to a catastrophic tear that can put the occupant on the ground in seconds. That can be a safety hazard. I'm sure the design is well thought out, but when I saw the sunlight via these pinholes it certainly caused me to pause and think.
SUMMARY
It appears to be a well-made hammock. I look forward to testing it over the course of the next several months and reporting back on how well it works out for me. I love hammock camping and I think this will be a great product for use during the summer months. The netting should keep me bug free without having to use chemicals or other netting measures.
I'm excited to test out how the 'flat' sleeping feel works and if I find it actually feels considerably different than sleeping in a hammock without an air mattress. As the cooler weather comes on during the latter part of the testing period I'll be interested to see how the insulating properties work. I'm not so concerned about my core and legs, but I do have some questions as to whether or not a simple 20 in (51 cm) air mattress will keep my shoulders warm when in a hammock? Air circulating around a hammock can cause a thermal cooling effect if there is not insulation protecting me. Time will tell if the pad will be wide enough at the shoulders.
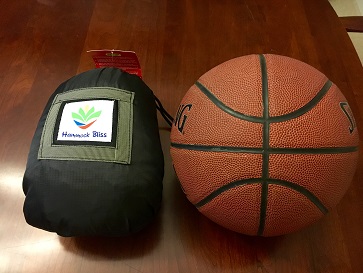 | | Hammock size comparison |
It will take some time for me to get comfortable with the rope suspension; I've become accustomed to different methods. The hammock is considerably heavier and takes up quite a bit more volume in my pack than the hammocks I generally use in the backcountry. These are minor thorns I'll accept in testing what at the outset appears to be an extremely well designed product from a manufacturer that is dedicated to making the hammock camping industry both better and more mainstream.
The stitching holes I see at the sewn points are my only true concern with the hammock. As this is the design and there is reinforced webbing along all these points I'm certain the manufacturers have specifically created a strong product that can handle the load. Holes in my hammock just concern me...it is in my nature. I look forward to testing it and hopefully proving my concerns fruitless.
FIELD REPORT
FIELD LOCATIONS AND CONDITIONS
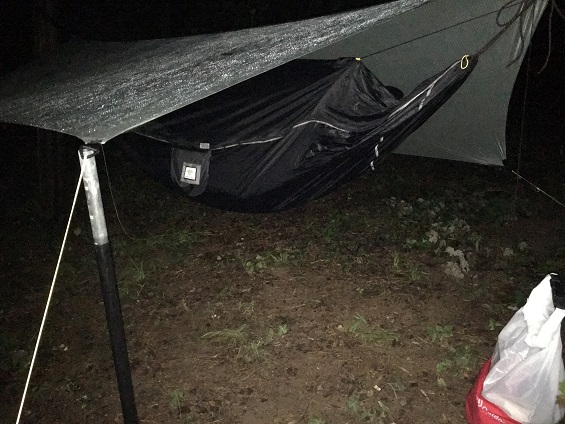 | | A Damp Evening |
1 - 5 July, 2015: Smith Mountain Lake near Hardy, Virginia. My brother has a lake house about an hour west of Lynchburg, Virginia and we had a large clan gathering over the Independence Holiday. I used the hammock as an opportunity to sneak away from everyone in the evenings and give it at test! I slept on a hill outside his house that had nearly a 60 degree slope. That's something I'd guess the average tent camper can't comfortably accomplish! Evening slumber temperatures averaged 65 - 70 F (18 - 21 C) and it was clear every evening. I had to keep a tarp up as there were scattered thunderstorms every afternoon. However, I was never in the hammock during stormy weather. The elevation was 997 ft (304 m).
5 - 8 August, 2016: Bear Island on J. Percy Priest Lake. The island is a fifteen-minute paddle from Anderson Boat Ramp, in Davidson, Tennessee (a part of the Metropolitan Nashville Area). Lake elevation at full summer pool is 490 ft (149 m). Temperatures rose as high as 91 F (33 C) during the day and dipped no lower than around 78 F (26 C) at night. It rained considerably during the day, so it was muggy and damp in the evenings making for humid sleeping conditions.
PERFORMANCE IN THE FIELD
The hammock has been a little more work than I've been accustomed to, but once I get it setup it is quite comfortable. I find the rope suspension not only overly heavy, but unnecessarily unruly for quick setup. I'm fairly particular in the way I like to hang my hammocks. This includes having my feet a few inches above my head and having the right 'sag' to the hammock. This hammock does not have a structural ridgeline that aids in quickly setting the sag, and for the ropes and the netting suspension to work properly I needed to choose trees that were a little closer than I'm accustomed to using.
 | | Kayak Paddles & Porch Mode |
I had to choose trees that were approximately 12 ft (3.7 m) apart versus the 15 ft (4.6 c) distance I generally choose. This may seem like a simple variance, but when using my tarp and accounting for the aforementioned sag it did take some adjusting. Again, after I spent the time to set the hammock up it was very comfortable, however, I'm used to setting up my rig in less than 3 minutes not the 20 or more it took me to each time I suspended the Hammock Bliss.
Another minor thing that I will mention is that I slept with my feet at the end of the pad sleeve. All the images I noticed on the internet had the hammock camper sleeping with their head at that end; however, I prefer to sleep with my head to the right and my feet to the left when in a hammock. Had I slept with my head at the end as designed I'd have been sleeping opposite my comfort zone. Doing so caused me no problems, but had my air pad needed re-inflating during the night I couldn't have just rolled over and added air. This is an observation, not a complaint.
Once I fuddled through the clumsiness of setting the hammock up I found it to be quite comfortable! The air pad was plenty adequate insulation in the summer months; in fact it provided too much insulation one evening! I can't say I noticed the markedly flatter lay the manufacturer suggests in their advertising. I find that sleeping on a diagonal in a hammock creates that effect without the stiffness the pad added. The Mayans perfected this centuries ago!
 | | Perspiration Moisture at 6 a.m. |
I'll elaborate on the pad giving me too much insulation one night. The second night on my Bear Island outing it was extremely muggy and the humidity was well into the 80% range or higher by the time I went to bed. It was so hot and muggy that evening I awoke in a massive pool of sweat and had to get up towel off. I remembered one of my buddies had needed to leave the island for a personal reason, but had left his hammock in hopes of returning. It was such a sweat shop inside my hammock that I just walked over to his unoccupied rig around 3 a.m. and hopped in it myself. I will have to remember this on future outings with extreme humidity! I usually don't find that I need bottom insulation above 75 F (24 C), but I wanted to follow the spirit of the test and use the air pad! I will not do so in the future if I encounter similar conditions. Notice the moisture remaining a few hours later due to my perspiration and the extremely muggy conditions in the image to the left.
As autumn is coming on and I have four outings planned over a six week period I am interested to see how the air pad works in cooler temperatures...particularly around the shoulders.
SUMMARY
Again, the hammock is quite comfortable once I get it set up it just takes more time than I'm accustomed to spending compared to my many other suspension options. I've learned I needn't use an insulating pad is certain conditions and to hang the hammock between trees no further than 12 ft (3.7 m) apart.
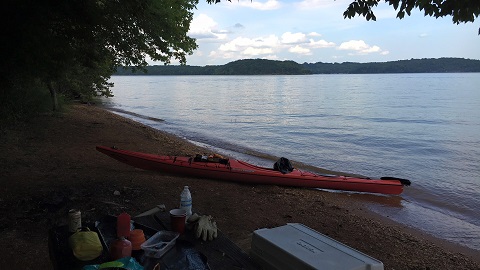
I only kayaked with the hammock to date so its weight and the volume it takes in a backpack haven't been an issue for me, but that will change in the coming weeks. I'll be logging miles on four backpacking trips coming up. Hopefully I'll become more comfortable hanging the hammock with the climbing ropes during the Long Term phase of the report.
 | | Why I go out! |
I was initially concerned with the perforated holes sewn along the pad sleeve insert. I've noticed no stretching or issues that would lead to possible fabric failure at this point...which makes me happy. I presume the grosgrain ribbon reinforcement is designed to strengthen the product.
LONG-TERM REPORT
LONG-TERM TEST LOCATIONS AND CONDITIONS
October 7 - 9, 2016, Walland, Tennessee, Whispering River RV Resort: This was a two night-three day church camping trip at a commercial campground at the base of the Smoky Mountains. My children slept in a 6-person tent with friends while my wife and I slept in hammocks near them. Temperatures dropped to around 38F (3 C) during the night. The skies were clear and there was no rain in the campground, however, it rained sideways and was near freezing when we day-hiked up to Clingman's Dome.
October 14 - 15, 2016, Manchester, Tennessee, Old Stone Fort State Archeological Park: An overnight Cub Scout Camping outing with my 7-year old son. Temperatures dropped to around 43 F (6 C). We were in the midst of a drought in middle Tennessee, and it was clear, dry and cool in the evening.
October 20 - 23, 2016, Sipsey Wilderness, Alabama, Bankhead National Forest: This was a four day-three night outing in the backcountry of the Sipsey Wilderness. I hiked with 7 other hammock campers covering approximately 26 mi (42 km). Temperatures averaged near 65F (18 C) in the day and dropped to just above freezing in during the nights.
November, 10 - 13, 2016, Bandy River Area Tennessee/Kentucky, Big South Fork National Recreation Area: Our 6th annual Veterans' Day Outing! This was a four-day three-night outing in one of the deepest wilderness areas east of the Mississippi River. Temperatures dropped to as low as 28F (-2 C) at night. Having my 7-year old son we only hiked a total of 22 mi (35 km) over the four days. Evenings were quite cool as there was a fire ban due to the dry weather.
PERFORMANCE IN THE FIELD
I was able to continue to using the Sky Bed Bug Free on four additional outings during the Long Term portion of the test series. Several outings were what I would consider "base-camping" while others were true backpacking trips. I state this, because I found the hammock to be a comfortable hammock and quite suitable for the non-backpacking situations. However, during long distance outings I found the hammock to be both bulky and heavy in my pack.
I still continued to struggle with the rope suspension. I found it bulky and awkward to work with. Adjusting the rope suspension continued to take considerably more time than I'm accustomed to when setting up a hammock. I was always the last person to finish setting up my hammock on the two backpacking outings even though I was often one of the first to start setting up. I'm not at all a fan of the rope suspension.
The hammock was comfortable and kept me warm in temperatures above freezing in the base-camping situations. However, in sub-freezing temperatures, as I suspected in my Initial Review, I found my shoulders getting cold as the night ensued leading to my core becoming chilly. During the last outing I used my inflatable pad on the first evening at base camp and became quite chilled. On the ensuing nights, as I was deep in the backcountry I decided to use an under-quilt and was quite comfortable. The hammock is designed for use with a pad and I found it completely suitable above freezing. When using an under-quilt it wasn't necessary to use the pad. I suppose I could have used both in tandem, but decided to leave the additional weight since I was packing much of my son's heavier gear.
What I learned was the hammock is a very comfortable product, but the use of an inflatable air pad has its limits for me. My best guess is around 38-45F (3 - 7 C) is likely a bottom limit for me without an under quilt that encapsulates my body and shrouds my shoulders. A 20 in (51 cm) wide inflatable pad simply will not keep me warm in the depths of a winter hang.
SUMMARY
I found the hammock to be extremely bulky and heavy for backpacking. It was comfortable, but time consuming for me set up properly.
I enjoy the hammock and can see myself continuing to use it in base-camp or car-camping situations, but not for backpacking trips. Now the test series is complete, I will likely change the suspension system on the hammock. That will likely void the warranty, so I'm not advocating this. I'll add a set of 12 - 15 in (30 - 38 cm) Amsteel continuous loops to each end of the hammock. Doing so will allow me to use several varying suspensions that I employ, and in doing so I will be able to set the hammock up in just a few minutes as compared to the 20 or 30 minutes it took me to comfortably do so during the test series. This is merely a personal preference that will work for me.
My 9 year old daughter loves the hammock and isn't too far from outgrowing her child-designed hammock. She prefers a hammock with an integrated bug net while I am indifferent, so I could easily see her trying to snag it from me. She's already said as much!
I found using it with an inflatable pad did give me the allusion of a 'flat-lay', but I was comfortable in the hammock with or without it. I'll use it as designed in warmer temperatures but continue to rely on a quilt anytime I sleep in temperatures that close in on or fall below freezing.
I'd like to thank BackpackGearTest.org and Dov Frazer at Hammock Bliss for allowing me to test the Sky Bed Bug Free.
This report was created with the BackpackGearTest.org Report Writer Version 1.
Copyright 2016. All rights reserved.
Read more reviews of Bliss Hammocks gear
Read more gear reviews by Steven M Kidd
|


