|
|
 |
Guest - Not logged in | |||||||||||||||||||||||||||||||||||||||
Reviews > Shelters > Hammocks > Grand Trunk Nano 7 Hammock > Test Report by Derek HansenGrand Trunk - Nano-7 HammockTest Series by Derek Hansen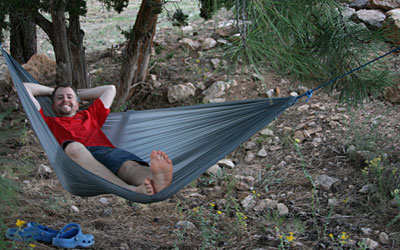
TESTER INFORMATION
BACKPACKING BACKGROUNDI am a lightweight backpacker with a typical overnight pack weight of 15 lb (7 kg) and a multi-day weight of 20 lb (9 kg). My normal backpacking style is to carry a simple hammock and a multi-functional tarp, often a poncho used for multiple purposes. PRODUCT INFORMATION
INITIAL REPORT27 Aug 2009 PRODUCT DESCRIPTIONThe Grand Trunk Nano-7 Hammock (hereafter just 'Nano' or 'hammock'), is a simple, lightweight hammock, which has gathered, hemmed ends for hanging. The hammock is made from sharkskin gray 1.27 oz (36 g) ripstop nylon. The hammock arrived in excellent condition, shipped direct from the manufacturer. The hammock shipped with two lightweight carabiners, which were already threaded into the hemmed ends. These carabiners are printed with "Grand Trunk" on one side and "Not for climbing purposes" on the other. The carabiners appear similar to keychain-type carabiners. A third, red mini carabiner was attached to the stuff sack for convenience. The hammock has a very simple rectangular construction, with a stuff sack sewn onto one of the long edges, right in the middle of one side. Beyond the product tag, which is sewn on the inside of the stuff sack, the hammock did not come with any hanging instructions. The draw string on the stuff sack was tied into a knot at the base and did not come with a cord lock mechanism. WEBSITEThe new Grand Trunk website is a great improvement over their older sites. Grand Trunk is the former Travel Hammock company and they currently maintain multiple websites. The new site was clear and easy to navigate and the Nano was listed in their hammock product line. Hanging instructions were available online, and the company also sells their own suspension system. INITIAL IMPRESSIONS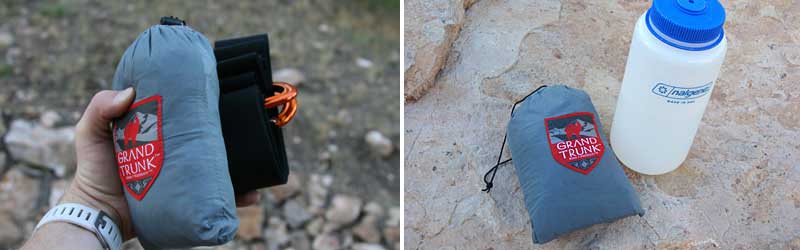
I hardly noticed the box when it arrived in the mail. It was so small I almost missed it! The hammock inside the package was also so small I could almost stuff it into my hand—in fact, the hammock is roughly the size of a softball when wadded up. I’ve been hammock camping for a number of years and this is the first hammock I’ve seen that is so small. 
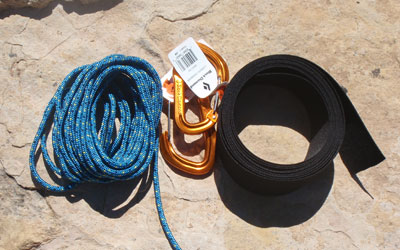
When I tried to loosen the stuff sack cord, I found it tangled in another line—no cord lock was present. I managed to untie the knot and loosen the stuff sack, but I wondered if this was suppose to be a cinch-type locking system that I just dismantled. Well, I found an extra cord lock lying around my old gear and used it on the stuff sack. Now it works great! The hammock itself is featherweight. At only 5 oz (142 g), it is easily the lightest hammock I’ve ever seen. My first mission was to get a suspension system. I like using webbing straps around trees, and like the simplicity of incorporating a carabiner into the system instead of lashing rope directly onto the webbing or around a tree. I decided to remove the “Not for climbing” carabiners that came with the Nano, and opted instead for stronger climbing-spec carabiners. I’ve used smaller “key-chain” variety carabiners before and have bent out the straight gates. I feel more comfortable using carabiners rated for climbing. I also purchased 10 ft (3 m) of 5 mm (0.2 in) climbing-spec rope, which I cut in two. I also purchased a little over 10 ft (3 m) of 2 in (4 cm) black webbing, which I cut in half and sewed in loops on each end. There are literally dozens of ways to rig up a hammock; this is just the way I am most comfortable with. I’ll admit, however, that I’m disappointed my suspension system is so heavy in comparison to the hammock (15.7 oz/445 g vs. 5 oz/142 g). I’ve easily tripled the weight of the hammock and I’m determined to cut the weight down (using smaller rope, less webbing, etc.). This hammock is so LIGHT! 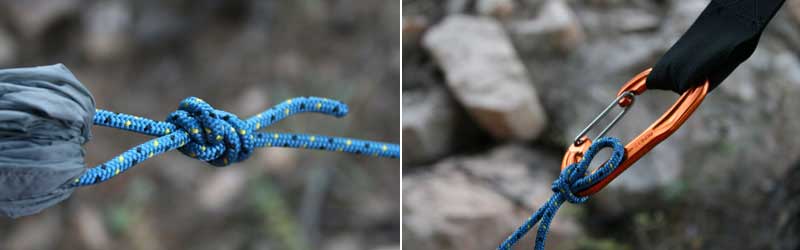
I fed the small climbing rope through the hemmed ends of the hammock and tied a figure-8 follow-through knot near the hammock edge. With the two lengths of rope attached to the hammock, I was still able to easily stuff the hammock and rope back into the attached stuff sack. With 10 ft (3 m) of rope and the hammock, there is room for little else in the stuff sack. I drew up a simple diagram of how I hang a hammock. I look for sturdy trees that are about 12 to 15 ft (4 to 5 m) apart, wrap the webbing around the trees about 6 ft (2 m), secure a carabiner through the sewn loop in the webbing, and tie a slippery larks head knot from the line coming from the hammock to the carabiner. 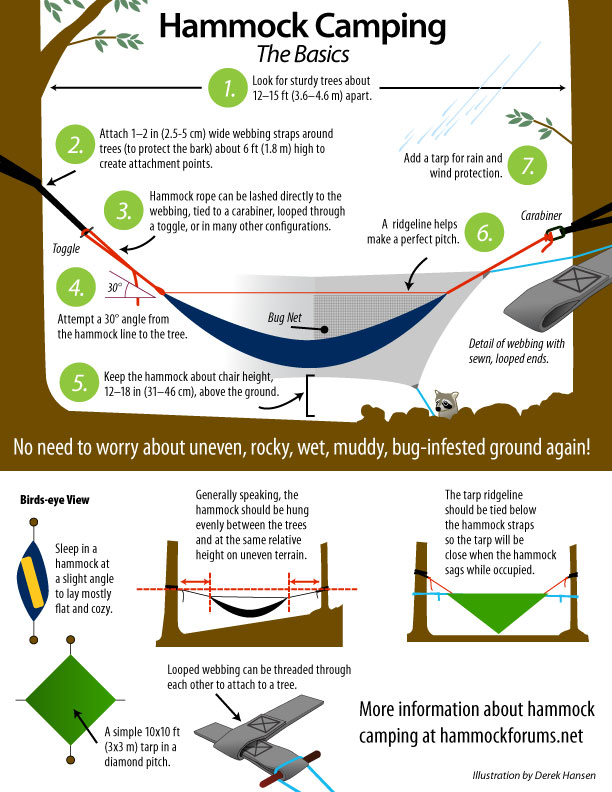
With the slippery larks head, I can easily adjust the hammock tension, and also make sure the hammock is centered evenly between the two trees. As I mentioned before, there are many ways to hang a hammock; this is just one way I use that is quick and easy. I don’t have many places in my back yard where I can pitch a hammock, but I found one place that would be inhospitable to tents (an added bonus)—a kind of draw or gully with rocks, roots, and tangled trees all around—but was perfect for a hammock. I first wrapped the webbing around the trees and secured a carabiner to each side. Next, I drew out the rope and tied the slippery larks head to each carabiner; the hammock never touches the ground. The only adjustment I had to do to get the hammock balanced was to adjust the height of the webbing on the tree so the hammock wasn’t lop-sided. When the Nano was first described to me, I was expecting a lounge chair, but after setting up the hammock and lying down, I’m convinced I can use this as a camping hammock. The dimensions are tight, but I felt comfortable lying in the typical diagonal style. PRO—Super light! Comfortable. Packs down small. CON—Just a bit narrow. I wish the stuff sack came with a mini cord lock. FIELD REPORT17 Nov 2009 FIELD LOCATIONS AND CONDITIONSI’ve taken the Nano hammock on several day hikes and three overnight campouts. September 25–26 ~ Sycamore Canyon, Kaibab National Forest. Out with the Boy Scouts at the Fall Camporee. A total of 5 miles (8 km) hiking. The low temperature was 35 F (2 C) and the high was 75 F (24 C). Elevation was 6600 ft (2012 m). October 9–10 ~ Walnut Canyon, Coconino National Forest. Fast-packed 6 mi (13 km) into the Walnut Canyon area where the overnight low was 27 F (-3 C) and the daytime high was 65 F (18 C). Elevation was 6800 ft (2073 m). October 15 ~ Veit Springs, San Fransico Peaks, Coconino National Forest. Went on a field trip with my daughter's class to hike Veit Springs. My daughter and I hiked over 2 mi (3 km) exploring the trails, caves, and springs, and finding a geocache along the way. The mean temperature was 65 F (18 C). Elevation was 8400 ft (2560 m). October 31 ~ Campbell Mesa, Coconino National Forest. Hiked 5 mi (8 km) while geocaching and scouting for good stealth camping on the mesa. I started early in the morning and had breakfast out on the trail. Temperature began at 20 F (-7 C) and rose to 60 F (16 C) by 11 AM. November 6–9 ~ Sinclair Wash and Rio de Flag areas, Coconino National Forest. Spent the weekend with my kids and went on all kinds of hiking, geocaching, and resting in the Nano. Elevation 6800 ft (2073 m) and the mean daytime temperature was 65 F (18 C). November 10–11 ~ Sandys Canyon, Walnut Creek. Went on impromptu overnight camp with my daughter to take advantage of the Veterans Day holiday. Hiked 2 mi (3.2 km) to the cliffs of Walnut Creek and "Le Petit Verdon." Overnight low temperature was 28 F (-2 C) and rose to 60 F (16 C). November 14 ~ Mount Elden, Coconino National Forest. The first snow of the season sprinkled a nice white powder on the mountains, and provided me with an irresistible temptation. My route took me a little over 4 miles (6.4 km) with 4000 ft (1220 m) of elevation change hiking and running up and down Mount Elden, a silicic lava dome mountain rising 2395 ft (730 m) to an elevation of 9297 ft (2834 m) above sea level. The mean temperature was around 42 F (6 C). This is one of the rockiest, steepest trails near my home; a real ankle crusher. PERFORMANCE IN THE FIELDNew Suspension As I mentioned in my Initial Report, I was really disappointed in seeing that my bombproof, climb-a-mountain suspension effectively tripled the weight of the hammock. As the suspension system is a huge part of a hammock set-up, I was determined to find a better solution. 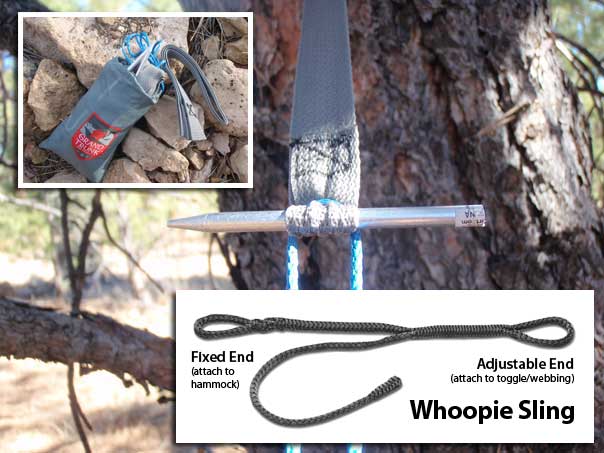
The Whoopie Sling is basically an adjustable eye loop that locks in place when tension is applied to the line. I had been reading on HammockForums.net about new, super-strong line called Amsteel Blue that was not only thin and light, but also stronger than steel for its size. I also read up on a new suspension system using Whoopie Slings, which utilizes constriction (like a Chinese finger trap) to adjust the length of the suspension. After making my own Whoopie Slings, I next made some smaller 1 in (2.54 cm) webbing straps and opted for a toggle instead of my usual carabiner attach point. I made the toggles by cutting an aluminum tent stake in half.
I owe a lot of credit to the folks at the Hammock Forums for all the work in describing how to put this type of suspension system together. With the new suspension system, I’ve paired the Nano to a scant 7.65 oz (217 g)!! This is, by far, the lightest—über-light—hammock set up I’ve ever used. It is absolutely amazing—the Holy Grail of lightweight hammock camping. With my 11 oz (312 g), full-coverage tarp, I have myself a 1 lb 2.65 oz (529 g) super shelter! The Nano has really made this possible with its amazing base weight. 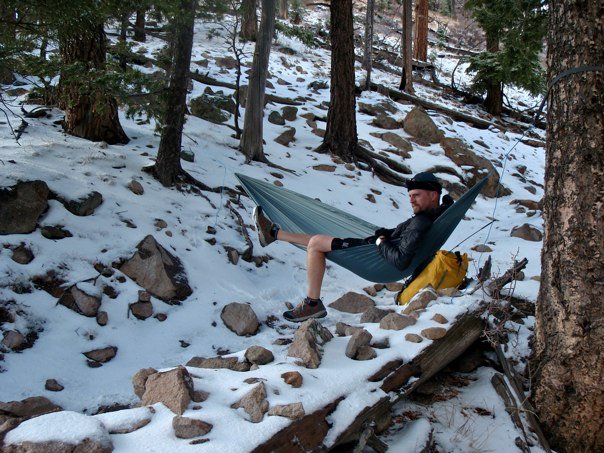
Better than a sit pad? I think so! With my new Whoopie Sling suspension, I was able to pitch the Nano in under a minute with no knots. The Nano provided a cozy nest of comfort during many day hikes. Not only has the new suspension reduced the overall weight of the hammock, it is by far the easiest method I’ve used to hang, adjust, and take-down a hammock. I quickly wrap the webbing around one tree and slide a toggle through a loop then put the second webbing and toggle to the adjacent tree. I next slide the Whoopie Sling loop over one toggle, and as I walk to the other tree, I slowly pull the hammock from the stuff sack and finally slide the last Whoopie Sling over the second toggle—no knots, and the hammock never touches the ground! The adjustment is easy and I’m in the hammock in less than a minute. A Good Night Rest Gathered hammocks, like the Nano, can cause some discomfort in my legs because of strain on my knees and ankles when sleeping overnight. Depending on how well I pitch the Nano, some of this strain is minimized, but not always. By shifting my sleeping position or by moving my legs, I can often reduce the strain. When just lounging in camp or on the trail, I do not notice any strain on my knees or ankles. The hammock is superior to sitting on rocks or the ground. The Nano is very comfortable. 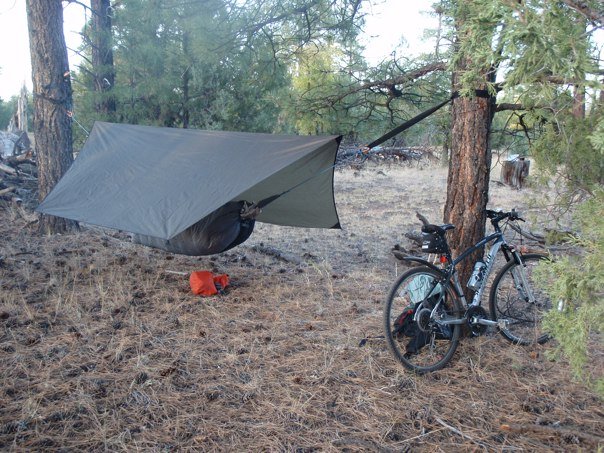
A pseudo-stealth site near Walnut Canyon. I find the Nano comfortable enough for sleeping overnight. Durability Sometime in my testing I collected a snag in the fabric on the bottom of the hammock. I’m not sure if the fabric was caught on a branch, if I was wearing something sharp, or if I brushed a rock during set up. The good news was that I had some Tear-Aid on hand and was able to fix the small hole with a patch. I’m glad the Nano is using rip-stop fabric, but it is lightweight. After patching the hole, I have tried to be more protective of the hammock. I’ve also noticed some fraying on the hem along the long edges of the hammock. I plan on cutting or melting the edges to fix this. The seams and stitching are well-done, so it is bizarre that there is some fraying. 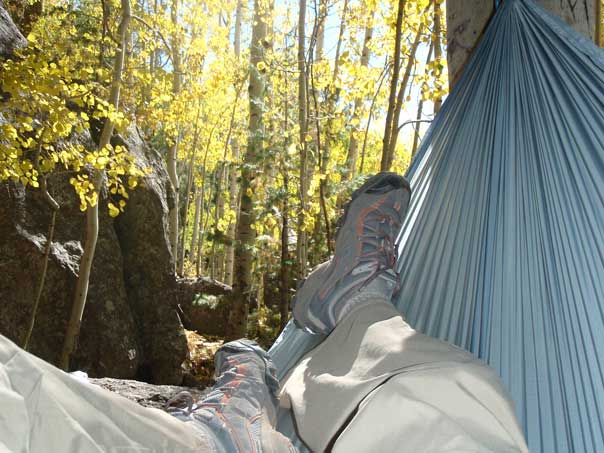
Lounging during lunch on the Veit Springs Trail. I pitched the hammock over several downed trees and my daughter and I enjoyed our lunches in comfort. Several other students and parents on the field trip were very jealous. The stuff sack is perfectly sized for the amount of fabric, and I can also easily fit the new suspension ropes (Amsteel Blue 7/64 Whoopie Slings), toggles, and 1 in (2.54 cm) webbing straps. On one trip, I noticed that some of the stitching had come loose and the stuff sack was now only half attached. I plan on using my sewing machine to fix this because I really like having the stuff sack secured to the hammock, especially since everything fits so well. 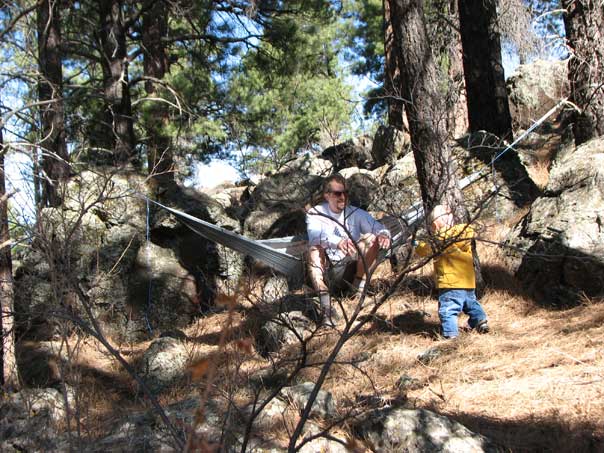
No place for a tent! This is classic hammock territory: on a slope with lots of boulders. FIELD USE SUMMARYPRO—While larger (wider, longer) hammocks are arguably more comfortable, I’ve really enjoyed the Nano for both sleeping overnight and lounging during the day. The hammock packs so small and is so light I’ve taken it on all my day hikes in my small 18 L (1098 cu in) pack. The Nano has been an indispensable part of my gear list over the past few months. CON—I’m only disappointed that the stuff sack stitching is coming loose. With my primitive sewing skills, I can easily fix it, but I don’t think my abuse should have caused the unraveling. LONG TERM REPORT19 Jan 2010 FIELD LOCATIONS AND CONDITIONSNovember 26–28 ~ Red Mountain, Snow Canyon, Southern Utah. For the Thanksgiving holiday, I did some car camping with the family. We took several of the cousins geocaching and hiked (bushwhacked) more than 5 mi (8 km) hunting for caches. Overnight low temperature was 30 F (-1 C) and rose to 63 F (17 C) during the day. We experienced light sprinkles of rain. I slept in the hammock for both nights. December 23 ~ Campbell Mesa, Coconino National Forest. I borrowed some snow shoes and went out for a few hours on the mesa and hiked a few miles/km in the snow. I used the Nano to take a break. Temperature was around 30 F (-1 C). December 29–31 ~ Orem, Utah. Visiting family over the holidays, I decided to try some backyard testing, as daily snowfall prevented any trips. I slept in a hammock for two nights. The overnight low was 12 F (-11 C). January 9 ~ Campbell Mesa, Coconino National Forest. My older sons and I took off in the morning to explore the mesa and enjoyed lunch on the trail and relaxed in the hammock. We hiked a little over a mile (2 km). Elevation was 6800 ft (2072 m) and the outside temperature was 40 F (4 C). January 15–16, 2010 ~ Fossil Creek Wilderness, Arizona. Went on an 8-mile (13 km) backpacking trip with my two oldest kids and followed the Fossil Springs Trail down to a beautiful riparian area. We all slept in hammocks. Overnight low was 30 F (-1 C). The trail begins at an elevation of 5680 ft (1731 m) and descends to 4280 ft (1305 m), an elevation change of 1400 ft (427 m) in 4 miles (6.4 km). PERFORMANCE IN THE FIELDMost of my testing of the Nano has been during the cooler months and so I’ve tried a few different types of insulation to keep myself warm when I sleep overnight with this hammock. When I used a sleeping bag pulled up around the hammock like a burrito, I wasn’t able to get the most comfortable lay because the sleeping bag cocooned me and I noticed some severe shoulder strain, especially when I slept in the hammock more than one night. The stitching on the stuff sack eventually came completely loose. Thankfully, I am skilled with a “thread injector” and easily fixed it. I like the stuff sack attached. 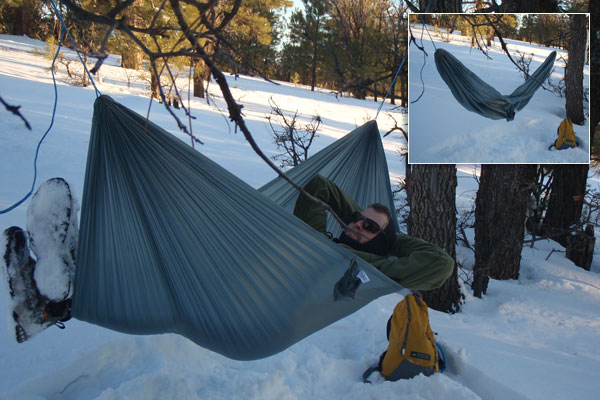
During my snowshoeing experience in December, I brought the Nano along for a respite. I love how small, light, and packable the Nano is for backpacking. The hammock was easy to deploy and made a worthwhile stop in the snow. 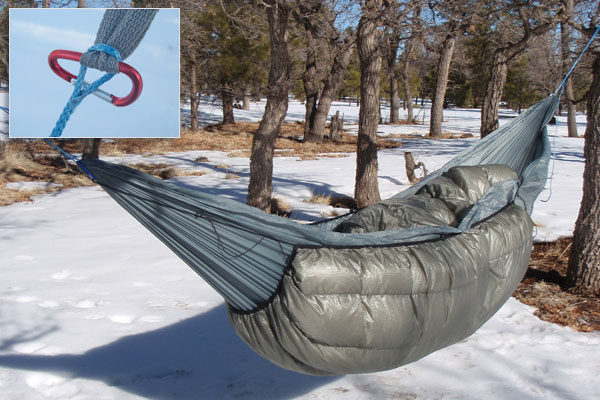
INSET PHOTO: I "upgraded" my toggles to lightweight mini carabiners, which provide a more secure "locking" mechanism than the straight toggle, and I can leave them attached to the webbing strap for storing. I recently acquired a dedicated under quilt for hammock camping and that has allowed me more freedom of movement in the Nano and I’ve noticed a remarkable difference when I was able to lay more diagonally. During my backpacking trip in the Fossil Creek Wilderness, I found I could lay diagonally in great comfort without the sleeping bag restricting me to a mostly parallel lay. FINAL SUMMARYThe Nano is a great hammock as part of an ultra-lightweight shelter and sleep system. It is a little short and narrow, and I think adding a few inches on both dimensions would really make this hammock exceptional. While I might use a larger hammock for some of my overnight camping trips, I will continue to bring the Nano on my day hikes. And when I’m really shaving ounces and bulk for a backpacking trip, I think the Nano is a serious contender. PRO—Very light, packable, and sleeps fairly comfortably overnight. CON—Stitching on the stuff sack. I think the Nano could be a few inches wider and longer and still be a great lightweight hammock. The narrow width has caused some shoulder strain. I would like to thank Grand Trunk and BackpackGearTest.org for providing me with the opportunity to test this product. Read more reviews of Grand Trunk gear Read more gear reviews by Derek Hansen Reviews > Shelters > Hammocks > Grand Trunk Nano 7 Hammock > Test Report by Derek Hansen | ||||||||||||||||||||||||||||||||||||||||