Nite Ize Biners and Figure 9s
Test Series by Kurt Papke
Tester Information
| Name: |
Kurt Papke |
| Age: |
55 |
| Gender: |
Male |
| Height: |
6' 4" (193 cm) |
| Weight: |
220 lbs (100 kg) |
| Email address: |
kwpapke at gmail dot com |
| City, State, Country: |
Minneapolis, Minnesota USA |
Backpacking background: mostly in Minnesota - I have hiked all of the
Superior
Hiking Trail and Border Route.
My preferred/typical backpack trip is one week, mostly in the
Spring/Fall
seasons. I do periodic day hiking in
Michigan, Wisconsin, Utah,
Colorado and Oregon.
I am a comfort-weight hiker: I try to carry as few items as possible,
but do
not go to extremes to reduce the weight of items carried. My
normal shelter is a hammock, so tiedowns for my tarp are an important
part of my gear system.
Initial Report
Product Information
There are five product items being tested in this series as described
in
the table below. Note that the measured weights are approximate
as the items are so lightweight even my most accurate scale has
difficulty resolving the actuals. Where possible I weighed
multiple units simultaneously to both increase accuracy and obtain
averages across several pieces. The measured weights do not
include the supplied accessory cords.
Product
|
Qty
|
Listed
weight
|
Measured
weight
|
Listed
dimensions
|
Measured
dimensions
|
Listed
load limit
|
Fits
rope sizes
|
Material
|
Color
|
Accessory
cord
supplied (if any)
|
| Figure 9 - Small - Four Pack
with Cord |
4
|
0.13 oz (3.6 g)
|
.15 oz
(4.25 g)
|
1.5x1.125x0.125 in
(40x28x3 mm)
|
1.5x1.125x0.125 in.
(40x28x3 mm) |
50 lb
(22.7 kg)
|
0.0625 to 0.1875 in
(2-5 mm)
|
Aluminum
|
None
|
4 x 6 ft (1.83 m) of 0.125 in (3
mm) cord
|
| Figure 9 - Large with Rope |
1
|
1.1 oz
(30.8 g)
|
1.0 oz
(28 g)
|
3x2.25x0.25 in
(76x56x8 mm)
|
3x2.25x.25 in
(76x56x8 mm) |
150 lb
(67.5 kg)
|
0.125 to 0.375 in
(3-9 mm)
|
Aluminum |
None
|
1 x 10 ft (3.05 m) of 0.1875 in
(5 mm) cord
|
S-Biner #1
|
2
|
None
|
0.125 oz
(4 g)
|
1.5625x0.5625 in
(no metric equivalents listed)
|
1.5625x0.5625x0.1875 in
(39.7x14.3x4.8 mm)
|
5 lb
(2.3 kg)
|
N/A
|
Stainless
steel
|
Spectrum
|
None
|
| S-Biner #2 |
1
|
None |
0.3 oz
(9 g)
|
2 x 0.875 in
(no metric equivalents listed)
|
1.9375x0.875x0.25 in
(49x22x6 mm)
|
10 lb
(4.5 kg)
|
N/A |
Stainless
steel |
Black
|
None |
| S-Biner #4 |
1
|
None |
1.1 oz
(30 g)
|
3.5 x 1.5 in
(no metric equivalents listed) |
3.5x1.5625x0.3125 in
(89x39.7x8 mm)
|
75 lb
(33 kg)
|
N/A |
Stainless
steel |
None
|
None |
Product Descriptions
The picture below shows the various products under test as they arrived
from Nite Ize. They are respectively the #4, #2 and #1 S-Biners,
and the large and small Figure 9s. The packaging for the Figure
9s unfolds to access the usage instructions. The S-Biners did not
have any instructions included with the packaging.
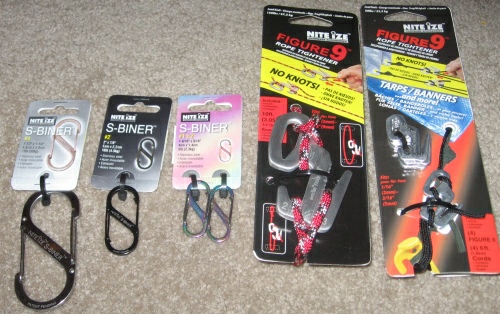
Figure 9s
The Nite Ize Figure 9s are rope tighteners that allow a rope to be
attached to itself or another object without using a knot. The
picture below shows how I will likely use the Figure 9s most often:
attaching a rope to a stake.

The Figure 9 setup is best understood from the supplied usage
instructions shown below. In the picture the blue rope shows the
configuration where the rope is attached to itself to form a large
loop, and the red rope shows the fixed end system where the rope is
attached to an object with a small loop, as was done in the stake
example in the above photo.
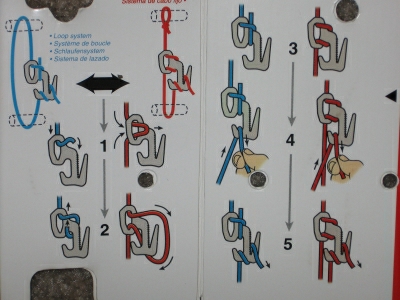 I found the
instructions easy to follow and remember. With a little
trial-and-error I did find that in the fixed end system (red rope), it
is important that the loop goes around the large section of the Figure
9 as illustrated in step #2. If I looped it the other way around
the ring, it had a tendency to fall off. I found the
instructions easy to follow and remember. With a little
trial-and-error I did find that in the fixed end system (red rope), it
is important that the loop goes around the large section of the Figure
9 as illustrated in step #2. If I looped it the other way around
the ring, it had a tendency to fall off.
In addition to their utility as a knotless rope fastener, the Figure 9s
provide a 1:2 pulley mechanical leverage which allows the rope to be
tightened down more than if a knot was used that does not provide a
similar pulley. In the instructions at left the mechanical
advantage occurs in step #4.
The rope is held fixed in step #5 by being wedged into a serrated
v-shaped slot.
S-Biners
The Nite Ize S-Biners are low-load bearing double-hinged carabiners -
they are not intended for climbing. The double hinges allow items
to be hooked onto one end of the S while the S-Biner itself can be
hooked/unhooked from an object independently using the other end of the
S. The hinges are spring-loaded to ease hooking items onto the
system, while at the same time preventing unwanted opening of the hinge.
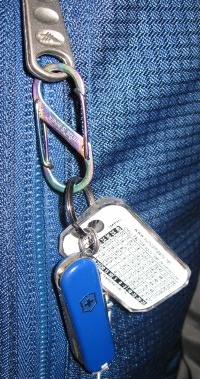 The
smaller S-Biners can be used similarly to a keychain. In the
photo at left I used a #1 S-Biner to attach my small knife and
thermometer to a convenient zipper pull on my backpack. The
smaller S-Biners can be used similarly to a keychain. In the
photo at left I used a #1 S-Biner to attach my small knife and
thermometer to a convenient zipper pull on my backpack.
Initial Impressions
The quality of the usage instructions and the manufacturing of the
items is very high. There are no rough edges, burrs, blemishes or
any other detectable quality problems.
I can immediately see how I will use the small Figure 9s -- to tie down
my hammock tarp lines to their stakes. I'm not clear yet how I
will use the large Figure 9. Similarly I can see several uses for
the two smaller sizes of the S-Biners, as illustrated in the picture
above they will be handy for attaching various items to my pack,
shelter, belt, etc. The #4 S-Biner I am not so clear on, as I
rarely tote items in the 75 lb (33 kg) range.
I have several concerns for the Figure 9s:
- Will they hold in high wind conditions?
- How well do they grip the thin tarp tiedown ropes supplied with
my hammock?
- How will I keep from misplacing them?
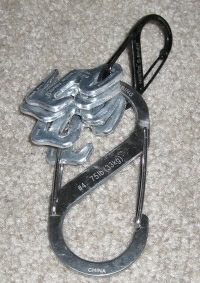
My initial thought to solve the organizational problem is to employ an
S-Biner!
Test Plan
As I carry the Nite Ize products on my day hikes and backpacking trips
over the next four months I will be looking for:
- Usability: how easy is it to pack the items and not lose
them? How easily can I setup the Figure 9s in the field?
This question may become more important as the weather gets colder and
I am wearing gloves or mittens.
- Reliability & robustness: do the Figure 9s hold up in
the wind? Do things inadvertently fall off the S-Biners?
How well does the gear function in the cold weather?
- Functionality: how handy do I find the Figure 9s - are they that
much easier than tying a knot? How many uses can I find for the
large Figure 9 and S-Biner?
- Aesthetics: how do the items look after 4 months of wear and tear?
This concludes my Initial Report on the Nite Ize Biners and Figure
9s.
Long Term Report
Test Locations/Conditions
Testing began with a four-day Fall (October) backpacking trip along the
Southern
end of the
Superior Hiking trail in Northern Minnesota.
This trail section varies in altitude from 650 to 1200 ft (200 to 365
m). The terrain is forested with granite outcroppings.
Temperatures ranged from a high of 60 F (16 C) to a low of 28 F (-2 C)
at night. Winds were light, a few rain sprinkles but no serious
precipitation.
Next use was December 8-10, 2008, a 3-day trip to the Superior
Hiking Trail along the Beaver Bay to Penn Creek section.
Temperatures
ranged from a low of -2F (-19 C) to a high of 15F (-9 C). Winds
were generally calm, but during one night gusted to 16 mph (26 kph)
creating a wind chill factor of approximately -20 F (-29 C).
Elevation
ranged from 750 to 1250 ft (230 to 380 m).
The January use during this period was a 3-day snowshoe/backpacking
trip
to the Superior
Hiking Trail along the Egge Lake to Leskinen Creek sections.
Environmental conditions are included in the table below.
February included a snowshoe backpacking trip to the Porcupine Mountain
Wilderness in Michigan's Upper Peninsula. Environmental
conditions are described in the table in that section.
Gear Usage
My principal use of the small Figure 9s was to tie down my tarp guy
lines for my hammock to the stakes. Due to their small size and
the picture resolution the Figure 9s are not readily discernible in the
hammock photo, but easily seen in the close-up:
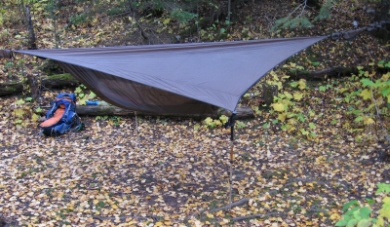 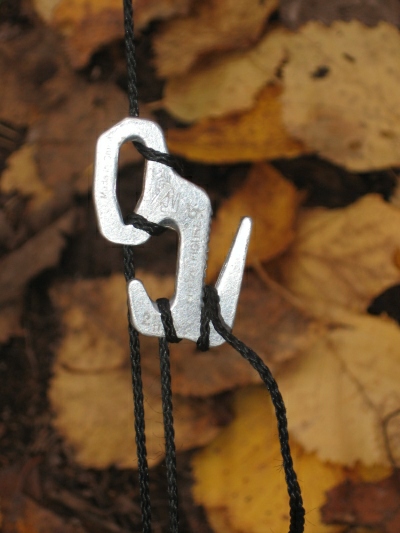
Note from the second photo that in this case I did double-wrap the thin
line around
the Figure 9. I don't know if that was necessary or of any
benefit, but the line I was using (this is the stock tarp line supplied
by Hennessy) was quite fine, approximately 1x2 mm (0.04 x 0.08
in). Note that this line is at least in one dimension smaller
than the minimum specification for the small Figure 9's. I found
the
Figure 9s were easy to attach to the guy lines, and made tie off to the
stakes simple - no knot required. The tiedowns held up well all
three
nights with no discernible loosening. In the morning when I was
packing up I elected to not detach the Figure 9s, but rather to simply
roll them up into the "snakeskins" that the hammock is packed in.
I was a little hesitant to do so as I was fearful that any sharp edges
on the Figure 9s would fray the hammock, but my fears were
unwarranted. I was not able to detect any damage inflicted by the
metal Figure 9s, and the convenience was really enjoyable as I didn't
have to go looking for them in my pack the next evening. I was
not able to measure any slippage of the lines in the Figure 9s - my
tarp remained taut through the night.
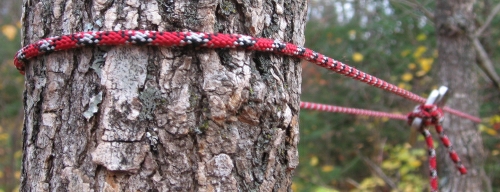
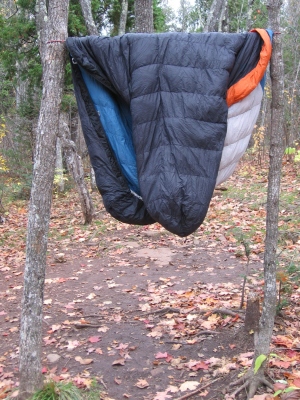
On my last night camping out I found a use for the large Figure
9s. I wanted to air out my down sleeping bag, and used the Figure
9 and supplied rope to set up a line between two trees. The first
photo shows the Figure 9 in place on the rope, the second shows my bag
hanging nice and secure to dry in the Fall air:
I found the operation of the large Figure 9 to be actually simpler that
the small, most likely as I was able to more easily grasp the larger
hardware with my fingers and I was less likely to accidentally drop it.
During this trip a #1 S-Biner was used to clip my thermometer and knife
to my pack as shown in the picture in the Initial
Report. During one of the nights I detached the Biner from my
pack and hung it from the ridge line for night-time access. This
worked very well - it was easy to detach from my pack, and simple to
hang from the ridge line.
The other #1 S-Biner was attached to a loop at the end of my hammock
ridge line. The intent was to clip items to it at night to keep
them out of my way, but I didn't have occasion to use it on this trip.
The #2 and #4 S-Biners did not find any use on the October trip, other
than
keeping things organized as in the photo above.
Endurance Testing
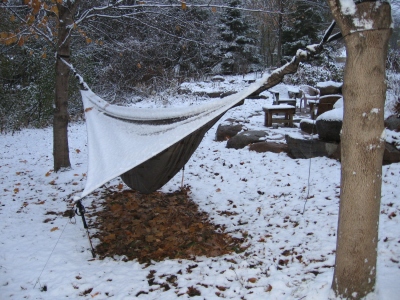 During the
month of November, when hiking in Minnesota is dangerous due
to the firearms deer hunting season, I did some "endurance" testing of
the Figure 9's with my hammock tarp in my backyard as pictured at
left. The idea was
to set up the hammock and tarp for an extended period of time and see
how well the Figure 9's held up in adverse conditions of
freezing rain, snow and wind. The weather cooperated and supplied
some wet, heavy snow and sleet which did a good job of weighing down
the tarp. During the
month of November, when hiking in Minnesota is dangerous due
to the firearms deer hunting season, I did some "endurance" testing of
the Figure 9's with my hammock tarp in my backyard as pictured at
left. The idea was
to set up the hammock and tarp for an extended period of time and see
how well the Figure 9's held up in adverse conditions of
freezing rain, snow and wind. The weather cooperated and supplied
some wet, heavy snow and sleet which did a good job of weighing down
the tarp.
For this experiment, I set up my hammock on Sunday, November 9 and left
it set up until November 18, a period of 10 days.
For this testing I used four Figure 9's: two for attaching the tarp
tieouts to the ground stakes, and two for attaching the tarp to the
trees holding up my hammock. I also used two of the supplied
ropes for the tree attachments. They were just the right
length. As can be seen in the photo, the weight of the heavy snow
and ice put quite a bit of load on the tarp support ropes, but the
Figure 9's held with no problems.
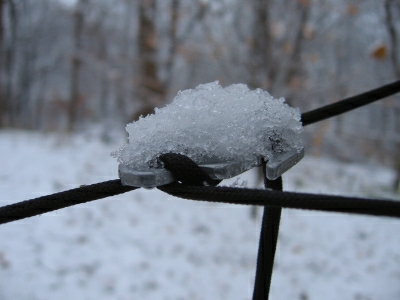 I did re-tension the
tarp lines with the Figure 9's several times due to stretch, but I
observed no slip in the Figure 9 connectors, despite the adverse
conditions. The wet, heavy snow buildup can be seen in the detail
photo at right which shows a closeup of one of the tarp-tree tie-ups. I did re-tension the
tarp lines with the Figure 9's several times due to stretch, but I
observed no slip in the Figure 9 connectors, despite the adverse
conditions. The wet, heavy snow buildup can be seen in the detail
photo at right which shows a closeup of one of the tarp-tree tie-ups.
Observations: one of the things I noticed was the Figure 9's are
not easy to slide up and down on a rope in the fixed end configuration,
particularly when wearing gloves in cold weather. I could not
just pull on the loose rope and slide it up or down. This is
probably a good thing, as I want it to stay in place, but it would be
great if Nite Ize could find a way to make it easier to adjust.
As currently designed, I either have to use a fingernail (not easy with
gloves on...) to loosen the loop, or attempt to "push" the rope through
the loop. I find that I have to make these adjustments almost
every time I set up camp, as I don't seem to guess very well where to
position the Figure 9 on the rope the first time. It often is too
close to the stake/tree, which means that when I tension the rope I run
out of "loop", or I position it too far from the stake/tree and run out
of free line to hook up to the Figure 9.
Results: my suspicion was that the Figure 9's would loosen on my
hammock side tieouts due to the very small diameter cord that Hennessy
uses. This turned out to be unfounded, and the Figure 9's held
fine despite the cord being smaller than the specs for the small Figure
9's.
Use on the December winter backpacking trip

The above photo shows the Figure 9 attaching my hammock tarp to a
tree. During the night the photo was taken the wind gusted to 16
mph (26 kph) putting a fair amount of stress on the Figure 9. I
experienced no slippage.
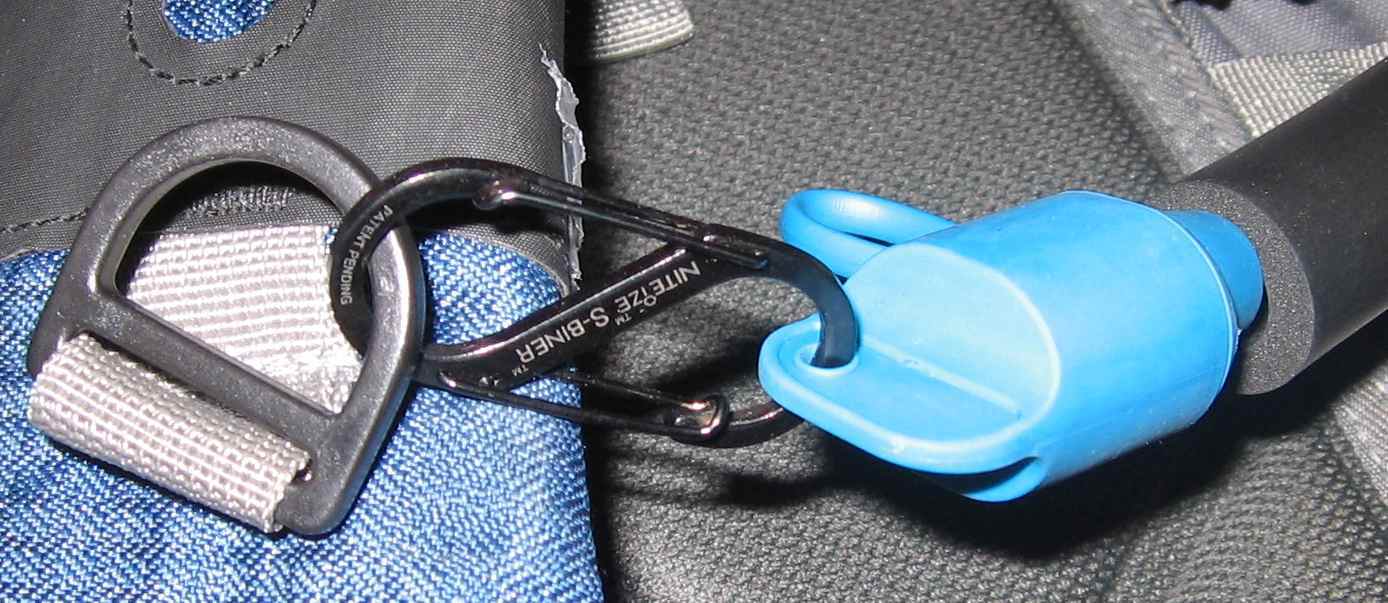
The above photo shows the use I put the #2 S-Biner on the trip.
My hydration reservoir supply tube did not have any kind of attachment
hardware for securing it to my pack, but it did have a hole in the bite
valve cover. As can be seen in the picture, the #2 S-Biner fit
perfectly through the hole, and attached nicely to a D-ring on the
shoulder strap. This worked very well - I was able to easily
detach the S-Biner from the D-ring to bring the bite valve directly up
to my mouth.
There was one other application of the S-Biners on this trip that I do
not have a picture of. My Hennessy hammock has a loop in the two
ends of the ridge line where a carabiner or rope can be attached to
hang items on the inside of the hammock. I used one of the
lengths of rope supplied with the Figure 9's in conjunction with a #1
S-Biner to hang my insulated hydration reservoir on the inside of the
hammock at night to keep the water as warm as possible to prevent
freezing. This worked very well, and it was easy to attach and
detach the reservoir from the hammock using the S-Biner. It would
have been easier to use a #2 S-Biner, but I was only given one to test
and it was dedicated to the use shown in the above picture.
Use on January
2009 Backpacking Trip
Dates
|
January 11-13, 2009
|
Location
|
Superior Hiking Trail near Finland, Minnesota
|
Altitude
|
1322 ft to 1726 ft (400 m to 525 m)
|
Temperatures
|
High of 15 F, low -27 F (-9 C to -33 C)
|
Terrain
|
Forested with lakes and rivers
Rolling hills with no steep ascents
|
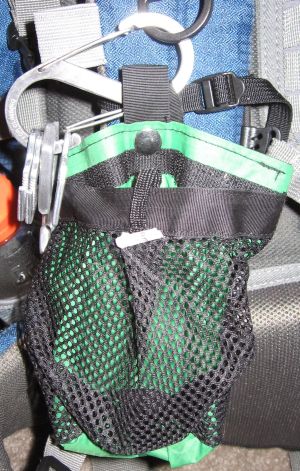 Once again the Figure 9's were
used to secure my hammock tarp tiedowns with no issues. The major
change on this trip was to move the #4 S-Biner to my shoulder strap so
it would not only carry my supply of Figure 9's, but also keep my
shoulder strap accessory pocket from sliding down as shown in the photo
at right. Once again the Figure 9's were
used to secure my hammock tarp tiedowns with no issues. The major
change on this trip was to move the #4 S-Biner to my shoulder strap so
it would not only carry my supply of Figure 9's, but also keep my
shoulder strap accessory pocket from sliding down as shown in the photo
at right.
One of the things I liked about this configuration was I could use the
upper section of the S-Biner to hold the pocket, and the lower to hold
the Figure 9's. This way I couldn't accidentally have the pocket
slip off when I was accessing a Figure 9.
Also visible in the photo is the somewhat horizontal posture the
S-Biner assumed when used this way. It held the Figure 9's off to
the side, which I found convenient.
Use on a
February 2009 Backpacking Trip to the Porcupine Mountains
Dates
|
February 12-14, 2009
|
Location
|
Porcupine Mountain Wilderness in Michigan's
Upper Peninsula
|
Altitude
|
778 ft to 1600 ft (237 m to 490 m) |
Temperatures
|
Nighttime lows of around 15 F (-9 C), daytime
highs of 30 F (-1 C) |
Terrain
|
Forested with lakes and rivers. The trail
was along an escarpment with some steep grades. |
Once again the small Figure 9's did their typical great job of tying
down my hammock tarp. On this trip I began to notice some fraying
of the lines, in the areas where I normally connect the Figure
9's. It appears they are starting to cause some wear and tear.
The bad news on this trip is I moved the small S-Biner
that I used as a keychain for my small Swiss Army Knife from the front
of my pack to hold up my shoulder strap accessory pocket as shown the
previous section. On day 1 of this trip when I set my pack down
for a break my knife fell off the S-Biner and dropped into the
snow. Fortunately, I was able to track it down.
Unfortunately the same thing happened the next day, but I didn't
immediately notice it and my knife was lost in the wilderness :(
Moral of the story: I have to be careful when using the S-Biners that
they are not positioned somewhere that pressure against them will open
up the hinge and allow gear to fall off.
Summary
I like the Figure 9's and the S-Biners. I find the small Figure
9's and the #2 S-Biners to be the most useful size for my
applications. In intend to continue to use both of these pieces
of gear on all my future backpacking trips.
Likes:
- The Figure 9's are easy to use and hold well with no slippage,
even when used with line that is somewhat outside of specifications.
- The S-Biners were reliable. I had no problems with clip
breakage.
- The S-Biners were easy to use: I was able to effortlessly clip
and unclip it to things, and add more items to the S-Biner or take them
off quickly.
- The #1 S-Biners are very handy for clipping things to my pack,
and to my hammock ridge line for nighttime access.
Areas for
improvement:
- Make it easier to slide the Figure 9's on the rope when desired. Clearly, I don't
want the Figure 9 to slide on its own, but it would be real nice if a
way could be found to get it to adjust when I want to.
- It is possible for gear to escape from an S-Biner if it is
subjected to conditions that might force the hinge open and allow a
loose piece of gear to fall off. On their website Nite Ize does
show a technique for secure attachment, but this has the downside of
making it much more difficult to detach a piece of gear.
This concludes my Long Term report for the Nite Ize Biners and Figure
9's.
Many thanks to Nite Ize Inc.
and BackpackGearTest.org for the
opportunity to
test this product.
Read more reviews of Nite Ize gear
Read more gear reviews by Kurt Papke
|


 I found the
instructions easy to follow and remember. With a little
trial-and-error I did find that in the fixed end system (red rope), it
is important that the loop goes around the large section of the Figure
9 as illustrated in step #2. If I looped it the other way around
the ring, it had a tendency to fall off.
 The
smaller S-Biners can be used similarly to a keychain. In the
photo at left I used a #1 S-Biner to attach my small knife and
thermometer to a convenient zipper pull on my backpack.


 During the
month of November, when hiking in Minnesota is dangerous due
to the firearms deer hunting season, I did some "endurance" testing of
the Figure 9's with my hammock tarp in my backyard as pictured at
left. The idea was
to set up the hammock and tarp for an extended period of time and see
how well the Figure 9's held up in adverse conditions of
freezing rain, snow and wind. The weather cooperated and supplied
some wet, heavy snow and sleet which did a good job of weighing down
the tarp.
 I did re-tension the
tarp lines with the Figure 9's several times due to stretch, but I
observed no slip in the Figure 9 connectors, despite the adverse
conditions. The wet, heavy snow buildup can be seen in the detail
photo at right which shows a closeup of one of the tarp-tree tie-ups.

 Once again the Figure 9's were
used to secure my hammock tarp tiedowns with no issues. The major
change on this trip was to move the #4 S-Biner to my shoulder strap so
it would not only carry my supply of Figure 9's, but also keep my
shoulder strap accessory pocket from sliding down as shown in the photo
at right.