|
|
 |
Guest - Not logged in | ||||||||||||||||||||||||||||||||||||||||||||||||||||||||||||||||||||||||||||||||||||||||||||||||||||||||||||||||||||||||||||||||||||||||||||||||
Reviews > Shelters > Tents > AntiGravityGear TarpTent > Test Report by Andrew Mytys
Tester's Biographical Information:
Backpacking Background: I consider myself a lightweight hiker, carrying the lightest gear I can find that will provide a comfortable wilderness experience and support my goals. Although my pack weight might label me as an "Ultralight Weenie," I carry "luxury items" that hard-core ultralighters would shun; e.g. a 23 oz (652 g) sleeping pad. Depending on the level of insects present and if I'm hiking solo or not, I might pack a hammock, tent, or tarp. My base weight for three-season hiking is in the sub-8 to 10 pound (3.5 - 4.6 kg) range, unless regulations force me to carry a bear canister.
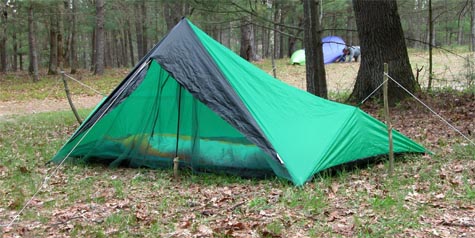
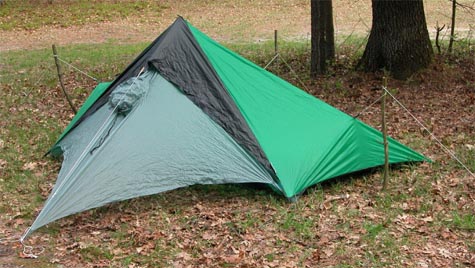
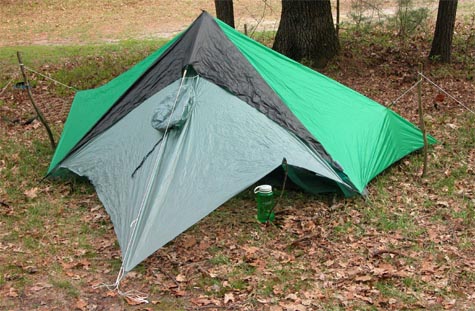
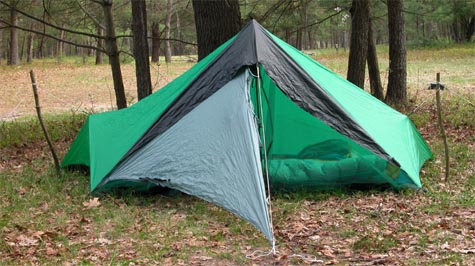
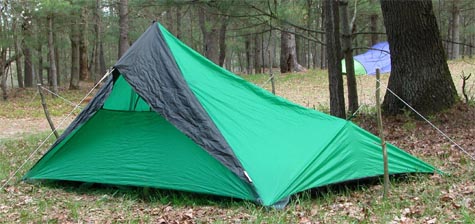
Product Description: The Anti Gravity Gear (AGG) Tarp Tent is a square-walled, non-freestanding tent made of silicone-impregnated rip-stop nylon (silnylon). Designed with the ultralight backpacker in mind, the tent is a basic and frills-free shelter - no zippers, no pockets, no windows. The tent provides full coverage, offering protection from both inclement weather and biting insects. As a lightweight backpacker, silnylon tarp tents are nothing new to me. In using them, I've have always been reminded of the "tradeoffs" I was making by saving POUNDS in shelter weight - namely, I had to contend with excessive levels of condensation, less than adequate protection from precipitation when blowing winds were present, and "tuck-under-floor" doors made of no-see-um netting that never seemed to keep the shelter completely bug-free. Will hiking with the Anti Gravity Gear Tarp Tent be any different? The Anti Gravity Gear Tarp Tent is a very simple design - a floor, a front wall made of no-see-um bug netting, a canopy that makes up the other three walls and ceiling, and a front beak for added protection from the elements. The simplicity theme continues with the setup of the tarp tent - stake out the back corners, prop the center peak of the tent up with the tip of a trekking pole and secure with a guy line, and stake out the remaining front corners. To maximize headroom, there are three additional pull-out points that can be guyed out, including one point at the center of the back wall, and one point on both the right and left walls. There's also a peak loop sewn to the tent so that the shelter can be suspended from a line, rather than propped up with a trekking pole. The elegance of the tarp tent's design can be further appreciated once it has been pitched. There are no seams located along the canopy or floor, save for along the perimeter where the canopy and floor meet. So, there are no stressed seams that can let rain through to drip down on the occupants. There are no zippers on the shelter that can jam, snag, or wear out, but there are a series of hang loops along the front wall that can be used to hold the netting door up and completely out of the way. The door has enough slack such that only half of it can be suspended, if desired. To completely close the door, it should be tucked under the floor with a little gear placed on top for added security. The nice thing about the tarp tent's design is that there's conservatively a full 6 inches (15 cm) of netting to tuck under the door, so the netting can shift a little without instantly creating a point of entry for bugs. Additionally, hooks on the mesh door can be attached to loops along the floor, lifting the floor into a "bathtub" configuration. For additional protection from the elements, customers can purchase the optional StormFlap or Poncho Villa for use with the tarp tent. The StormFlap is basically a section of silnylon that extends upward from the floor of the shelter towards the ceiling, being held up by the same hooks that are used to hold the netting door open. In essence, use of the StormFlap creates a tightly stretched vertical front wall for the tarp tent. The optional Poncho Villa is another option for added rain protection. The poncho connects to the tarp tent above the basket of the trekking pole supporting the shelter's beak, with two of its corners held down by clips along the front corners of the tent, and a third corner pulled outward in front of the tent, creating a fully enclosed vestibule that not only protects the inside of the tarp tent from the rain, but creates an additional "dry" area for storing gear, etc.
Construction/Fit and Finish: The construction and finish of the Anti Gravity Gear Tarp Tent is first rate! There are no loose seams or threads and pullouts are reinforced in high stress areas.
Intended Use/Testing Strategy: Over the course of the next four months, I will be using the tarp tent as my primary shelter. I will use it while hiking solo, with my dog, and also try to use it as a two-person shelter. I will comment on durability, roominess, and condensation levels. I will also be on the lookout for any noticeable "trade-offs" in using the tarp tent over more traditional shelters and comment on what life inside the tarp tent is like. I believe that gear should serve me well and that I should not have to constantly fiddle with the gear only to just "get by." A tent is an item that's used at the end of the day, it is integral in a good night's sleep, and in times of wet and cold conditions it can even be a lifesaver. I definitely appreciate a solid design that works, but at the same time I have little patience for solutions that are less than adequate. This should be an interesting test series.
Field Locations and Conditions:
Pitching the Tarp Tent: Pitching the Tarp Tent is a quick and simple affair, provided that the manufacturer's instructions are followed. I found it easiest to pitch the two rear corners first, then secure the tent's peak, then stake out the two front corners, and finally guy out the two side walls and rear wall. When pitched correctly, there is no sagging to the shelter and the two front corners are at a distance apart such that the StormFlap or Poncho Villa vestibule can be attached to the two front corner clips. All of this takes me no more than 2-minutes of casual effort.
Used With Trekking Poles: The roof of the tarp tent can be supported using a trekking pole positioned point-up. There's a small PVC cup at the peak of the roofline that's used to hold the tip of the trekking pole and protect the surrounding material from being punctured. I found the optimal height to pitch the front peak to be at 43 inches (109 cm). At this height, the front corners were positioned at a distance apart from one another such that I really had to stretch the corner loops of the StormFlap or Poncho Villa vestibule to secure them onto the clips, allowing for a very tight pitch to be realized. When using the vestibule, I found it necessary to have a trekking basket attached to the pole supporting the front of the tarp tent - a loop along the rear of the poncho is supported by the basket. In a phone call with the manufacturer, I was told that the basket wasn't needed, and that the tension at the apex of the roofline was enough to hold the loop of fabric on the outside of the cup. I tried this configuration several times and found the loop kept slipping out from behind the cup, and I became so engrossed with getting the setup to work that I totally lost track of where the tip of my trekking pole was, eventually puncturing the beak of the tarp tent. A pair of trekking poles are still only enough to secure two of the four tieouts - I chose to use my trekking poles for the peak and rear wall of the tent, using downed branches I found in camp to secure the side walls of the shelter.
Used Without Trekking Poles:
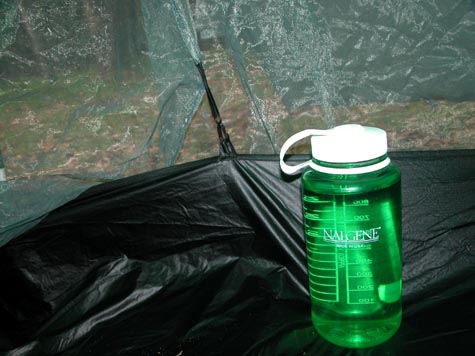
A Bug-Proof Shelter?: I've found the tarp tent to be an effective shelter when it comes to keeping the bugs out; surprisingly more effective than a tent. The problem with a tent is that it has an "official" door, complete with a zipper for opening and closing it. When entering/exiting a typical tent, I have to open the door, move through the opening, then close it. Often times, the duration of time that the door is open is enough for 50 or more mosquitoes to get inside the tent - the fact that they congregate inside the vestibule and on the mosquito netting doesn't help the situation any. With the Anti Gravity Gear Tarp Tent, the "door" is actually a hole that my body creates by moving under a section of bug netting that drapes down to the ground. This allows an opening to be created for a short time, sized just large enough for me to get through without creating an excessive amount of additional openings into the tent. Maximum Occupancy: The tarp tent makes for a spacious solo shelter. Being a single-walled shelter, condensation is a concern. Sleeping in the center of the floor allows me to stretch out between the two peaks along the side-walls, keeping both my head and feet at a safe distance from contact with the walls of the shelter. However, when taking up this desirable position, there's really no room on either side of me for another person to sleep. Yes, I can fit another sleeping pad between myself and the front wall of the tent, but putting a person on top of that pad is another story altogether. The volume that another adult with a sleeping bag takes up in the tarp tent makes touching a wall inevitable for both individuals. If I were hard-pressed, I would use the tarp tent as a two-person emergency shelter. For day-to-day use however, I'd rather that each camper carry their own tarp tent - at about 21 ounces (600 g), it's not a burden by any stretch of the imagination. Roominess: In terms of stretching out, there is an ample amount of room on the horizontal axis inside the 10-foot model of the tarp tent. When properly pitched, I never felt as if I were in jeopardy of touching a side wall - I just made sure my head was positioned below one side-wall pullout, and that my feet were positioned below the other. Once I was laying down inside, there was plenty of room to support myself on my elbows and read a book, pull out my maps and plan the next day's hike, clean my camera gear, etc. Stormworthiness: I found the beak and netting of the tarp tent sufficient in shielding me from the elements in only the most ideal of conditions - a light rain, under a dense forest canopy, with little or no wind. I haven't had enough experience with the StormFlap to judge if it provides a bone-dry shelter in wind-driven storm conditions, but it seems to be pretty effective at covering most of the gaps created by the base shelter. For true "bombproof" protection, the Poncho Villa vestibule is really the way to go, in my opinion. Given that the vestibule only weighs about 4 ounces (113 g) more than the StormFlap, and that it can double as a windshirt/rain jacket (read my review of the Poncho Villa), the choice, to me, of which rain-shield solution to purchase is obvious. In my opinion, the StormFlap is really more of a "modesty curtain" to be carried in dry climates, given the dual-use nature of the Poncho Villa and how nicely it performs in inclement weather. I also prefer the aerodynamic shape of the vestibule to "yet another flat wall" in wind-driven conditions. Condensation: It's been an odd summer here in Michigan, with relatively dry nights and temperatures above that of the dew point. As a result, I can't say that I've really been exposed to conditions where condensation was a major concern. That said, the tarp tent is a single-walled shelter. The first night I used the shelter I did not pitch it correctly, causing the walls to sag. This decreased the amout of space between my face and the roof of the tent, and I noticed quite a bit of condensation occurring around the area where my breath came into contact with the tent walls. Overall, I noticed that if I came into close contact with the walls (e.g. the foot of my sleeping bag) then droplets of moisture did begin to form. To minimize condensation, I definitely recommend using the tarp tent with the most amount of interior space - the 10-foot model. I also recommend guying out both side walls and the rear wall, and adjusting the guy-outs for maximum tension before settling in for the night as silnylon tends to stretch and the shelter may have sagged a bit since it was initially pitched. In addition, I found it best to pitch the tent with the door facing into the wind. Curiously enough, I found that attaching the Poncho Villa vestibule and pulling half of it back on itself (see photo in Initial Report section, above) helped to decrease condensation levels inside. I think that this is because the wall allowed winds to bounce off the vestibule and circle back into the tent, which helped keep air flowing into the tent even if winds shifted a bit from the direction they were blowing in when I initially pitched the tent. Vestibule: The vestibule is cavernous - with food stored outside the sleeping area, I easily fit my wife's and my gear underneath - this included two pairs of boots, my camp shoes, both of our near empty packs, and my cook pot and stove ready to heat water in the middle of the night, should my sleeping bag prove too cold and I need a Nalgene bottle filled with boiling water to heat things up. I had enough room to safely navigate a cooking area underneath without disturbing the gear around it (oooops, you're not supposed to have an open flame near silnylon, are you?) Storage: While the tarp tent doesn't have any pockets sewn into the walls or an option for a gear loft, it does have elastic loops along the inside that are used for securing the front wall netting/door in the "open" position. I've used these loops to hold my glasses, flashlight, and other items. They help keep small items up off the floor and within easy reach - a plus for me, as I'm basically blind without my glasses. Improving on the Design: So far, the only change I would make to the tarp tent's design would be to add another 3 feet (1 m) to the guy line for the two side wall and one rear wall pull outs. I camp in areas where soil can be sandy, and the amount of line that comes with the tarp tent received for testing results in limited staking options, particularly when the walls are pulled out onto sticks for increased peak height along the side walls.
 This concludes my Field Report. The Long-Term Report will be appended to this report in approximately two months from the date of this report. Please check back then for further information.
Field Locations and Conditions:
On this trip, I pitched the Tarp Tent atop an ancient glacial moraine - the soil was composed of sand and gravel, and the ground was near, but not completely, level. As a result, the corners of the shelter were staked in positions where the floor was "tight," but the walls had a little sag to them, even after all the guy lines were pulled out. The sagging walls meant that my breath didn't have as much airspace to move around in before coming into contact with them. Between this fact and the dew point temperature being met, the walls quickly became covered in condensation. I felt like a mechanic on a creeper, rolling around under a car trying to keep his coveralls from getting dirty. While the walls really weren't that close to me, all that condensation staring me in the face, ready to rain down at the slightest tremor, had me moving about in a very calculated and careful manner. I got out my pack towel and tried to wipe the walls dry, but it seemed that the condensation returned after each pass of the towel. Thankfully, the size of the tent's interior allowed me to center myself in such a way that I wasn't in any real danger from touching a wall, even if tossed and turned a bit in my sleep. Yes, the interior walls were heavy in condensation, but I never did experience the accumulated moisture raining down on me. Summary: I found the shelter's capacity to be 1+, meaning that I would be comfortable sharing it with an infant or large dog, but I would only use it with two adults in emergency purposes - there's just not enough space inside the shelter to avoid touching walls when two adults are present. From a durability perspective, the Tarp Tent has held up fine. Outside of my accidentally puncturing a hole in the beak of the shelter with my trekking pole, there is no wear or damage to be seen. In terms of improvements to the design of the Tarp Tent, I would suggest increasing the length of the rear and side guy lines by about 3 feet (1 m). In addition to this, I would add another two pullout points along the back wall. If one were to draw a line from the shelter's peak to each of the two back corners, the position of the pullout would be along these lines, about 40% down towards each corner. These pullouts would be used when the tarp tent was pitched on uneven terrain, to prevent the roof from sagging. Overall, I have gained an extremely favorable impression of the Anti Gravity Gear Tarp Tent. The shelter packs small and weighs very little (about 21 ounces, or 600 grams). While its single-walled design does promote condensation, the large mesh door minimizes the accumulation of moisture in most conditions (the exception is limited to those times when the air temperature is at or below the dew point and there is no wind present). I found that the optional Poncho Villa vestibule can help to manage condensation build-up within the shelter, as it can be pitched in such a way as to allow airflow to bounce off its interior wall and into the tent, creating a kind of vortex effect. I also found that I could easily position myself inside the tent so that I had at least a foot of space between my the head and foot of my sleeping bag and the nearest wall - while the interior tent walls might have had condensation on them, the shell of my sleeping bag remained dry. For those 3-season hikes where I want to go light and keep things simple, the Tarp Tent is one of the first shelters I would reach for. While there are other options that may be lighter, few come to mind that are as quick to set up and offer as much bug-free space as the Anti Gravity Gear Tarp Tent. In terms of options, I feel that the Poncho Villa vestibule is a mandatory add-on when traveling in areas where precipitation may occur.
Read more reviews of AntiGravityGear gear Read more gear reviews by Andrew Mytys Reviews > Shelters > Tents > AntiGravityGear TarpTent > Test Report by Andrew Mytys | |||||||||||||||||||||||||||||||||||||||||||||||||||||||||||||||||||||||||||||||||||||||||||||||||||||||||||||||||||||||||||||||||||||||||||||||||

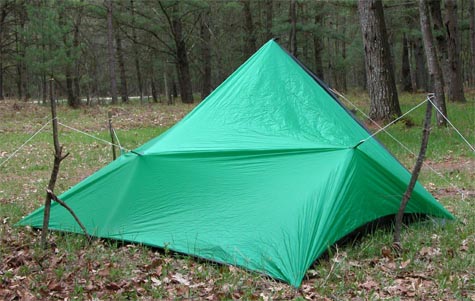
 For those hiking without trekking poles, there's an external loop of fabric at the peak of the roofline that can be used to suspend the tent from a line. Anti Gravity Gear even sells a 40 foot (12 m) section of Spectra cord for this purpose. Personally, I am much too impatient to be fooling around with tying a cord around trees, adjusting suspension height as needed, then untying the cord come morning. I was never a Scout of any sort and the only "knot" I know is the kind that takes hours to undo, especially in the morning when my fingers are stiff and the cord might be a bit damp. A cord suspended at waist level is also an invitation for someone stumbling around camp in the middle of the night to accidentally tear down my pitched tent. Nope, I found a much better solution, my friends. Rather than futzing around with a cord, I carry a Coghlan's Stove and Lantern Funnel. This item weighs a scant 0.4 oz (11 g) and creates a suitable "tip" on branches up to 2 inches (5 cm) in diameter. Coincidentally, my navel is 43 inches (109 cm) off the ground so I've got an easy reference point to measure from. So, all I have to do is find a big stick - no problem in the terrain that I typically hike in - and snap a section off of it at the desired length. Using the funnel, I can have a really nasty and sharp tip on the branch, and the fabric of the tarp tent will be perfectly safe. The images to the right illustrate the way my system works.