AntiGravityGear Tarptent
Reviewed By Pat
McNeilly
Initial Report: May 18, 2007
Field Report: July 22, 2007
Long-Term Report: September 24, 2007
Name: Pat McNeilly
Age: 44
Gender: Male
Height: 5 8 (1.7 m)
Weight: 155 lb (70 kg)
Email address: mcne4752 at yahoo dot com.
City, State, Country: Gaithersburg,
Maryland, USA
Backpacking Background:
I have been hiking for at least 20 years but backpacking for only the last four
years. Most of my backpacking is done as
overnight trips and occasional weekend and weeklong trips. My typical packweight
is approximately 18 to 20 lb (8 to 9 kg) before food or water. Most of my backpacking is the three season
variety in the mountains of Maryland, Virginia, Pennsylvania, and West
Virginia. In addition to backpacking, I
also fish, hunt, and have been involved in disaster relief. As a result, some of my backpacking equipment
gets used in a number of different venues.
Product Information:
Product: 10 Tarptent
Manufacturer: Antigravity Gear
Year of Manufacture: 2007
Color: Green
URL: http://www.antigravitygear.com/.
MSRP: Tarptent $229.99
USD
StormFlap $29.00 USD
Titanium Stakes (8) $15.00 USD
40 Spectra line $18.00 USD
Poncho Villa $79.00 USD
Seam Sealing $30.00 USD
|
Item
|
Weight (listed)
|
Weight (measured)
|
|
Tarptent
|
20
oz (567 g)
|
22
oz (624 g)
|
|
Stuff
Sack
|
Not
listed
|
0.5
oz (14 g)
|
|
Storm
flap
|
1.3
oz (37 g)
|
1.3
oz (37 g)
|
|
Stakes
(each)
|
Not
listed
|
0.2
oz (6 g)
|
|
Spectra
line
|
1
oz (28 g)
|
0.8
oz (23 g)
|
|
Stake
bag
|
Not
listed
|
0.2
oz (6 g)
|
|
Poncho
Villa (vestibule)
|
5.9
oz (167 g)
|
5.9
oz (167 g)
|
Initial Report
Review Date: May 18, 2007
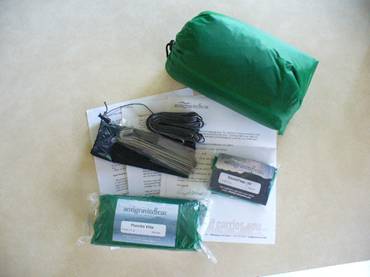
Product Description (as described on the manufacturers website):
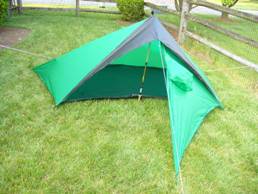
The AntiGravityGear Tarptent
is a lightweight single-walled shelter designed for ultralight
backpacking. The shelter has a trapezoidal
shaped floor and sets up with a hiking pole.
The Tarptent comes with mesh door and has a
storm flap and a vestibule attachment as optional components.
 Product
Review:
Product
Review:
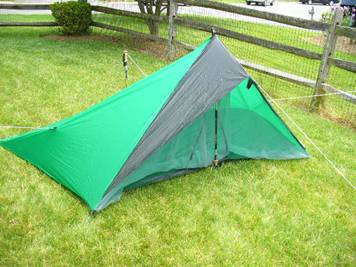
The Tarptent is completely constructed of sil-nylon and has a trapezoidal floor with the long side
(rear) measuring 10 ft (305 cm) and the short side [front measuring 7 ft (213
cm)]. The remaining two sides measure 5
ft (152 cm). The Tarptent
has a front beak constructed of two triangular pieces of sil-nylon
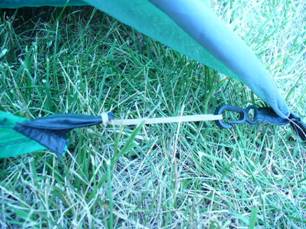
which extends approximately 17 in (43 cm) from the front of the Tarptent and has a guy line attached to it. A plastic cup (appears to be made of PVC
tubing) is provided at the apex of the Tarptent for
insertion of a hiking pole to help prevent a puncture but it appears that care
may need to be taken so as not to have the pole slip out of the cup and
puncture the beak or other portion of the Tarptent. There are stake loops located at each corner,
as well as an additional loop at the mid-point of the back edge. Two guy-out loops are located approximately
12 in (30 cm) up from the mid point of each side and a third loop is located
approximately 18 in (46 cm) mid-way along the rear of the Tarptent. Each guy-out point is reinforced with a 1 in
x 1.75 in (2.5 cm x 4 cm) patch of webbing.
There is an additional loop located at the apex of the Tarptent where the body meets the beak. This loop would allow the Tarptent
to be set up without a pole by attaching to an overhead branch.
The mesh door is a simple curtain of bug netting which hangs down across the
entire front opening. Three sets of
hooks (described as mitten hooks), suspended on 4 in (10 cm) loops of elastic
cord, hang along the seam attaching the beak and tent body. These loops and hooks allow the mesh door to
be rolled up and secured. The mesh also
has two mitten hooks, suspended on 2 in (5 cm) loops of elastic cord, attached
to the face of the mesh. This set of hooks are approximately 13 in (33 cm) from the
bottom of the mesh and can be hooked to two corresponding loops on the front
edge of the floor to create a bathtub effect.
I will note that one of these two loops was not sewn through and I had
to tie a knot to secure the mitten hook on the elastic. This should not alter its function but I will
keep an eye on it.
 The
Tarptent has a few optional items to provide a more
weather resistant set-up, such as the StormFlap and
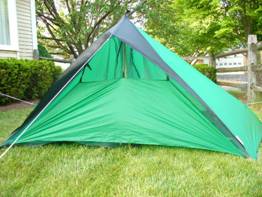
the Poncho Villa (vestibule). The StormFlap acts as a door of sorts to protect the user from
blowing rain and debris. The StormFlap is a trapezoidal shaped piece of sil-nylon which fits along the front of the shelter under
the beak. Each end of the long side [72
in (183 cm)] of the StormFlap has a loop which
attaches to a mitten hook at the front stake loop of the Tarptent. The short side [28 in (71 cm)] of the StormFlap has three loops which attach to the mitten hooks
used to hold up the mesh door. When
installed, the StormFlap provides a vertical wall in
the front of the shelter. This new
wall does not extend all the way to the top of the shelter but leaves room for
some ventilation.
The
Tarptent has a few optional items to provide a more
weather resistant set-up, such as the StormFlap and
the Poncho Villa (vestibule). The StormFlap acts as a door of sorts to protect the user from
blowing rain and debris. The StormFlap is a trapezoidal shaped piece of sil-nylon which fits along the front of the shelter under
the beak. Each end of the long side [72
in (183 cm)] of the StormFlap has a loop which
attaches to a mitten hook at the front stake loop of the Tarptent. The short side [28 in (71 cm)] of the StormFlap has three loops which attach to the mitten hooks
used to hold up the mesh door. When
installed, the StormFlap provides a vertical wall in
the front of the shelter. This new
wall does not extend all the way to the top of the shelter but leaves room for
some ventilation.

A vestibule can be formed from the AntiGravityGear
Poncho Villa, as an optional item. The
Poncho Villa can be used as raingear when not being used as the Tarptents vestibule.
I am reviewing the Poncho Villa in conjunction with the Tarptent and a separate report on the poncho is available
under raingear. The poncho is basically
a square piece of sil-nylon which measures 63 in (160
cm) per side and has a hood with a drawcord. The corners of the poncho have loops to allow
for pitching as a vestibule. One loop is
attached to the end of a hiking pole before it is inserted into the cup under
the beak and the other loop is staked out.
The last two corners are attached to the two mitten hooks located on the
front stake loops.
A few last things that I noticed are that the overall quality seems to be quite
good. The seams appear to be well
done. The seams are sealed which looks
to be complete. The stakes supplied with
the Tarptent are titanium and are 6 in (15 cm)
shepherds hook style. Although these
are very light, I am interested to see how well they hold in different soil
types.
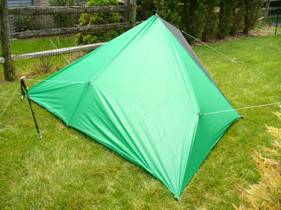
I found the Tarptent quite easy to set up. I usually
use a tarp as a shelter and therefore did not have any problems with how to
properly stake out the sides or deal with the guy lines. Only a single pole is required to pitch the Tarptent but a second pole attached via the rear guy point
helps with interior space. The side guy
points also help in providing additional interior volume to the Tarptent. It seems
like there is ample room for one person and two could probably fit without much
problem. I would expect that with the
Poncho Villa attached as a vestibule, there should be ample space for two. I find the mesh door quite remarkable. Simply lift it up and walk out. No zippers or other type of closure to fumble
with. Lets see if I am still crazy
about it after four months.
My plan is to evaluate the ease of set-up and how well the various options
function during a trip. I will be
evaluating the overall durability of the materials, as well as watching for
separation of seams and the like. I will
be looking to see how well the Tarptent deals with
rain and condensation.
Field Report
Review Date: July 22, 2007
Field Information:
I use the Antigravity Gear Tarptent on a three day
backpacking trip in the Monongahela National Forest of West Virginia. The weather conditions included temperatures
45-80 F (7-27 C) and I encountered fairly dry conditions with only small amounts
of rain. The elevations ranged from
2000-4800 ft (610-1460 m) on this trip.
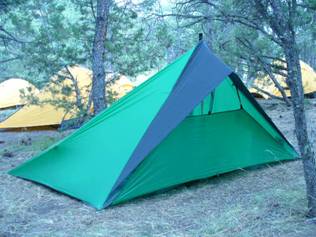
I also used the Tarptent as my sole shelter on
a 12 day trek at Philmont Scout Ranch in New Mexico. The weather conditions included temperatures
from 45-90 F (7-32 C) and I encountered mostly dry conditions but did encounter
rain on most days of the trip, usually in the form of afternoon
thundershowers. The elevations on this
trip ranged from 6700-12400 ft (2040-3780 m).
Product Review:
 The
Tarptent has been easy to set up in the field. It is as simple as placing two stakes at the
rear corners, inserting a trekking pole under the beak, and staking out the
front guy line. At this point the shelter
will stay up and the front corners can be staked out. This can be accomplished in a couple of
minutes. The best pitch seemed to be
achieved by making sure that a long front guy line was perpendicular to the
rear wall. This did tend to produce a
tripping hazard (particularly with ten teenagers around) since the guy lines
are hard to see even in daylight.
Staking out the additional guy lines is not absolutely necessary and
does take a bit longer but does provide greater interior space. I did have opportunity to set up the Tarptent with an imminent thunderstorm rumbling. The Tarptent went
up just as quickly (if not quicker) than tents used by my companions.
The
Tarptent has been easy to set up in the field. It is as simple as placing two stakes at the
rear corners, inserting a trekking pole under the beak, and staking out the
front guy line. At this point the shelter
will stay up and the front corners can be staked out. This can be accomplished in a couple of
minutes. The best pitch seemed to be
achieved by making sure that a long front guy line was perpendicular to the
rear wall. This did tend to produce a
tripping hazard (particularly with ten teenagers around) since the guy lines
are hard to see even in daylight.
Staking out the additional guy lines is not absolutely necessary and
does take a bit longer but does provide greater interior space. I did have opportunity to set up the Tarptent with an imminent thunderstorm rumbling. The Tarptent went
up just as quickly (if not quicker) than tents used by my companions.
The only aspect of the set-up that needs particular care is ensuring that the
trekking pole is inserted in the plastic cup on the underside of the beak. While staking out the front guy line, I
pulled the fabric taut and heard a popping sound. My trekking pole had slipped out of the cup
and was now sticking out of the top of the beak. I figured that this would leave me with a
leaking tent for the nine days left in my New Mexico trek. I was able to patch the hole with two small
circles of duct tape on the inside and outside of the material. This appeared to hold for the remainder of
the trip and I did not have any problems with rain entering the Tarptent.
Attaching the vestibule requires that the PonchoVilla
be at hand when setting up the tent. I
found that I would set up the tent but forget to pull out the vestibule and had
to attach it after the initial set up.
This is not hard to do but required that I pull down the trekking pole
to insert the pole through the loop on the back of the PonchoVilla.
 I
found that closing the vestibule and the StormFlap
difficult depending on how wide the opening between the two front stakes
was. This distance can vary depending on
the height of the trekking pole. I found
it difficult to attach the sil-nylon loop on either
closure to the mitten hook beside each front stake. To alleviate the problem I attached a small
rubber band to the loop on one side of the StormFlap
and vestibule. This allowed the closures
to attach more easily but still remain taut and shed water.
I
found that closing the vestibule and the StormFlap
difficult depending on how wide the opening between the two front stakes
was. This distance can vary depending on
the height of the trekking pole. I found
it difficult to attach the sil-nylon loop on either
closure to the mitten hook beside each front stake. To alleviate the problem I attached a small
rubber band to the loop on one side of the StormFlap
and vestibule. This allowed the closures
to attach more easily but still remain taut and shed water.
I found that getting in and out of the Tarptent much
easier than I expected. I had expected
that I would be constantly knocking against the trekking pole, the guy line, or
the edge of the beak. I have not found
this to be the case very often. The
opening is wide enough for me to exit and not touch the pole or guy line. On occasion, I have had my back rub against
the beak but that did not seem to be much of a problem.
 I
have had mixed results with condensation in the Tarptent. I have used the Tarptent
in various configurations. I have used
it with (i) the StormFlap
as a door; (ii) the vestibule attached and completely closed; (iii) the
vestibule attached with one half open; and (iv) only
the mesh as a door. All configurations
produced condensation except for when using the mesh only. This was true even in New
Mexico where the overall humidity is much lower than West Virginia. I found that the vestibule produced more
condensation that other configurations since it appeared to seal things up a
bit more and prevented adequate ventilation.
Typically, I would wipe the condensation up with a bandana and try to
let the Tarptent air out to dry. I found that if there is any amount of sun
available, the sil-nylon dries quickly.
I
have had mixed results with condensation in the Tarptent. I have used the Tarptent
in various configurations. I have used
it with (i) the StormFlap
as a door; (ii) the vestibule attached and completely closed; (iii) the
vestibule attached with one half open; and (iv) only
the mesh as a door. All configurations
produced condensation except for when using the mesh only. This was true even in New
Mexico where the overall humidity is much lower than West Virginia. I found that the vestibule produced more
condensation that other configurations since it appeared to seal things up a
bit more and prevented adequate ventilation.
Typically, I would wipe the condensation up with a bandana and try to
let the Tarptent air out to dry. I found that if there is any amount of sun
available, the sil-nylon dries quickly.
I found that the Tarptent provided good protection
from the weather and bugs. I did not
have any leaks in the seams, even during one night of constant rain. The beak provides a good amount of protection
from rain, even without using the StormFlap or
vestibule attached. When these options
are attached, I found the Tarptent to be as
weatherproof as just about any other tent I have used. I did use the mitten hooks on the bug netting
to help the Tarptent floor bathtub up one night in
case the rain produced run off. The
floor was pulled up enough where I thought that running water would be diverted
under the tent. However, I did note that
the floor was not raised up as much in the corners near the front stakes. This did not cause any problems but did make
me question whether I had set up the Tarptent in an
appropriate location. The bug netting
door did keep bugs out but I felt more comfortable when I weighed it down with
boots or camp shoes to create a better seal.
One nice thing about the bug netting is that it can be raised and
secured in place with an elastic cord and mitten hook at the top of the
entry. This keeps the netting out of the
way when exiting and when stuffing the Tarptent into
its sack.
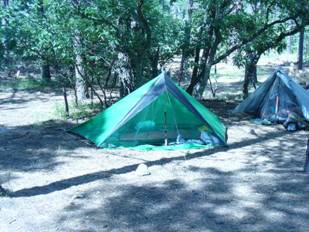
One of the best aspects of the Tarptent is the amount
of space it provides. I am one who likes
to have space for gear and to sit up. I
have not had any problems with lack of space, particularly if the rear guy
point is used. I can easily change
clothes without hitting my head on the walls.
Due to the slope of the back walls of the Tarptent,
there isnt much space along the rear wall.
I typically put gear along the rear wall and in the rear corners and
sleep closer to the door. To maximize space
the rear and both sides must be guyed out but I find that I have plenty of room
even if the sides are not pulled out.
Overall, I am pleased with the amount of space for the weight of the
shelter.
I did note a couple of other minor issues.
First, I noticed that the Spectra line included with the Tarptent appeared to be strong but did not hold friction
knots very well. I found that parts of
the Tarptent would sag if I did not adjust the
tension on the knot. I could easily
solve this problem by adding additional wraps to any friction knot I used but I
was disappointed that line which costs $18 USD per 40 ft (12 m) didnt perform
better. The second issue involved the
titanium stakes. These stakes are light
but a number of campsites on my New
Mexico trip had very hard packed soil which made use
of these stakes impossible. In some
cases no stakes would penetrate the ground and required tying guy lines to
rocks. Where conditions allowed, these
stakes did perform well.
Long-Term Report
Report Date: September 24, 2007
Field Information:
Since my Field Report I have only been able to use the Tarptent
on two overnights camping outings (not backpacking). Both trips were in central Maryland and the temperatures encountered
ranged from 65-85 F (18-29 C). No rain was encountered on either outing but
high humidity was a factor on both outings.
The winds were light to moderate but not strong enough to cause problems
with the pitch of the tent. These are
typical weather conditions for the Mid-Atlantic at the end of summer.
Product Report:
It seems that no matter the conditions I encountered with this product, I would
always have some amount of condensation on the walls. During August and early September in Maryland I always expect
condensation with just about any tent. I
was a bit surprised to find that I had only small amounts of water on the
inside of the tent on my last couple outings.
There are multiple factors which contribute to condensation including
wind, and ground moisture, nonetheless I was happy not
to have to deal with a shower of water when I touched the Tarptent
walls.
The sil-nylon has held up well. Every time I pitch the Tarptent
I think to myself that the material will not take the stress of a taut
pitch. This material is remarkable stuff
and the quality appears to be very high as is that of the stitching. I have not found any weakening of the seams
or at any stress points, such as the corner stake points or the apex where the
seams of the beak and main tent come together.
The Tarptent has been easy to clean with a simple
wiping with a moistened cloth. I have
not been using the Tarptent with any type of groundcloth and after giving the underside of the floor a
cleaning, I gave it a thorough inspection for damage. I did find a few areas where the appeared to
be some abrasion from small sticks and rocks.
None of these appeared to actually penetrate the fabric or compromise
the waterproofing on the material.
I did get to test the Tarptent with two people inside
and I prefer it as a solo shelter. Two
adults can fit inside and with the vestibule attached space can be
manageable. However, this forces one
person to sleep much closer to the rear wall which increases the likelihood of
contacting condensation on the walls. I
also found that there is a tendency for the person in the front to keep their
distance from the supporting pole. This
tends to push the person sleeping in the back into the rear wall. Additionally, the person in the rear must
climb over the person in the front to exit the shelter which requires some
interesting maneuvers. The bottom line
is that two people can work but I wouldnt want to make a habit of it.
After going through the entire testing process for this product I am certainly
satisfied with the Tarptent. It sets up quickly and has held up well in a
variety of conditions. The material is
light weight and packs small both of which are assets when looking to cut down
on carried weight. The amount of space
is great for solo hiking and is something I have absolutely enjoyed about the Tarptent.
Condensation is a problem but that is a problem with single wall tents
and can be managed.
Summary:
The AntiGravityGear Tarptent
is an ultralight sil-nylon
shelter which sets up easily with a trekking pole. The Tarptent has
ample room for one plus gear and has the option of adding a vestibule for even
more space. However, the space feels
rather cramped with two people inside.
Condensation is a bit of a problem with the Tarptent
but the sil-nylon does tend to dry quickly. The quality of the material and workmanship is
excellent.
Things I like:
1. Lots of space for the weight
2. Easy quick set up.
3. Good bug protection
Things I dont like:
1. Tends to collect condensation
2. Guy lines tend to slip
3. Tight for two people
This concludes my testing of the Tarptent. I would like to thank AntiGravityGear
and BackpackGearTest.org for the opportunity to test this item.


