|
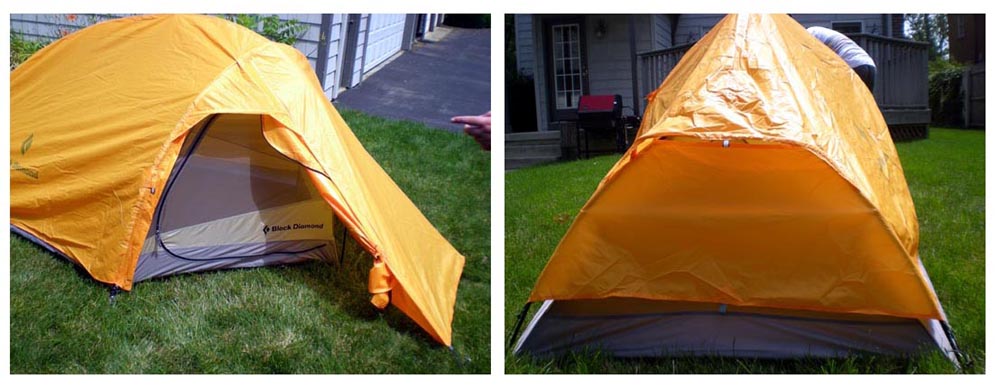
Black Diamond Mirage Tent
TEST SERIES BY LARRY KIRSCHNER
INITIAL REPORT - June 22, 2008
FIELD REPORT - August 26, 2008
LONG TERM REPORT - October 24, 2008
TESTER INFORMATION
|
NAME:
|
Larry Kirschner
|
|
EMAIL:
|
asklarry98 at hotmail dot com
|
|
AGE:
|
43
|
|
LOCATION:
|
Columbus, OH
|
|
GENDER:
|
M
|
|
HEIGHT:
|
5' 9" (1.75 m)
|
|
WEIGHT:
|
200 lb (90.70 kg)
|
I've been an intermittent camper/paddler since my teens, but now that my kids are avid Boy Scouts, I've caught the backpacking bug. I typically do 8-10 weekend hikes per year, and have spent time over the past 2 years backpacking at the Philmont Scout Ranch in Cimarron, New
Mexico and canoeing the Atikaki wilderness in Manitoba. I like to travel "in comfort",
so I used to pack heavier than needed, but now I'd say I'm down to medium weight. With all of
my investment into these ventures, I expect my wife and I will continue to trek long after
the kids are gone …
INITIAL REPORT
June 22, 2008
PRODUCT INFORMATION & SPECIFICATIONS
Manufacturer: Black Diamond Equipment, Ltd (Black Diamond)
Year of Manufacture: 2008
Country of Manufacture: China
Manufacturer's Website: www.bdel.com
Model: Mirage
MSRP: USD $298.95
SPECs per manufacturer
Weight (includes tent, poles, stuff bag, stakes, guyline): 2 kg (4 lb, 6 oz)
Dimensions (packed): 48 X 16.5 cm (19 x 7 ")
Dimensions (pitched):
Width (widest): 1.47 cm (58 in)
Width (narrowest): 107 cm (42 in)
Length (longest): 239 cm (94 in)
Internal Height: 94 cm (37 in)
SPECs as measured
Weight (includes tent, poles, stuff bag, stakes, guyline): 2.04 kg (4 lb, 8 oz)
Dimensions (packed): 48 X 17.5 cm (19 x 7.5 ")
Dimensions:
Width (widest): 1.5 cm (59 in)
Width (narrowest): 107 cm (42 in)
Length (longest): 240 cm (94 in)
External Height: 115 cm (45 in)
INITIAL IMPRESSIONS
Other than being packed in a plastic bag, the Black Diamond Mirage tent (henceforth
called "the Mirage", or "the tent") arrived essentially ready to go out on the trail.
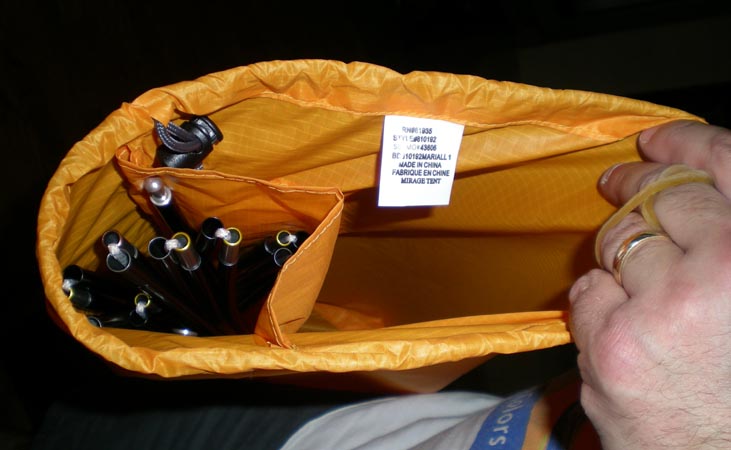
The tent came in an orange-yellow (called "marigold") stuff bag the same color
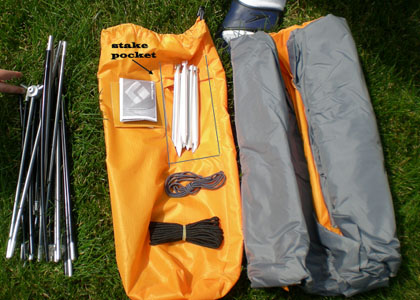
as the rainfly. Examining the bag more closely, it has an external pocket that is
filled with tent stakes, as well as the tent instructions
 and fabric swatches
(marigold for the bag/rainfly, grey mesh for the tent sides, grey fabric for the solid
part of the tent solid sides, and dark grey for the floor), and some cords. There were
10 tent stakes, each 18 cm (7 in) long, made out of aircraft-quality aluminum with a
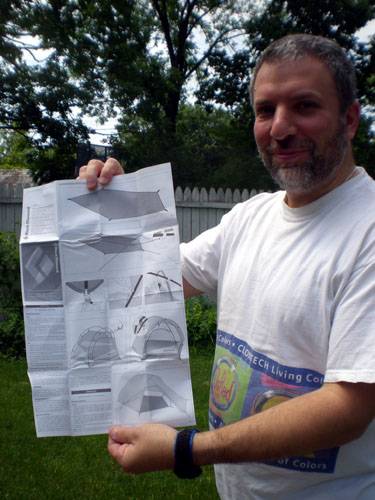
polished silver finish. The instructions show how to put the tent together (more on that
later) in pictures, with accompanying text in English, French, German, Italian, Spanish,
and Japanese. There are 3 short silver cords and 1 long black cord, whose use I will describe below.
and fabric swatches
(marigold for the bag/rainfly, grey mesh for the tent sides, grey fabric for the solid
part of the tent solid sides, and dark grey for the floor), and some cords. There were
10 tent stakes, each 18 cm (7 in) long, made out of aircraft-quality aluminum with a
polished silver finish. The instructions show how to put the tent together (more on that
later) in pictures, with accompanying text in English, French, German, Italian, Spanish,
and Japanese. There are 3 short silver cords and 1 long black cord, whose use I will describe below.
There was also a second booklet attached to the tent bag which covered general
information about the Mirage and other members of the DoubleLight family of tents.
Other than describing all of the tents in this line, this booklet also provides use, care,
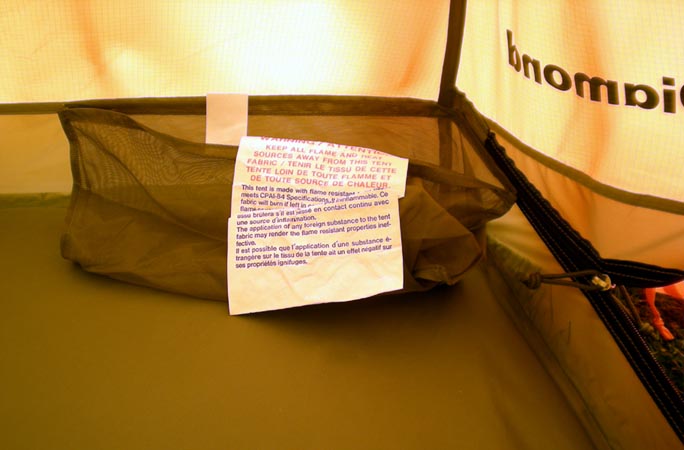
and maintenance instructions. There are a few important points in these instructions. First,
because these tents are light, Black Diamond advises that the tent should always be staked out.
They also warn to be careful not to poke the tent if you happen to be shoveling it out of snow.
In terms of care and cleaning, it is recommended that the tent always be stored dry, but that it
never be machine washed or dry cleaned. The tent can be washed gently with warm water
(without soap) or hand-washed in a bathtub full of cool water with a specific cleaner
recommended by Black Diamond. The manufacturer also recommends washing the zippers with a
hose if they become stuck, and using a mild lubricant if necessary. The poles should also be
dried and checked for damage.
WARRANTY: The product comes with a warranty lasting 1 year from the purchase
date, and covers manufacturer's defects. Black Diamond indicates that any defective
products will be replaced free of charge. Normal wear and tear is not covered under
this warranty, and the warranty may be void if the cleaning instructions (noted above)
are not followed.
After examining the contents of the outer pocket, I took the tent out of the stuff bag.
The tent and rainfly were wrapped together (right of the photo) and I also examined the tent
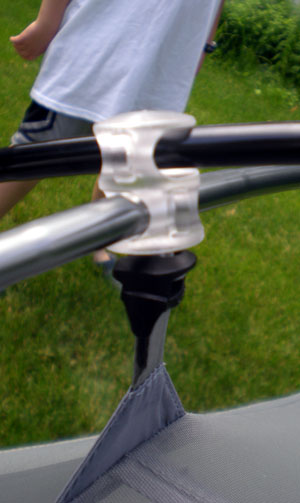
poles. The poles are anodized DAC Featherlite NSL poles, and there are essentially 3 poles
used for this tent: a front pole, a back pole, and a ridge pole which extends to the ground
to form the front point of the tent. However, the three poles are already joined together by
means of DAC Swivel Hubs, so that once the pole sections are joined, there is nothing further
to do. Of note, the Hubs have an "up" side and a "down" side (the down side attaches to the tent
fabric), so the poles must be laid out straight with the proper orientation in order to assemble the tent.
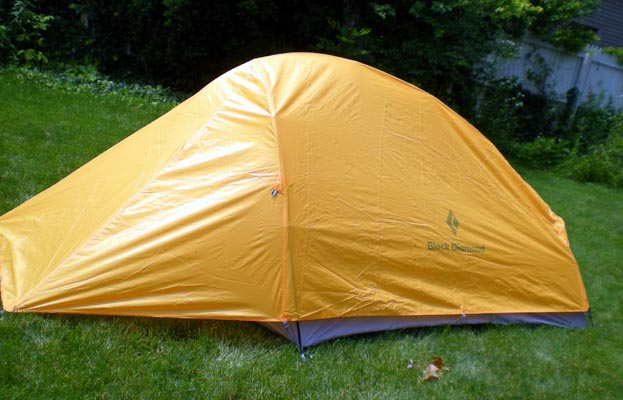
As noted, the tent itself is varying shades of grey with a marigold-colored rainfly. The tent
has nylon mesh for its entire top surface, and nylon ripstop fabric for the solid part of the
sides. The tent floor is made from polyurethane coated nylon. The fly is constructed from
ripstop nylon with polyurethane and silicone coating, and is noted to be UV-resistant.
Because this tent has an unusual shape, Black Diamond makes a ground tarp specific for the Mirage.
I do not have the tarp at present, but will likely get this as I start using the tent in the field.
ASSEMBLING THE TENT + TRYING IT OUT
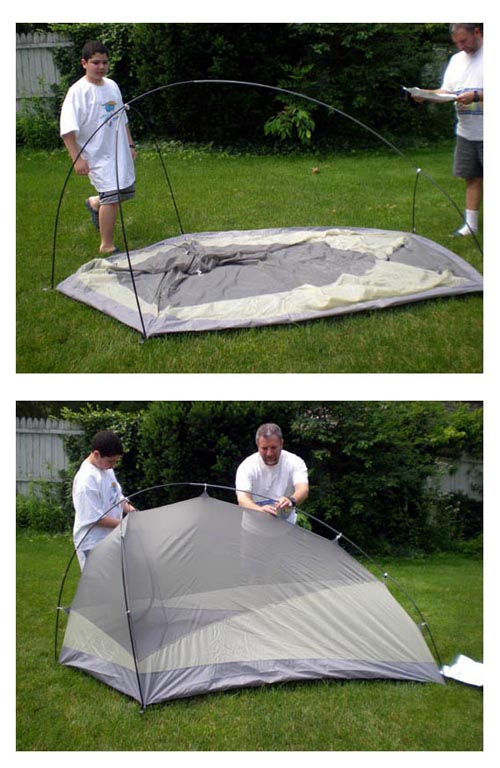
With the help of my 12 year old son Peter (5 ft/152 cm), I began to assemble the tent,
which was a very straightforward process. Following the instructions, we laid the tent on
the ground, and laid the pole assembly on top of it, with the swivel hubs in the proper
orientation.
 Initially, we had the front poles upside down, but because the whole assembly
swivels easily, it was no problem to flip it over. The tent has grommets at the corners,
and there is not excessive stress on the poles, making it easy to fit the ends of the poles
into their places. Next, we attached the remainder of the tent fabric to the pole structure
using clips, and then staked out the corners, including the front stake point.
Initially, we had the front poles upside down, but because the whole assembly
swivels easily, it was no problem to flip it over. The tent has grommets at the corners,
and there is not excessive stress on the poles, making it easy to fit the ends of the poles
into their places. Next, we attached the remainder of the tent fabric to the pole structure
using clips, and then staked out the corners, including the front stake point.
At this point, we decided to test out the tent before putting the rain fly.
I got in the tent, and found that there was plenty of room to sit up without
hitting my head on the ceiling.
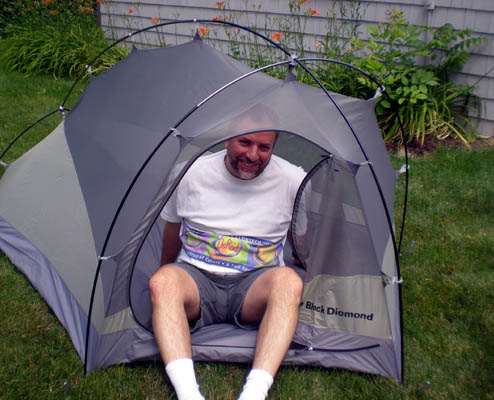
I also noticed that there is a small gear pocket on the
inside of the tent.
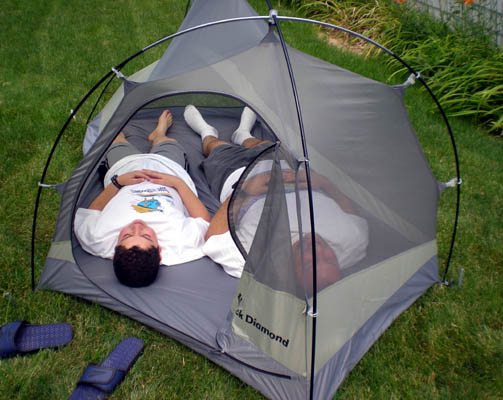
 Because there is just the one door, I slid over to the other side of
the tent, and Peter and I tried lying down to see how roomy it was. As you can see, we
were nearly laying shoulder-to-shoulder, even without sleeping bags. There was plenty
of room at the foot of the tent, and there was also plenty of room at the head area.
There was also enough vertical room for us to both sit up easily without feeling like
we were on top of each other. The mesh ceiling was very nice, providing an airy feel
to the tent, at least when the fly was not on top.
The tent has a single C-shaped door, which has two opposing zippers which both go all
the way around the opening. These slid very easily, even around the curves.
Because there is just the one door, I slid over to the other side of
the tent, and Peter and I tried lying down to see how roomy it was. As you can see, we
were nearly laying shoulder-to-shoulder, even without sleeping bags. There was plenty
of room at the foot of the tent, and there was also plenty of room at the head area.
There was also enough vertical room for us to both sit up easily without feeling like
we were on top of each other. The mesh ceiling was very nice, providing an airy feel
to the tent, at least when the fly was not on top.
The tent has a single C-shaped door, which has two opposing zippers which both go all
the way around the opening. These slid very easily, even around the curves.
Thinking we had enough, we then proceeded to add on the rainfly/vestibule. This was also
accomplished very easily, as it only fits on the tent in one direction. The fly has hook/loop
enclosures at the front and back which wrap around the front and back poles. When the
vestibule was staked out, it provided a nice covered area for gear, which is 10 sq feet
(0.93 sq meters) according to the manufacturer. The zipper for the vestibule also slid smoothly.
The vestibule has a tie-back along the opening so that the zippered side can be rolled back and stored.
The rainfly has a small rounded plastic insert at the top of the footbox side which makes
a small window for ventilation.
The fly also has small loops on the 2 long sides and on
the bottom. After scratching my head about these, I realized that the 3 grey strings that
I noticed initially were supposed to be attached to these loops. This was done, allowing me to stake the
sides of the rainfly away from the tent to provide some extra ventilation. I never did use the longer
black cord for the tent, but I presume this is meant as a guy line for the vestibule, as there are loops
of fabric for an attachment.
After measuring the tent, it was time to take it all down. This was done very quickly,
and it was very easy to roll and stuff the tent back into its bag. As I was doing this,
I noticed an additional feature of the Mirage tent bag: There is actually no separate bag
for tent poles, but the bag has a separate section that holds them, keeping them away from
the rolled tent/rainfly.
EXPECTATIONS FOR THE BLACK DIAMOND MIRAGE
Overall, the Mirage appears to be a very-well made tent with a bevy of innovative
features. It is a snap to set up and take down, and the vestibule appears to be of a
useful size. It definitely meets my expectations, and in fact probably exceeds my
expectations for a tent. I am excited to take this out hiking and see how it does
on the trail.
TEST PLAN
For the Field test, I will be using the Mirage for all of my hiking/backpacking
activities over the next few months. I have ordered the Mirage ground cloth, because,
although the tent bottom appears sturdy enough, I prefer to minimize the chance of
any damage. I have never used a tent of this shape before (all my others are rectangular),
so I am interested to see if I like this feature or not. Also, given the fact that I thought
I was shoulder-to-shoulder with my 12 year old son in the tent, I want to see how I like it
for 2 "regular-sized" adults. If the weather stays warm (very likely), I am hoping to try
sleeping with just the ground cloth/rainfly combination as a way to cut weight on the trail
for future expeditions.
This concludes my Initial Report on the Black Diamond Mirage Tent, and I would like
to thank Black Diamond for providing it for testing.
Please check back in 2 months for my Field Report on this item.
Back to TOP
FIELD REPORT
August 26, 2008
FIELD CONDITIONS
I have used the Mirage for 5 nights over two trips during the course of the
Field Report phase of the test. The first was a weekend (2 nights) trip to the
Ohiopyle State park in southwestern Pennsylvania (elevation 1200 ft/ 366 m) in
late July. It had rained earlier in the day before we set up camp, but was dry
after the tents went up. Temperature at night on that trip was nice, with lows
overnight around 55 F (13 C). It was moderately humid on that trip, but the dew
point was warm, so there was only a modest amount of wetness in the morning. The
second trip was an extended weekend (3 nights) trip to Gettysburg, in southeastern
PA (elevation 400 ft/122 m) in mid-August. Again, it was dry and quite pleasant,
with nighttime temperatures in the mid-50's F (12-14 C), although it was quite
humid, and there was a heavy dew each of the mornings.
FIELD EXPERIENCE
On the first trip described above, I used the tent as a solo tent. Wow, was it roomy!
I was able to completely empty the contents of my backpack into the tent, and still had
plenty of room to move around. As noted in the Initial Report, the tent is high enough
that I could sit up inside without any trouble. It was also a snap to set up by
myself. The first night out, I slept with the vestibule fully closed, and the interior of
the tent stayed quite warm, although there was adequate ventilation from the window at
the bottom (foot) end of the tent.. On the second night, I left the vestibule door
open overnight to see if I would get better ventilation. There was a little more airflow,
but not a huge difference, which I attribute to the offset location of the vestibule door.
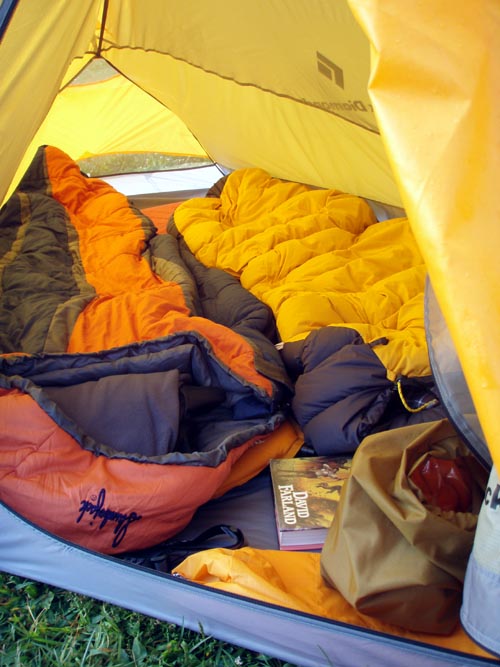
I also noticed that the tent is very light inside, because of the bright yellow color which reflects any ambient light. You can
get a sense of how bright tent is inside from the photo below the next paragraph.
On the second of the trips, my wife Evelyn and I shared the tent for the three nights.
This trip was with the Boy Scouts, and one of the other Scout leaders had brought a
large 3-man tent which he was using by himself. We had planned that if things got too
tight in the Mirage that I would share his tent, and let my wife have the Mirage to
herself. In terms of setting up the tent, the first thing worth noting is that I can
now set up this tent really quickly. In fact, my wife helped our friend set his tent
up while I pitched the Mirage by myself. As they were busy putting up that tent
(which was not a new tent), I pitched the Mirage, unpacked my gear, and had time
to get out my chair and sit down and watch them finish up. After my wife had
thrown her gear in the tent, it looked a little crowded, and I thought I might be
spending some time sleeping in the next door tent. However, once we got our sleeping
pads/bags arranged, there was really plenty of room for both of us. We slid our bags
all the way down to the bottom of the tent, which left a fairly substantial area at
the top of the tent for gear. Although I left most of my gear in my backpack on this trip,
there was plenty of room for a book and a gear bag for each of us containing all that we needed for the evening/next day.
Although this is a two-walled tent, I was also a little concerned about the fact
that the bags were pretty much pushed up against the side and bottom of the tent.
I use a synthetic bag so I was not overly concerned, but my wife likes a down bag,
which could have been trouble if it had gotten wet. Fortunately, even though the
outside of the tent was quite wet in the mornings (from the dew), the inside was
completely dry, including both of our sleeping bags. After using the tent for a
while, I think this important property is due to the good spacing between the rainfly
and the tent, as shown in the photo. The only trouble we had with the dew came when my
wife opened the tent door and folded back the rainfly, which began dripping on my head
as I slept on the door side of the tent.

Aside from the tent being sturdy and steadfast, I wanted to comment on the stakes that are provided by Black Diamond. When I camped at Gettysburg, the ground was fairly dry and hard. Although it was difficult to put the stakes in by hand, I found a flat rock to use as a tool, and had no trouble setting the stakes.
WEAR AND TEAR
So far, I have had absolutely no problems with the tent. In the interest of full disclosure, I will note that I purchased (separately from the tent) the fitted ground cloth that matches the Mirage. Although I have used 2 or 3 mil painters' drop cloths for other tents, I decided to purchase the fitted one from Black Diamond because of the tents non-rectangular shape. With the ground cloth in place, I have seen no signs of wear in the tent fabric, and the zippers still flow freely.
FIELD IMPRESSIONS
Overall, I continue to be very impressed with the Black Diamond Mirage tent. It is a snap to set up, and it is easily roomy enough on the inside for two average size hikers. I will continue to use the tent over the Long-Term report phase, and I hope (?) I get some bad weather so I can see how this tent holds up when it isn't sunny and warm outside!
This concludes my Field Report on the Black Diamond Mirage Tent. Please check in
back in about 2 months for my final report on this item.
Back to Top
LONG-TERM REPORT
October 24, 2008
FIELD CONDITIONS
During the Long-term report phase of the test, I used the Mirage for 2 additional nights on a weekend trip to Put in Bay on South Bass Island, Ohio, located a 30 minute ferry ride from the Southwest corner of Lake Erie. On that trip, the weather was warm, with evening temperatures around 55-60 F (13-15 C), and I again shared the tent with the lovely Mrs. K. The first night of the trip was clear, but the second day was rainy on and off, including a fairly heavy rain shower which hit as we were starting to wind down for the evening. This necessitated a quick run to the tent, followed by a rapid entry, and then sorting out wet from dry.
FIELD EXPERIENCE
This last trip was really the only where it rained to a significant extent.
Under these conditions, I was very pleased with the Mirage. I found that there was
plenty of room under the vestibule for 2 pairs of boots, 2 ditty bags of non-essential
equipment, as well as a small daypack. All of this equipment stayed nicely dry in the
vestibule, as did all of the gear (and people) on the inside of the tent. It was actually
somewhat surprising to me that even when we dove inside the tent to get out of the oncoming
storm, we had plenty of room (including adequate headroom) to maneuver ourselves in order to
put our wet boots and shells out of the tent.
During this trip, I experienced my only troubles with setting up the tent, when I had some
difficulty getting the rainfly to sit properly on the tent. After puzzling over this
new difficulty, I realized that the problem came from one of the hook and loop fasteners
on the underside of the rainfly. It seems that the loop had gotten fastened around the wrong
part of the pole arrangement, making it impossible for the fly to fit. Once I opened that
loop, the rainfly fit fine, and I was able to re-fasten the loops in the proper place.
In terms of wear and tear, I have continued to use the Black Diamond footprint with the Mirage, and
have not noticed any concerns. I will also note that the tent dried very quickly after I got it home
and let it air for a little while.
SUMMARY
Overall, I found the Black Diamond Mirage Tent to be a well-made, surprisingly roomy 2-person backpacking tent. During the course of the test, I used it exclusively with its corresponding Black Diamond footprint, and I will continue to carry it on trips to the backcountry, as it provides a good combination of features for its weight.
Things I liked about the BD Mirage:
- Easy and fast to set up
- Packs small enough to fit easily inside my internal frame pack (5600 cu in/92 l)
- Roomy interior for two, with extra room for some gear in the tent
- Good headroom
- Reasonably large sized vestibule
- Water tight
- Good stakes
- Integrated pockets for stakes and poles in the tent bag
Things I disliked about the Mirage:
- Wet rainfly can drip into tent door if not carefully handled
This concludes my report on the BD Mirage Tent. My thanks once again to
Black Diamond for providing this equipment for testing, and to BackpackGearTest.org
for allowing me to participate in the evaluation process.
-larry kirschner
Back to Top
Read more reviews of Black Diamond gear
Read more gear reviews by Larry Kirschner
|


