

|
|
 |
Guest - Not logged in | |||||||||||||||||
Reviews > Sleep Gear > Quilts and Blankets > Jacks R Better Mt Washington Underquilt > Test Report by Rick Allnutt
Jacks
'R' Better Mt Washington Underquilt
Initial Report - 18 December 2008 Field Report - 10 February 2009 Long Term Report - 8 April 2009 TESTER INFORMATION
Over the last several years, I have become an ultralight camper with a three-season base pack weight of about 8 lb (3.5 kg) and skin out weight of 17 lb (8 kg). I have completed many section hikes on the Appalachian Trail (AT) in all four seasons, and many trips to state parks, with a total mileage of about 1550 miles (2500 km). I am a gearhead, a hammock or tarp camper, and I make much of my own equipment. Trail Name: Risk Risk's Ultralite Hiking Page: www.imrisk.com INITIAL REPORT PRODUCT INFORMATION & SPECIFICATIONS
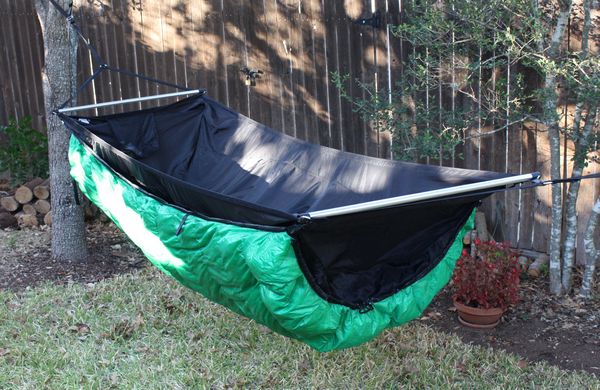
INITIAL IMPRESSIONS Warmth. That is the overreaching goal of the Mt Washington underquilt. And that goal is an all too difficult objective to achieve in winter hammock camping. This down-filled underquilt aims to achieve the goal by wrapping the entire underside of a hammock, including the sides, with a thick blanket of down.I first experienced a Jacks 'R' Better down underquilt in a booth at Trail Days in Damascus, Virginia a couple years ago. So when I saw the design of this underquilt on the Jacks' web page, I thought I knew what to expect. That turned out to true in part and not true in part. The part that I really expected was the comfy feeling of lying down on a hammock and feeling warmth creep into my back muscles. It is almost a magic feeling, almost like a massage, to have this feeling of warmth on my back lying in a hammock. The next wonder is that feeling extends to my shoulders even lying on my side. There is no position I can lie down and not have a blanket of down against my back, shoulders, hips, and legs when the hammock is surrounded by this underquilt. But there were some surprises in store for me as I began to take a closer look at the underquit. For one thing, the stuff sack was not what I expected. As I recorded in the photos below, the first time I packed up the underquilt, I put it into a small sleeping bag stuff sack. On the left photo, the measuring rod is a 17 in (44 cm) Bear Mountain Bridge Hammock pole. The right hand stuff sack was pretty full with the underquilt and was 17 x 8 x 8 in (44 x 20 x 20 cm). However, after taking a close look at the Jacks' website, I tried the compression stuff sack that came packed with the underquilt. This stuff sack had originally looked much too big to me and it was not until I cinched down the compression strap that I understood how small the quilt could be packed. When I did, the quilt packed into a 9 x 9 x 7 in (23 x 23 x 18 cm) bundle. As can be seen in the right photo, this is a much smaller bundle than my original packing job, and when I began putting the hammock in my pack it was good to have that extra space. (The left stuff sack in each of the photos is the Bear Mountain Bridge hammock.)   The quilt itself has a rectangular shape. The black inner surface of the quilt is much smaller than the green outer surface. The down is held by radial baffles instead of being sewn through from the outer to the inner surface. The result of this design is that when the black surface is drawn tight, the outer green cloth is not tight. It does not compress the down between the two surfaces. There is a draw cord at each end of the quilt with a central cord lock as well as a cord lock at each corner. The quilt has a loop of light webbing at each corner, and a pair of offset loops along each long edge. (These look like they are in the right position to be threaded through the asymmetrical hold out loops of a Hennessy hammock.) The Mt Washington underquilt came with great instructions. These instructions were written well and had appropriate pictures to illustrate the written words. There was one set of instructions for attaching the quilt to the Bear Mountain Bridge hammock and another set of instructions for gathered end hammocks. It is not an intuitive process to attach the quilt without the instructions (I did it wrong the first time I tried without looking at the instructions). 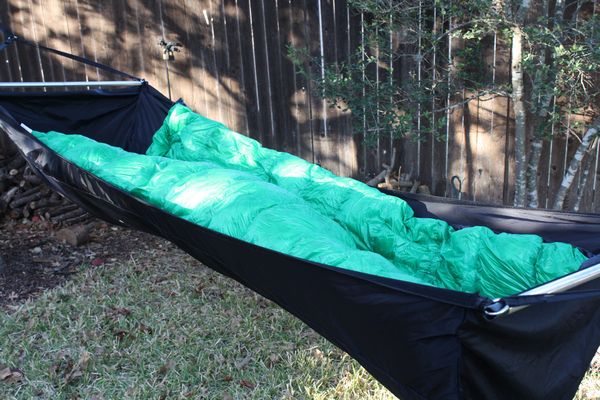 The
following description applies to attaching the quilt to a Bear Mountain
Bridge hammock. (In my Field Report I will give a review of attaching
the quilt to other hammocks.) The
first thing I did was to turn the hammock upside down. This step
is not in the instructions, but it makes it much easier to keep the
quilt off the ground. I laid the quilt
on the now upside down hammock with the outside (the light colored
cloth) up. The two suspension cords for the quilt are attached at
each end of the
hammock to the central round ring (furthest from the hammock) with a
cinch knot at the center of the elastic cord. To make the cinch
knot,
the middle of the suspension strap is brought through the ring and the
ends of the suspension strap and their attached minibiners are dropped
through the loop. Then the two ends of the suspension cord are fed
through the ring at each corner of the hammock to which the spreader
poles are attached. This is easier to accomplish before the spreader
bar is installed, and in fact I found that it was easiest to leave the
suspension cord attached to the hammock's loops when I packed up the
hammock. The
following description applies to attaching the quilt to a Bear Mountain
Bridge hammock. (In my Field Report I will give a review of attaching
the quilt to other hammocks.) The
first thing I did was to turn the hammock upside down. This step
is not in the instructions, but it makes it much easier to keep the
quilt off the ground. I laid the quilt
on the now upside down hammock with the outside (the light colored
cloth) up. The two suspension cords for the quilt are attached at
each end of the
hammock to the central round ring (furthest from the hammock) with a
cinch knot at the center of the elastic cord. To make the cinch
knot,
the middle of the suspension strap is brought through the ring and the
ends of the suspension strap and their attached minibiners are dropped
through the loop. Then the two ends of the suspension cord are fed
through the ring at each corner of the hammock to which the spreader
poles are attached. This is easier to accomplish before the spreader
bar is installed, and in fact I found that it was easiest to leave the
suspension cord attached to the hammock's loops when I packed up the
hammock. 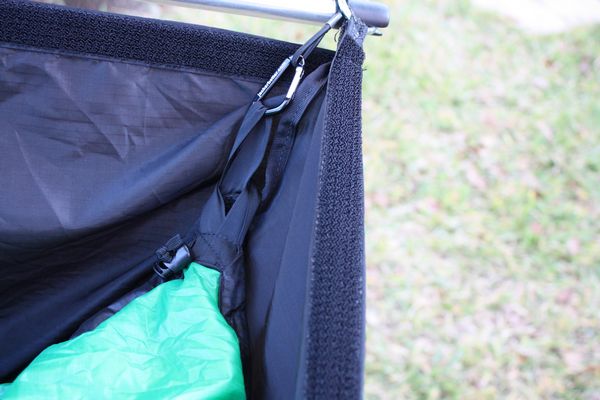 This
photo shows the minibiner at the end of one of the suspension cords. It
is attached to the hammock by a loop of material on the outside of one
the corners of the hammock. Notice that the crimped metal on the
suspension cord has been fed through the corner ring after the spreader
bars were installed. To attach the quilt to the hammock, all
that is necessary is to take the biner off the loop and feed that loop
through the loop in the corner of the underquilt. Then the biner is
again attached. Once the four corners are attached, the hammock can be
turned back upright and the underquilt hangs from the hammock corners.
The only remaining step is to cinch up the drawstring at each end of
the quilt by several inches so that a seal is formed with the end of
the hammock. This
photo shows the minibiner at the end of one of the suspension cords. It
is attached to the hammock by a loop of material on the outside of one
the corners of the hammock. Notice that the crimped metal on the
suspension cord has been fed through the corner ring after the spreader
bars were installed. To attach the quilt to the hammock, all
that is necessary is to take the biner off the loop and feed that loop
through the loop in the corner of the underquilt. Then the biner is
again attached. Once the four corners are attached, the hammock can be
turned back upright and the underquilt hangs from the hammock corners.
The only remaining step is to cinch up the drawstring at each end of
the quilt by several inches so that a seal is formed with the end of
the hammock.
Voila! It takes me a lot longer to describe this simple process than to accomplish it. When I timed myself the third time I attached the underquilt, it took a total of less than two minutes to install the underquilt. Then came the warmth. I found that when I lay down in the hammock, the hammock sank down in the quilt and there was no space between the hammock and the down filled insulation. As described above, the quilt has been designed so that the inside surface (the black surface) of the quilt is quite a bit smaller than the outside surface. This allows the down to expand between the inner and outer surfaces without being compressed between them. With the overstuffed down filling, there was no tendency for the down to settle in the bottom of the quilt and leave my shoulders cold. This last point is one that I had never figured out in designing my own hammock insulation systems over a period of several years. It was great to see how well this worked. Of course, I had to spend a night in the hammock with its down underquilt as soon as it arrived. Though the night never got near freezing, it was still plenty cool. I slept like a baby and when I woke, the skin of my back was warm to touch. That was a nice sensation! I reached between the hammock and the quilt and felt the warmth of my body between the quilt and the hammock. The thinnest area of insulation was directly under me and it still was a good 2 in (5 cm) of thickness. Most other areas were much thicker with insulation. In the further testing of this quilt, I will be looking for places where I can get into really cold temperatures. I will also be experimenting with the quilt's use with at least two other hammocks with different designs. Care instructions for the underquilt explain cleaning of the underquilt and are similar to such instructions for fine down sleeping bags. If the quilt becomes soiled during the testing period, I will not hesitate to clean it so that all loft is preserved. SUMMARY The Mt Washington Underquilt is a well sewn and well designed product that is useful for several different hammock styles. It packs very well in an included compression stuff sack. The things I really like about this quilt are: - It is very warm and promises to be warm enough to spend a night outdoors in the coldest temperatures I can reasonably expect to encounter in my winter camping. - The over stuffed quilt keeps good insulation thickness even in the vertical tubes on the sides of the hammock it attaches to. I thank Jacks 'R' Better and BackpackGearTest.org for selecting me for this test. FIELD LOCATIONS AND CONDITIONS 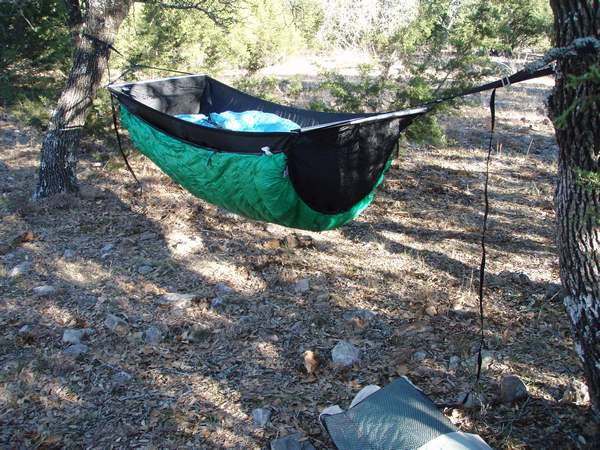 20 December 2008 – Night at South Llano River State Park,
Junction Texas. Hammock camping with underquilt. Low of about 45 F (7 C). A beautiful
clear night with lots of astronomy accomplished. 20 December 2008 – Night at South Llano River State Park,
Junction Texas. Hammock camping with underquilt. Low of about 45 F (7 C). A beautiful
clear night with lots of astronomy accomplished. 11 January 2009 – Sleeping out in the hammock with underquilt under clear skies and low temperature of 31 F (0 C). Warm, comfortable sleep despite the temperature. 13 January 2009 – Sleeping out in the hammock with underquilt under clear skies and low temperature of 29 F (-2 C). I slept warm with only shorts and a shirt. 23 January 2009 – Garner State Park Texas. Testing gear and doing astronomy at this dark sky site. Tested the hammock and underquilt in cold windy conditions. Low of 30 F (-1 C). 30 January 2009 – Cat’s Meow Star Field, Fredericksburg, TX. Cold night doing astronomy in the Texas hill country. Clear skies, temperature about 27 F (-3 C). Hammock camping with underquilt. PERFORMANCE IN THE FIELD I have used the Bridge hammock on five occasions thus far. On each occasion, I have used the Mt Washington Underquilt. I tried to sleep one night without the quilt and found that previous nights with the underquilt had been so much more comfortable with the quilt, that I got up and set up the quilt in the middle of the night. The underquilt is a well designed and well constructed piece of insulation. There have been no problems with any of the seams and I have seen no loose feathers that have worked their way out through the fabric or a seam. I have remained very satisfied that the method of attaching the quilt described above works very well. In addition, on several occasions, I packed the quilt and hammock together without separating them. I just packed them in the compression sack and started cranking down the compression strap. If anything, this is a more compact way of packing the quilt and hammock.  I
have spent a number of very comfortable nights in the hammock with
underquilt in temperatures below freezing. I am usually quite warm and
comfortable when wearing only a pair of shorts and a tee shirt.
However, on one occasion, when a cold front came through in the middle
of the night with very breezy conditions, I found that the underquilt
alone did not keep me sufficiently warm. By adding a single layer of
closed cell foam inside the hammock against my back, I was able to get
back to sleep and had no further problems with the cold. I
have spent a number of very comfortable nights in the hammock with
underquilt in temperatures below freezing. I am usually quite warm and
comfortable when wearing only a pair of shorts and a tee shirt.
However, on one occasion, when a cold front came through in the middle
of the night with very breezy conditions, I found that the underquilt
alone did not keep me sufficiently warm. By adding a single layer of
closed cell foam inside the hammock against my back, I was able to get
back to sleep and had no further problems with the cold. I also experimented with the underquilt on a Hennessy ultralight hammock. The instructions accompanying the quilt worked first time in helping me to put the quilt on the hammock. There are two tie-outs on the sides of the quilt that are designed to be held in place by the Hennessy side tie-outs. The elastic cords at the foot end of the hammock allowed me to easily snug the quilt under my legs and keep them quite warm. Getting out of the bottom entry hammock required me to remember that the quilt was there and reach down to the foot end and pull the foot-end edge of the quilt toward me before trying to put my feet out of the hammock. The edge can not be pulled quite as far back as the beginning of the bottom entry slit, but I had no difficulty getting into or out of the Hennessy hammock with the quilt in place. SUMMARY The underquilt is every bit as warm as any weather I have thrown at it. For windy weather, having a layer of closed cell foam available is a good idea for keeping my back warm. What I really like: - The comfort of sleeping in an underquilt equipped hammock can not be beat. I stay warm from my head to my toes. - The underquilt is adaptable and can be used for several different types of hammocks What I wish was different:g - Nothing at all. I may need to invest in a lighter weight version of this underquilt for summer hiking. LONG TERM REPORT 8 April 2009 FIELD LOCATIONS AND CONDITIONS 27 March 2009 - Another moonless weekend of astronomy - I tried to use the Bridge Hammock with underquilt on the first of two nights out. The weather was cold with high winds. Low temperature of 32 F (0 C). I ended up escaping to the back of my pick-up truck. It was too cold for me to sleep in the hammock utilizing the quilt as my under-insulation. Over the testing period, I slept outdoors six nights in total. PERFORMANCE IN THE FIELD The underquilt is well built with no evidence of any leaking down feathers -- either through the material or through the seams. There have been no technical problems with the construction or the use of the underquilt. I experimented some with using the underquilt on other hammocks, but mainly used it with a JRB Bridge Hammock. In one of my previous nights, I discovered that the hammock/quilt combination got quite chilly when the wind picked up. In this Long Term testing period, I again found that with wind I became uncomfortably cold. The underquilt was wonderfully warm when there was no wind. However, with a little wind I was chilly. With a lot of wind, I was downright cold. On the latest night with the tops of the trees blowing back and forth like brooms and the temperature at freezing, I was too cold to stay in the hammock with down insulation. SUMMARY The underquilt is very well constructed. What I really like: - warm comfy sleep when the night is cold and still What I wish was different: - The underquilt, attached to the outside of the hammock does not keep me warm when there is wind. From putting my hand between the hammock and the underquilt, I suspect that this is due to wind blowing between the hammock and the underquilt. I thank the Jacks for allowing me to test the Mt Washington Underquilt. Read more reviews of Jacks R Better gear Read more gear reviews by Rick Allnutt Reviews > Sleep Gear > Quilts and Blankets > Jacks R Better Mt Washington Underquilt > Test Report by Rick Allnutt | ||||||||||||||||||
 Manufacturer: Jacks 'R' Better