|
|
 |
Guest - Not logged in | |||||||||||||||||||||||||||||||||||||||||
Reviews > Snow Gear > Snowshoes > Fimbulvetr Hikr Snowshoes > Test Report by Theresa LawrenceFIMBULVETR HIKR SNOWSHOES Long Term Report - May 12, 2017 TESTER INFORMATION
I have more than 15 years of backpacking experience. Day hikes and 2-3 day backpacking trips take place on most weekends throughout the year while longer trips are only occasional. I backpack predominantly in mountain terrain (Coast Range, Cascades and Canadian Rockies) with the goal of summiting peaks. Activities I use my gear with include mountaineering, ski touring, rock climbing, kayaking, biking, trail running, Search and Rescue and overseas travel. I like my gear to be reasonably light, convenient and simple to use though I would not claim to be a lightweight hiker. PRODUCT INFORMATION
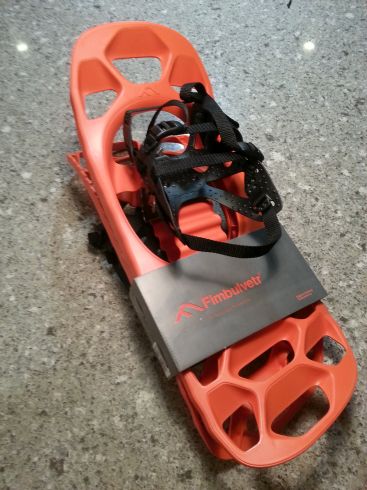
DESCRIPTION & IMPRESSIONS The Fimbulvetr Hikr snowshoes arrived bound by a cardboard sleeve. The information on the sleeve tells me that Fimbulvetr is an Old Norse word meaning 'The Great Winter' and these were designed for very serious 'hard-core winter enthusiasts.' More information on the manufacturer's website gives some technical specifications and also indicates the intent of the snowshoes is for steep inclines and all mountain terrain. The snowshoe itself and the binding material are made from DuPont Hytrel TPC-ET, which has a brittleness temperature of -90 C (-130 F). It is nice to know they will stand up to any possible cold I'd be willing to commit to. The crampons are made of stainless steel, (Fenris Crampons), as is the heel lift. There is a flexible instep in the shape of a 'Y' known as the All Directional Hinge. This design is meant to help with traction and support in all directions when traversing steep inclines and going downhill. The manufacturer refers to the bindings as B4 Bindings and are made with straps of polypropylene webbing and acetal buckles. The manufacturer's website also claims they are feather weight and designed light weight for easier, faster movement. However, I don't find them to be particularly light. I guess that depends what they are being compared to. Finally, I noticed the asymmetric design. There is actually a left and a right as the instep is closer to the median, which the manufacturer says allows them to take a 71 cm (28 in) traditional length and reduce it to a 60 cm (24 in) length. 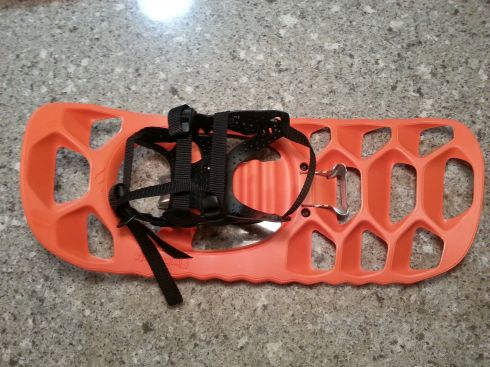 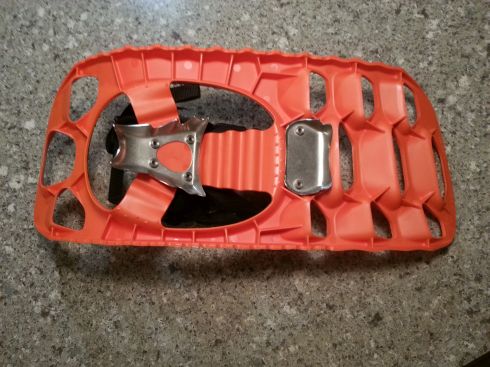 MORE FIRST IMPRESSIONS 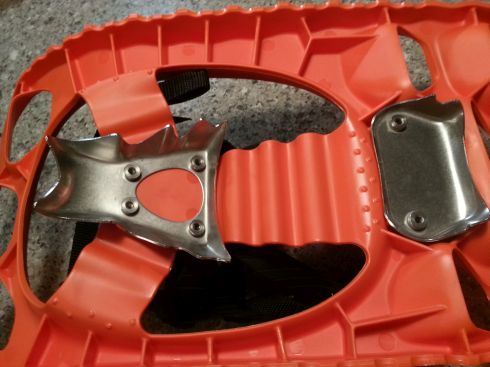 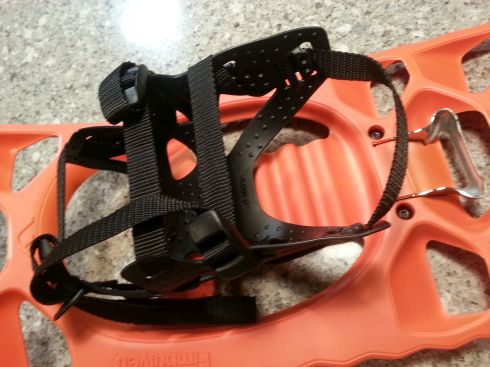 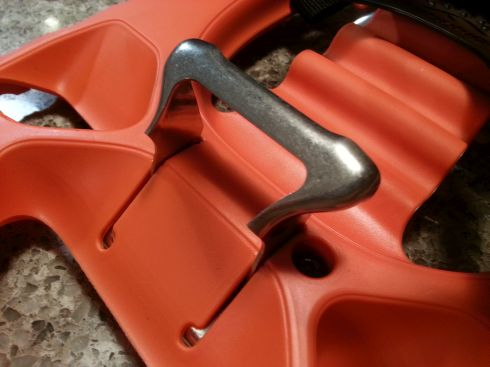 SUMMARY 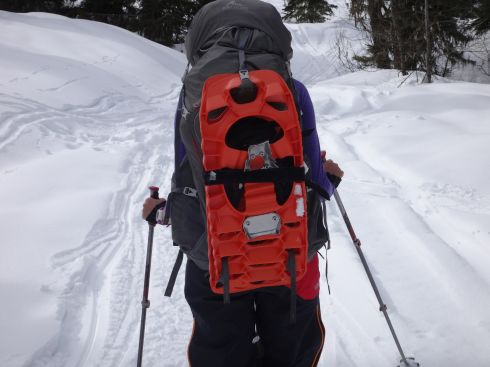 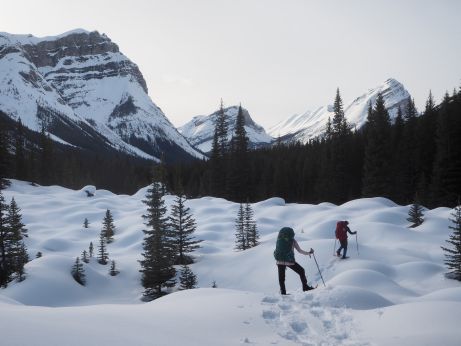 I have brought these snowshoes on three different backpacking trips. The first was an attempt at an overnight on a ridge with 2130 ft (650 m) elevation gain over 3 miles (4 km). However, there had been 6 inches of fresh heavy sticky snow that stuck to the snowshoes like glue cementing me in my tracks. I could not muster the strength to continue once the elevation started, which was near the beginning. I was wearing a 40 lb (18 kg) backpack and wearing full grain leather hiking boots. Instead I snowshoed these conditions for about 2 hours as a test and canceled the backpack overnight. The temperature was about 34 F (1 C). The second trip was a two night backcountry hut ski-tour. I ski-toured to the hut with the snowshoes on my backpack and snowshoed at hut elevation, 5625 ft (1700 m), and above. The conditions on this trip were sunny, wet, rainy, and snowy with temperatures of 30-41 F (-1-5 C). At this higher elevation the snow was not heavy. It was somewhat moist, but a rain crust underneath prevented penetration deep into the snow pack. The snow quality was soft on top of frozen rain crust. The third trip was a snowshoe backpack into a backcountry hut for two nights. I wore snowshoes for 19.25 mi (31 km) out of the 28 mi (45 km). The remainder I carried my snowshoes, opting for trail spikes or just old fashioned boot tread on a well used, hard packed trail. Conditions on this trip were flurries with the occasional sunshine. Snow quality was somewhat wet, but not heavy. FIT AND BINDING PERFORMANCE The bindings were quick and easy to adjust to any boot size. They accommodated my friend's women's size 6 hiking boots as well as my women's size 9 ski boots. Yes, I said ski boots. That is not something I would usually wear with a snowshoe, but that was all I had when I skied to a hut with alpine touring skis. The large range of boot sizes that were accommodated resulted in very long straps flapping about. This didn't interfere with trekking. It was just a minor nuisance as there wasn't really a good place to tuck them into that held for any length of time. I found my foot slipped forward quite often resulting in adjustments more frequently than I would have liked. And one time my foot fell out of the snowshoe completely, which was rather alarming. The heel strap worked its way off the heel and my foot came out like a sling shot. I attributed this to the fact that the heel strap is one with the strap across the foot. So, while this strap needed to be secured very tightly in order to keep the heel strap from slipping and losing the snowshoe, it meant that I couldn't loosen off the top strap if I felt it was binding too tightly across my foot. This was an issue as the top of my foot was swollen and bruised from the binding being too tight. However, I was able to move the strap to a different part of my foot by sliding my foot down in the binding and resetting the binding to avoid repeating this. After that I had no issues. The binding harness made my foot feel as though it was suspended since there was nothing underneath it and the binding could hinge freely sideways left or right. This was like rolling an ankle medially or laterally. This felt unstable or at least unsupported at times. For example, if the snowshoe was 'side-hilling,' my foot could remain in the normal walking plane, which in theory was great. But there would be an awkward pull on the ankle from being suspended from a snowshoe that was on its side. This was not comfortable and didn't feel secure in that I didn't have the same confidence I would have if my foot was in direct contact with something. However, in the right conditions this did work well for traversing, which I understood was what the design intended. In the pictures below, the conditions were right and this set up held my weight while crossing the slope. The snowshoe crampons were biting in to the rain crust beneath the new snow. However, further on I walked on to a different aspect that was more sun-affected and the snow was too soft to hold my weight. The crampons, which bit into the snow before slid through the snow and I slid with it sideways down the slope. If I were on skis sliding sideways, I would just edge my skis in, but in this case the edges on the snowshoes are so thick that no edging could take place. My partner's snowshoes on the other hand had thin edges and he just edged across. I had no safe way to cross the slope on my own, but I was able to follow his edged platforms to get across. Not ideal. What I did find with these suspended bindings was that the bottoms of my feet were never sore, even after hiking 19.25 mi (31 km). I attribute this to the fact that there wasn't a hard platform under my boot, which made them springy and low impact. However, because of the left and right lateral hinging of the binding I had fatigue in my ankles and strains on my knees from constantly stabilizing my feet in the snowshoes when the terrain was uneven. On flat terrain there were no issues, except when the snow was soft and deep. I'll get to that later on. I call it the medial inversion phenomenon. 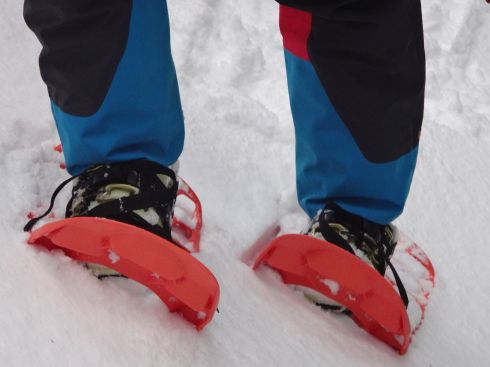 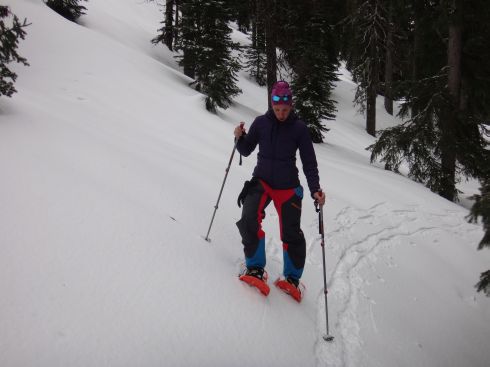 OTHER PERFORMANCE VARIABLES IN THE FIELD I'll admit to having some struggles with these snowshoes. My first trip was canceled when I was cemented in my tracks. I just did not have enough umph to carry blocks of heavy wet snow up 2130 ft (650 m) of elevation, much to my partner's annoyance as he wasn't accumulating the excessive quantities of snow that I had on his smaller, lighter snowshoes. But yes, I had more flotation with my larger surface area. One of the first things I noticed was that they were unusually wide, or at least in comparison to snowshoes I'm used to wearing. Here are pictures from the wet heavy snow. The large surface area bonded nicely with the snow and the holes didn't help. They allowed more snow to come through the bottom, adhering on the way and giving no way to shed the snow to the sides. I was literally carrying blocks of snow above and below my snowshoes that made my foot feel as though it weighed 50 lbs (23 kg)! I could barely move this snow. So I trenched around like this for a couple hours before packing it in. For those that know me, I am not one to give up that easily, my fitness level is usually something I can boast about. 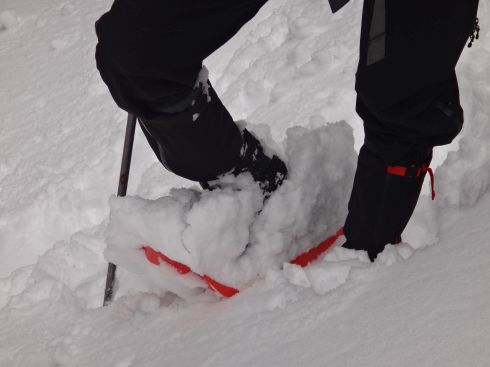 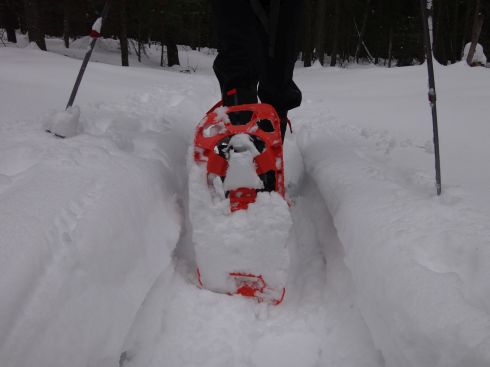 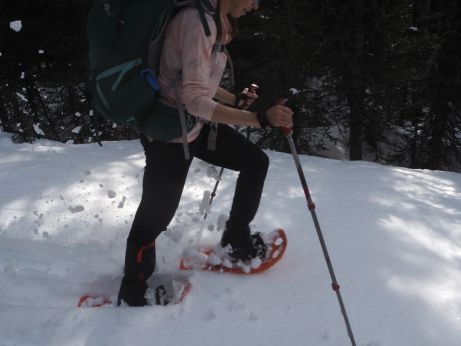 The
other trying aspect of this trip was that my snowshoes were too wide
to fit within the hard packed trenched trail. No one else I was with me
had
this problem. See photos below for perspective. The trench looks really
narrow, but these snowshoes are just really wide, as the two other
brands of
snowshoes fit in this same trail side by side. The only thing I
could
do to make this work was scrape the shoes over top of each other
as I
overlapped them. This took an awful lot of concentration for foot
placement
and changed my gate significantly. I did trip over them if I
wasn't fully engaged looking down at them. I would either catch
the side of the trench, the other snowshoe or the side of my
leg. This
led to many hours of frustration and cursing on this trail. The trail
was through dense
forest, so putting in my own trail on the sides was not really an
option most
of the time or when I was able to, it was more work to break the trail
and
deal with the bumpy terrain that was all sorts of buried logs and
boulders on the sides of the existing trail. 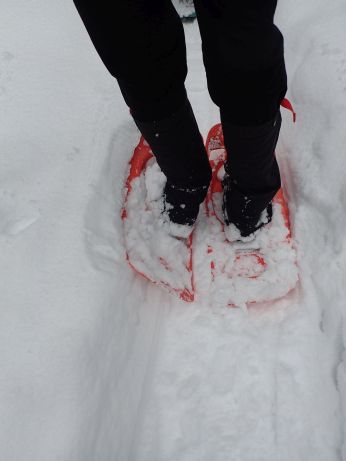 The
heel lifts worked well. I was able to lift them up and put them down
with my poles, which was handy. I did think it was odd that my heels
didn't line up with the heel lift bar. My heel only makes contact
with a small part of the inner corner of the heel
lift, leaving most of it untouched. It is obvious to me this
is because the heel lift is in the center of the snowshoes, while my
foot is not. The bindings are medial to the center line, which, I know
if that wasn't the case my stance would have to be very wide. This
didn't take away from the performance of the heel lift. I found it
helped significantly on steep terrain on packed trail. The
photo shows my hiking pole lift in action. 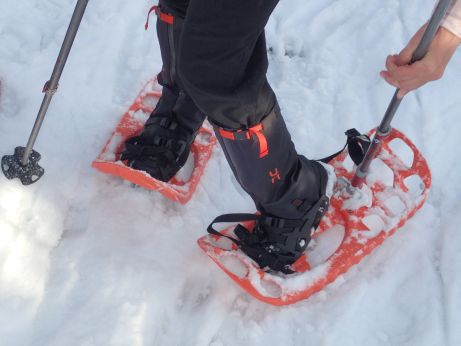 While trekking through untracked snow I noticed several things depending on snow conditions. If the snow was firm, but not too wet or heavy, all was well. My feet weighted evenly and the snowshoes responded well. That is, ignoring the spray of snow bits to my rear. However, if the snow was too soft they would canter inward medially. I've named it the medial inversion phenomenon. I have never experienced this before. While I don't snowshoe much anymore since I took to alpine ski-touring, at one point that was all I used to do. I have more than10 years experience snowshoeing up mountains in the winter and spring while I lived on the west coast (Whistler, British Columbia area). This was unexpected, but I gather it was because the binding isn't centered on the snowshoe, but medially positioned. So there is more snowshoe on the outside of my foot than on the inside. This led to the outsides floating on top of the snow and the insides where all my weight was, sinking down, putting the snowshoe at an angle. This was not an efficient way to move through snow. Going up hill on the packed trail was effective with the crampons unless they balled up with snow and ice. I found going downhill unpleasant with little control if the back crampon didn't catch or filled with snow. Sometimes, the back crampon would catch without wanting it to and I would trip. I also found the bulkiness of the snowshoes made it difficult to be nimble and catch myself quickly by adjusting my foot if it slipped. I never really knew where my foot would end up as sometimes I would put it down, but it would hit the other snowshoe or some uneven terrain and deflect in some unsuspecting direction. I must say using these snowshoes required a lot of extra mental attention. To use the snowshoes side by side, rather than overlapping them, I had to widen my gait, which at first bothered my knees, then went away. The only time I felt I could just look up from my feet and take in the scenery was when I was in an open flat field and even then I could trip myself up if I tried to maneuver other than straight ahead or if there was some uneven terrain. One thing with these snowshoes that I really miss is being able to glissade down open slopes. This was always my favorite part of snowshoeing and gives me many fond memories. But this was not possible as the flex in the snowshoes didn't allow digging my heel tips into the snow, which is how one glissades. My partner tried the snowshoes and stopped because they hurt his knees, especially when the snowshoes medially inverted due to his weight on this inside of the snowshoes. His comments were that they had no stability and his feet did not stay straight in the binding. His recommendations were that the concept was good, but the shape was wrong (too wide and cumbersome) and the bindings don't finesse (they had to be tightened in order to hold, so pressure on foot became a problem). I thought I would share his two cents. The reason I boot packed instead of wearing these snowshoes on the last several miles of this trip was that the instability was driving me crazy and not fitting in the trail was crushing my spirits. DURABILITY There was absolutely no issue with the craftsmanship. This is a solid, flawless product. These snowshoes have held up 100% to everything I encountered. There was just some minor scratches on the plastic where the other snowshoe would brush it when it was overlapping on the trail. It's not enough to be worn down and does not appear that it would compromise integrity. I believe these snowshoes are just peachy with this arrangement and could carry on indefinitely. SUMMARY In short, I regret to say these snowshoes have not lived up to my expectations. I was expecting lightweight, versatile and maneuverable snowshoes for getting around in the mountains. I have two other different sets of snowshoes in my house apart from these and these are by far the heaviest and bulkiest. I mainly use snowshoes for gaining mountains both for the approach and the summit depending on season and these would not be my first choice due to lack of agility and inability to be quick footed with change in terrain and they do not seem to adapt to less than ideal conditions. My experience so far has been mainly on the approach of such objectives due to the large amount of snow and high avalanche hazard. In the next test phase I will be more focused on use for gaining the summit as snow disappears from the approach. Pros - Lots of flotation - Crampons catch in the right conditions especially compacted snow - Low impact on my feet (no sore feet or blisters, once I took them off on hard packed snow I got both) - Durable, bomb proof and simple, no moving parts to break - Heel lifts make steep compact terrain easier - Heel lifts can be pulled up and put down with the end of a hiking pole Cons - Unable to edge - Unable to glissade - Large surface area binds large amounts of wet snow - Holes reduce weight, but allow snow to come up on top of snowshoe, with no way to shed it - Crampons are prone to snow and ice accumulation - Too wide for typical well used trails - Binding lacks lateral support (wobbling all over the place in uneven terrain) and feet did not stay straight in binding - Snow is flicked up with each step hitting back of legs and behind - Heel strap is connected to top strap so if not tight the snowshoe will fall off, but too tight causes other problems on top of foot (bruising) - Snowshoes cantered medially in soft snow - Heavy and bulky, not quick to maneuver. LONG TERM CONDITIONS I'm pleased to say I've had some great opportunities to use these snowshoes. There was one blustery summit bid where I made it to the ridge just shy of the summit. The winds and whipping snow and hail were rather unpleasant. But, the snowshoes got a great workout. The same day the sun was also brilliantly shining on the descent. Another two long distant treks on uneven terrain mixed with ice, snow and patches of bare trail turned in to carrying the snowshoes more than using them, as the terrain was more suited for trail crampons. The temperatures experienced were consistently around 5 C (41 F). The weather was a mix of sun, serious wind at times, as well as, rain, snow and sleet. Every season represented itself on every day that I was out. PERFORMANCE The conditions of the snow were quite soft and not as wet as some previous trips. This allowed the snowshoes to float without all the snow sticking and weighing them down. I was happy to have this experience as up to that point it was a persistent problem. I was able to take them up some pretty steep terrain. Going up worked well, traversing was also good as the snow was soft enough to dig the snowshoes in sideways to the slope. I descended some very steep slopes and the soft snow allowed me to get the heel and back end of the snowshoes into the snow, which was helpful for controlling the descent. But, what consistently impeded my progress down the hill was the balling up of snow between the snowshoes and my heel. I also found the heel lift not very helpful in the type of snow I was in, even on the steeps. This was because my snowshoe penetrated the snow in its entirety, allowing my foot to stay flat, so heel lifts were just not necessary. There was some tricky terrain on steep slopes that were difficult with these snowshoes. Mainly when the terrain was uneven and the snowshoes would be unpredictably propped up by various terrain issues that would trigger my foot to be at odd angles to the slope and snow shoe. In consistent and even snow and terrain, the snowshoes performed well. DURABILITY I did run in to a slight problem when on one trip I noticed one of the screws that fastened the back crampon on came out and was lost. I continued to snowshoe for some time before I noticed that the screw was missing and my back crampon was hanging sideways from only one screw. Incidentally, much to my amazement, I actually found the lost screw and with a tool was able to fasten it back together as good as new. My suggestion would be to swap out the screws for ones that cannot work their way out. SUMMARY In summary I did have some great moments with these snowshoes. But, overall I would say they have a narrow index of terrain and conditions that they perform well in and given the inconsistent and ever changing, temperatures and snow conditions in the Rocky Mountains, I don't anticipate using them as my 'go-to' snowshoes. My Pros and Cons listed above remain largely unchanged. I'd like to thank Snowmotion AS and BackpackGearTest.org for allowing me to take part in this test series. Read more reviews of Fimbulvetr gear Read more gear reviews by Theresa Lawrence Reviews > Snow Gear > Snowshoes > Fimbulvetr Hikr Snowshoes > Test Report by Theresa Lawrence | ||||||||||||||||||||||||||||||||||||||||||