|
Highgear AltiTech 2
By Raymond Estrella
OWNER REVIEW
September 18, 2006
TESTER INFORMATION
|
NAME:
|
Raymond Estrella
|
|
EMAIL:
|
rayestrellaAThotmailDOTcom
|
|
AGE:
|
48
|
|
LOCATION:
|
Orange County, California, USA
|
|
GENDER:
|
M
|
|
HEIGHT:
|
6' 3" (1.91 m)
|
|
WEIGHT:
|
200 lb (90.70 kg)
|
I have been backpacking for over 30 years, all over California, and in many of the western states and Minnesota. I hike year-round, and average 500+ miles (800+ km) per year. I have made a move to lightweight gear, and smaller volume packs. I start early and hike hard so as to enjoy the afternoons exploring. I usually take a freestanding tent and enjoy hot meals at night. If not hiking solo I am usually with my wife Jenn or brother-in-law Dave.
The Product
Manufacturer: Highgear Inc.
Web site: www.highgear.com
Product: AltiTech 2
Model: 20021
Year manufactured: 2004/05
MSRP: $150.00 (US)
Weight listed: 2 oz (57 g) Weight measured with battery 2.5 oz (71 g)
Size listed: 4 x 2.25 x .75 in (10 x 6 x 2 cm) Actual measured 4.4 in long (11 cm)
Color reviewed: Green (also available in Shadow)
Warranty: (from company web site) HIGHGEAR USA, Inc. hereby warrants to the original purchaser, that your product is free from defects in materials and workmanship for a period of two (2) years from the date of purchase.

Product Description
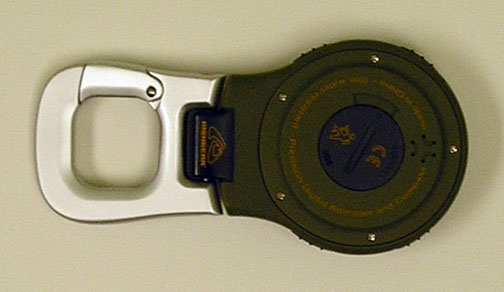
The HighGear AltiTech 2 is best described as a multi-function altimeter. It looks like a large watch without a band for wearing on the wrist. Instead it has an aluminum carabiner that can be attached to anything small enough to fit through its gate, the opening of which is .5 in (1.2 cm).
The body of mine is olive drab in color. It looks quite military to me. I picked the green over the dark grey hoping that it would be less apt to be warmed by the sun, and because I try to buy everything hiking-related in green if possible. The face consists of a grey-scale LCD screen, the display of which changes depending on the mode that it is in. The screen is surrounded by a rotating bezel that is marked with the four points of the compass and their mid-points. Below the face to the right is a round bubble level, and on the other side is the temperature sensor. Around the unit are four knurled buttons, one high, one low on each side.
The buttons have many functions depending on what mode/screen the unit is in at the time. But the main functions are as follows.
Lower left: this is the main mode switching button. Pressing it will cycle the AltiTech through its various modes in the following order. (Based on being in Time mode to begin with, the mode I usually keep it in.) Compass, Barometer, Altimeter, Altimeter Data Storage, Chronometer, Chronometer Data Storage, and Alarms.
Lower right: this is the back-light and when held for about seven seconds triggers the calibration mode for the barometer and altimeter, or to adjust the time.
Upper left and right: these buttons are secondary mode buttons. When in say the barometer mode these will switch between views of the additional screen information. Like if I press the right button it will change from the time displayed below the main pressure reading, to temperature. Now pressing the left button changes that from Fahrenheit to Celsius.
When calibrating these buttons adjust the number lower (left button) or higher (right button) to where it needs to be. Once at the correct position a push on the lower right button again sets it.
On the back of the AltiTech is a battery cover accessed with a coin and a quarter-turn counter-clockwise. The battery is easy to replace with a 3-volt CR2032 coin-cell battery. Six small holes near the top of the unit are the speaker for the chimes and alarms.
The following is a brief description of the various screens and some of the different configurations they can have. A picture of them will be to the right. In the interest of finishing this review sometime before the AltiTech 3 comes out I am not going to try to explore every possibility.
Time: this is what I normally leave it at when hiking and at night. I keep it in 12 hour format but it can be set to 24 hour format. I also keep in one time zone but it can be set to a second time zone that is accessed with a push of the top left button. Above the time display I have the option (via the top right button) to show the day and date, or a graph showing the past weather or barometric pressure trend. When set to barometer besides the graph above the time, the pressure in mbar is displayed below. When in weather or date above, the current temperature is displayed below. I keep it in weather most the time. At the top right of the display are one or two graphical icons to interpret the weather, varying between sun, clouds, and storm.
The next screen in order is the compass. The small triangle at the top of the screen points to the compass reading which is displayed in degrees and point. In other words it may show 214 degrees and have SW (southwest) above that. The compass turns off after 10 seconds to conserve battery life. Pressing the upper right button will activate it for another 10 seconds.
The next screen is the barometer. It can display the time or temp below also. I only keep it on this screen when I want to track a low pressure system moving in. I will set it to this mode and lay it in the tent then check how fast it fell during the time it has been sitting.
The next screen and the most used mode for me after the time is the altimeter. I have it show the altitude in feet with a graph in the area above showing my recent elevation gain and loss. The time is displayed below the main elevation number. A press of the upper left button will change it quickly to meters, which is handy if I have one of the newer USGS topo maps. It will go back to imperial after I let it off. Keeping it pressed for a few seconds will lock it in metric mode until I want to change it back. Pressing and holding the upper right button will store the current log of altitude information to the Data memory. This is accessed in the next screen to be displayed.
Going past the altitude data is the chronograph mode. The stop-watch function has a resolution of 1/100 second with maximum time range of 24 hours. It has a maximum of 50 laps/20 runs with times for each lap and split, with best and average laps' time. Data from the chronograph can be saved to the data memory, which is the next screen displayed.
The final mode is the alarm function where I can set two alarms if need be. The upper left button allows me to choose which alarm to set, the upper right turns it on or off, and the lower right button sets it.
Field Conditions
I have had the AltiTech all over the place. I used it to take readings 200 (61 m) below sea level in Death Valley and at a high point of 14,496 (4418 m) at the culmination of that backpacking trip on the top of Mount Whitney. It has measured temperatures as high as 118 F (48 C) on the Rincon Trail, and as low as 9 F (-13 C) near White Mountain.
The barometer has shown me high pressure on beautiful clear days as far south as Cleveland National Forest, and plummeting low pressure as far north as Mount Shasta where I got nailed by a storm 900 (274 m) from the summit.
Observations
I bought my first digital altimeter in 1992. I have or have had six of them over the years. (One of them went back in two weeks as I was very unhappy with it. It does not factor into my opinions of digital altimeters.) I immediately fell in love with them. The majority of my backpacking is done in mountainous locations, much of it in the Sierra Nevada mountain range. I found that using an altimeter along with a good topographical map I could find my position much faster than with a compass alone. In fact I got to the point that I rarely use a compass any longer. To me the more elevation change the trail experiences, the easier it is for me to follow with the altimeter.
Here is an example of how fast it can be. In August I did a day-hike on a new-to-me trail in the San Gorgonio Wilderness. I wanted to know where I made it to at the turn-around point as I did not have time to go to a known peak, and I wanted to track my mileage. When I came to a saddle I checked my altitude and cross referenced it to the contour lines on my topo map where they cross the trail. Got it. Now a quick glance to affirm that yes, there is a drop off to my right and a peak to my left, I am positive that this is where I am. This is much faster than triangulating with a compass for me.
The altimeter can change in accuracy depending on the weather conditions. As I am quite aware of the fact that it measures altitude gain as a lessening of pressure the higher I climb, I take advantage of known elevation locations to calibrate it if need be. Passes and lakes are best. A week after the hike mentioned above I went on a 4 day backpacking trip in the east side Sierra Nevada. The weather was very stable for the entire trip with none of the afternoon thunderstorms the area is known for in the summer. I calibrated the altimeter at Onion Valley and climbed over Kearsarge Pass at 11,760 (3584 m). I checked it at the top and found that I was within 4 (1 m) of actual. I left it alone. We dropped down to Vidette Meadow for the night. The next day we climbed over Forrester Pass at 13,180 (4017 m) and I checked it again. It was within 10 (3 m) of actual. Not bad for all the gain and loss I had been doing. Of course the flip-side of the atmospheric pressure coin is getting clobbered by a storm on San Bernardino Peak and watching it slip 100 (30 m) in an hour. It just stresses the importance of calibrating when I can.
I like the carabiner attachment. I lost an altimeter multi-function watch because I had put it in my pocket. I did not mind wearing it on the trail but when I was just back from a backpacking trip that we had worn the brakes out I dropped the truck off at a repair shop. While waiting to get the paper work done I felt self-conscious about the large watch on my wrist and took it off. After walking/jogging back to the office I realized that I had dropped it. A quick return found that someone else found (and kept) my expensive toy. I decided to try the AltiTech because of the carabiner.
I usually keep it attached to my sternum strap. This has proven to be a good spot to be able to glance down at it on the fly to check the time or altitude. It usually stays put but on a couple of occasions the AltiTech slid off the disconnected strap and fell to the ground. One of these drops put false to the company claim that the unit is water-proof to 10 m (30). As we stopped to filter some water at a creek along the Pacific Crest Trail above Whitewater California the AltiTech slipped off my sternum strap and landed in 6 in (15 cm) of water. Dave said Oh, no! I told him no worries its waterproof. And pulled it out in time to watch the display go blank. Once back home I took the back off, removed the battery and let it sit for a few days to dry out. I put a new battery in it but it would never work right again. As I had bought it at a retailer with an excellent return policy I just took it back to them and explained what had happened. They just swapped me out a new one and sent mine back to Highgear. I have had no problems with the new unit and am careful not to get it wet. It gets clipped to a loop on my shoulder strap most of the time now. (See below.)
I like the weather icons displayed based on the atmospheric trends recorded by the AltiTech. One time Dave made fun of it in Kings Canyon when it changed to a cloud from the sun it had been showing, as it was perfectly clear. Within two hours we were getting hailed on. Oh he of little faith!
As mentioned above I do not need a compass for orienteering usually. The compass of the AltiTech works just fine for my use. I use the bubble level to keep it flat and it has been fairly accurate. Calibrating it the first time was easy and I have found no serious fault with it. When doing flat-land hiking I bring a regular map-reading compass.
The thermometer seems to be accurate within about two degrees F (1 C) by comparing to a very nice 8 in (20 cm) stick thermometer Dave sometimes brings. If I bring it on winter trips I attach the AltiTech to the back of my pack to be able to get accurate readings of the days temps without my body heat affecting it. When carrying it across Death Valley I did the same thing and draped my pale blue towel over it to keep the sun from affecting the readings.
Extreme cold drains the battery very fast. When checking temps in 9 F (-13 C) weather the display would fade out for a few seconds each time I changed modes, and turning on the backlight in those conditions knocks it right out. I have learned to leave it on the time mode with the temperature shown below it, and use my headlamp to view it with. I have never run the battery completely out as I always put a new one in each winter. I do not like to be surprised in the field.
The alarm is just about useless to me. It is very faint, and the only time I use an alarm is getting up early for summit bids while mountaineering. Between the AltiTechs quiet alarm and the winds that are commonly present there is no way I ever hear it. As I can not stand the intrusion of hourly chimes that is another thing that does not get used.
Pros: Easy to use, accurate, fun
Cons: Not water-proof, alarm too quiet

This report was created with the BackpackGearTest.org Report Writer Version 1.
Copyright 2008. All rights reserved.
Read more reviews of Highgear gear
Read more gear reviews by Ray Estrella
|


